Thursday 30 April 2015

Completed: Kit the Boy Doll/SHB Sewalong

Gah, I'm slightly panic blogging here, desperately trying to get this in for the end of April deadline for SHB Sewalong.

Cutest sewalong badge ever!
So, the SHB Sewalong (SHB = Small Human Being = infant) has been hosted by Cation Designs, amongst others. The premise is simple: during April sew something for your wee one. The only rule being the little one has to be 1 at the very most. Still in utero is fine! I am literally scraping this make in in 2 senses: 1, I only just finished it before the deadline and 2, Baby Boy is only under 1 for another week.

Hey, there!
This project is pure nostalgia for me. The doll is a boy doll kit, from Clothkits. My mum was a big fan of Clothkits in the 70s and 80s so my sister and I were often decked out in their stuff, and we owned several of the ragdolls. If you're not familiar, the company sells kits to sew stuff*. Human clothes and rag dolls. The pattern is printed directly onto the fabric, so you just cut round the pieces and sew them together. I really, really wish I'd had the foresight to have some photos to show you of me in Clothkits garments, or even just with the dolls, but I'm not that organised. Next time I'm at my parents' I will see if we can dig any out and I'll do a follow up post.

* They also sell fabric and patterns.
Kit's body comes pre-printed with pants and vest, socks and shoes.
In 2008 Clothkits was resurrected and I seem to be on their mailing list for some reason. I recently received an email with an offer on the ragdoll kits. Cue trip down memory lane, and an impulse buy of boy doll kit, called, approriately, Kit. Boys can play with dolls too, right?

I decided to make this for Baby Boy's birthday, as I thought it would get more mileage that way. Small Boy definitely has designs on him, but since he (Small Boy, not Kit) starts school this year I thought he might grow out of dolls sooner. Either way, both will enjoy playing with him for a while.

The kit came with thread, shirring elastic, poppers and the preprinted fabric which makes the doll, jeans, shirt, waistcoat, pyjamas, hat and bag. All in the most fantastical 70's prints you have ever seen. So far I've made the jeans, shirt and waistcoat. I didn't have time to finish all the garments.


Pre-printed fabric

Helpful labelling included.
The instructions were... variable. Some were really clear, others clear as mud. Even with (handdrawn) diagrams, it wasn't always obvious what they wanted you to do. However, I changed the construction on a few things anyway to make things simpler. For example, the instructions have you handsewing on the legs and to close the body. I machine sewed these, which admittedly doesn't give such a good finish, but I think it will be sturdier. With the clothes, they instructed you hem in the round, which I think would have been tremendously fiddly, so I just hemmed everything flat to start with. And speaking of hems - they ask you to turn 0.25cm, then another 0.25cm to hem. Seriously? Er, no thanks. I overlocked the raw edges to an approx 0.5cm seam allowance and turned once.

70's digital watch included as standard.
In the jeans I used 1/4" elastic from my stash rather than shirring elastic, which seemed faffy. I used a 3 step zigzag to attach it to the wrong side. And on the shirt I used velcro rather than the given poppers, as it will be much simpler for little fingers. Annoyingly I only had black velcro on hand.


I love the detail they've included.
Shoes are so cute!
So, this is absolutely not my best sewing, but it's absolutely passable for children. I enjoyed sewing it, but sewing dolls and their clothing is not something I want to do too often. That said, it did occur to me it might be nice to make him something a bit more modern: a t-shirt and sweatshirt maybe? As Kerry said on Instagram, it's a good way to use up scraps. So, you never know. There might be more doll sewing on the horizon!!!
SHARE:

Monday 27 April 2015

Completed: The Not Going Out for Dinner Top

Remember when I started to make a top to wear out to dinner, then decided it wasn't appropriate and made this top instead? Well, this is it!


It is the Megan Nielsen Eucalypt Tank made from Cotton + Steel Frock in Hana Cobalt. It's rayon challis and it is beautiful.


I had initially wanted to make a dress with the fabric, but I was worried it might be too lightweight, so I thought I'd go for a top instead. I seriously deliberated over what to make with this. I can't remember what made me finally decide on the Eucalypt. Probably the fact that it doesn't take much fabric. At £16 per metre its fairly pricey. Fortunately I got it at Easter from M is for Make, when they had an offer on Cotton + Steel fabrics - can't remember what the discount was - so I didn't pay full price. I ordered a metre and prayed that it would be enough. Spoiler: it was!


I love the dipped neckline at the back.
I've liked this pattern since it was released but never got round to buying it. The make was more or less straightforward. The seams are Frenched, the neck and armholes bias faced. Fortunately I tried it on after doing the first pass on the French seams, and found it was neat across the bust at that point, and would have been too tight had I completed the second pass. I ended up unpicking the side seams, and then French seaming them with an approximately 1cm seam allowance, rather than the 1.5cm given. I was a bit confused about this, as I cut an XS, which corresponds to my bust measurement of 34". Given that the finished garment bust measurement is 36", this should have been fine. It's still a little bit neat for my liking but it's definitely wearable. For future versions I'll add 1.5cm to the CF.


The fabric was lovely to sew with. Yes, it was a little shifty, but not as bad as I was expecting. Even the bias facing proved not to be too tricky. And it pressed beautifully.


I'm not sure why I suddenly decided this top wasn't quite right. It just ended up looking quite different from the image in my head, which was disconcerting since I've had quite a lot of sewing successes recently. I was convinced something was off, but when I Googled the tank and saw all the other versions out there, I realised the image in my head was just different to the actual garment. Not sure why. In my head it was looser fitting, and the straps were much wider, more like a boxy shell top. The straps are definitely narrower than I am used to in a woven top, but the fit is actually spot on, and they sit beautifully. Once I got over the fact that the tank wasn't what I was expecting, and we had a very sunny day when it was warm enough to wear it, I fell in love with this top. The fabric very definitely makes the top in my opinion. The colour is gorgeously saturated and vivid. Very summery and very flattering, I think. It also feels beautiful to wear. Light and breezy, it is comfortable and cool, and it doesn't even seem to crease much. Confession: I loved it so much I wore it before it was hemmed! So, yes there is no hem in these photos. It has since been done. Took about 10 mins!!!


I just squeezed this into the metre of fabric, so there was no wiggle room for pattern placement or matching. Happily, the placement is more or less centred on the front, and the print is too haphazard to pattern match at the sides.

Flat shots (taken at night, so lighting is poor. Apologies):

Hmmm. Rug needs a clean.

My bias binding is not perfect. I always struggle to get it as neat as I would like. Typically on this tank, the worst part is right at centre front! Looks like I need to remove my stay stitching there too!


So, it never quite made it to "dinner" status, but this little top has a very happy future as a permanent fixture in my summer wardrobe. All I need now is the weather, please!!!


SHARE:

Saturday 25 April 2015

Completed: Seachange Top

I know that most of you have never met me, and so don’t really know me. But if you are a regular reader I can bet you know at least 2 out of the 3 following statements to be true:
  1. I don't like to wear or sew with polyester
  2. I don't like to wear cropped tops
  3. I don't like to wear voluminous sleeves
So, you may be surprised to hear that I made a top that features all 3!

This is me, firmly out of my comfort zone!


Last Friday I had plans to meet some friends for dinner. On Wednesday it occurred to me that I should make something new to wear. So Wednesday and Thursday evening were spent making a new top. At about 10.30pm on Thursday, with literally just the hem to go, I decided the top I was making wasn’t really destined to be a “going out for dinner top” after all. Lily Sage and Co’s Seachange Top had been on my mind anyway, because Debbie had just released the pattern. I loved the top when she first blogged about it – particularly the stripey version with the play on stripe directionality (something that’s been appealing to me a lot recently), but a cropped top with huge sleeves is not really what I wear. Certainly not every day. It occurred to me, though, that it might work for me in a dressier context. Like dinner the following night. I realised I had the perfect fabric in my stash and though I’d give it a go.

Love how the wind caught the sleeve here
It seems that the Gods of Baby Naps were smiling on me last Friday. I bought and printed the PDF on the Thursday night, but I did everything else: sticking the PDF together, cutting the pattern, cutting the fabric, sewing the entire thing in less than 4 hours over 2 naps. I have paid for it though - Baby Boy hasn't slept through the night since!
The pattern was a good one to panic sew. Kimono in shape, there are very few pattern pieces and no sleeves to set in. With sleeve and bottom bands there are no hems to measure, turn, press and sew. Plus no fastenings! However to counter that, I did pick a super slippery polyester to work with. I like to keep things challenging.


The pattern goes together really nicely and is well drafted. I did have some issue with the sleeve bands, but I’ll come to that in a minute. Other than that it was a cinch. There is absolutely tons of ease in the top. So much so that I did consider sizing down, but since I was making it in a non stretch woven, I wanted to be sure to be able to get it over my head, so I went with the size S which matched my bust measurement. In hindsight I could have gone down to the XS but I don’t think it matters much. I did consider lengthening the top but I like the cropped style and thought that in a longer length the top might lose something, so I stuck with cropped and instead I cut the largest size length. But honestly the difference is literally millimetres.

With my fabric, French seams would have been nice, but I didn’t have the time so went with overlocking the raw edges. It’s fine, but I forgot that the giant sleeves mean you can see the overlocking where the sleeve bands are attached, particularly as I used grey overlocking thread to save time changing it (never takes me less than an hour to change my overlocker thread. Sigh.). Debbie doesn’t suggest any particular type of finishing, so something to bear in mind if you want to make this.


So, sleeve bands – yeah – they ended up being about an inch longer than the sleeve. I cut them smaller to match, but then one ended up being too small. I have no idea what happened, but I was slightly slapdash in cutting the bands in the first place, so they may have been off grain and then stretched, maybe? I managed to make it work in the end, but one sleeve has a small tuck at the bottom to accommodate the slightly too short band. I might be able to make a top in 4 hours, but I never said it was perfect. 


The only thing in the construction methods that I would question is how Debbie has you attach the neck binding. She has you join the short ends, then fold it in half and sew, exactly as if you were attaching a neckband on a tshirt or sweatshirt. But then you fold the neckband under and topstitch it down. It does work and all raw edges are enclosed but it means you have 5 layers of fabric at the neck which starts to get a bit bulky, even in a drapey fabric. If I were to make this again, I would just go for a standard bias facing.


The fabric is John Kaldor and has been in my stash forever, but I do remember I bought it way back at the start of my sewing career from Remnant Kings in Edinburgh. I love the painterly print and it is for that reason alone that I have kept the fabric. As you know I am not keen on polyester and several times have gone to donate it to a swap, but at the last minute kept it. I’m glad I did. I think its perfect for this top. Something about the name Seachange makes me feel it is destined to be made in shades of greens and blues. Yes the poly is a bit sweaty, but with giant arm holes its not too bad. And it doesn’t appear to be too staticky either.  But then I haven’t washed it yet. Yes, I did not listen to my own cautionary tale and did not prewash. There wasn’t time. Fingers crossed this one won't shrink.


What really helped in this make were a couple of new tools and a new trick. Firstly the trick: I sewed over the pins. I've never done this before but it really does speed things up and helped with managing the slippery polyester. Secondly the tools: last week I finally spent the Remnant Kings gift voucher that I won in their #merrystitchmas competition. Instead of buying loads more fabric, I bought (mostly) tools:

clockwise from top left: polka dot linen look cotton (well, some fabric slipped in), tailors ham, freezer paper, magnetic pincushion, rotary cutter, needles, thread. Giraffe and foot: model's own
The rotary cutter was invaluable. I only have a teeny tiny cutting mat, bought years ago for craft purposes, but it was still much more accurate than trying to cut with scissors. And the magnetic pincushion, as Hazel said as I was buying it, is a life changer!!!

Not sure what caught my eye, here.
I was a bit worried about how the top would look on me. Debbie is tall and slim with broad shoulders and this style looks amazing on her. OK, I am relatively slim, but I'm not particularly tall or broad. However I think it looks good. I wore the top, as worn here layered over black cami, with normal mid-rise jeans. I think if I were to buy/make some highwaisted jeans or trousers, I might be more comfortable wearing it without the cami. I might test that theory at some point. Similarly I'd like to try it with a skirt, or even culottes! In the meantime, though, over a cami the top works well. And for a night of sitting down and eating, it was perfect. I felt quite cool and a bit edgy. Kind of how Debbie looks in it, to be honest! So, overall, although it will have limited wear, I love this top. It did take me out of my comfort zone, style wise, but fortunately it was a gamble that paid off. I love the idea of a striped version, but it would need to be in a luxe fabric as another going out top, as I don’t ever see myself wearing this shape as every day wear. A version in silk would be beautiful, but a lovely rayon or viscose could work equally well.

What do you think? Would you make and wear this? If so, how would you wear it?

SHARE:

Tuesday 21 April 2015

Me Made May 15


Time is cracking on, and I haven't yet signed up!

This has taken a bit of thought this year. I initially thought I'd go for a similar challenge as last time, namely one handmade item per day. This should be more of a challenge as, as I have previously mentioned, the bulk of my handmade wardrobe is work wear, and I'll still be on Mat leave during May. However, I want to make sure I don't just end up with 31 versions of "jeans and handmade top", because that's not much of a challenge at all. Having said that, our mornings are pretty hectic and I rarely have the luxury of time to deliberate what to wear, so I don't want to make it too challenging and therefore super stressful. Talk about your first world problems!

Having gone through several convoluted versions, I finally realised I could keep it really simple, as follows:

 'I, Helen of Grosgrain Green, sign up as a participant of Me-Made-May '15. I endeavour to wear one handmade item each day for the duration of May 2015, with a total of 8 days in the month wearing handmade bottoms (trousers, skirts, shorts, dresses, jeans)'.

I don't actually have any handmade trousers, jeans or shorts currently, but I'm hoping the challenge will spur me on to make some during the month, if not before. Shorts is probably also optimistic given I live in Scotland, but you never know!!!

Are you signing up? What is your challenge?

SHARE:

Monday 6 April 2015

Completed: Stripey Sailor Tee and a Cautionary Tale

Have you realised how close we are to Me Made May 15? We are about 4 weeks away and I have so much that I wanted to sew before then. I definitely want to take part this year, but it will be trickier as I'll still be off work, however the bulk of my handmade wardrobe is workwear. Still thinking about what my challenge will be.

Incidentally, Baby Boy will also be 1 in about 4 weeks. Yup. No idea, either.


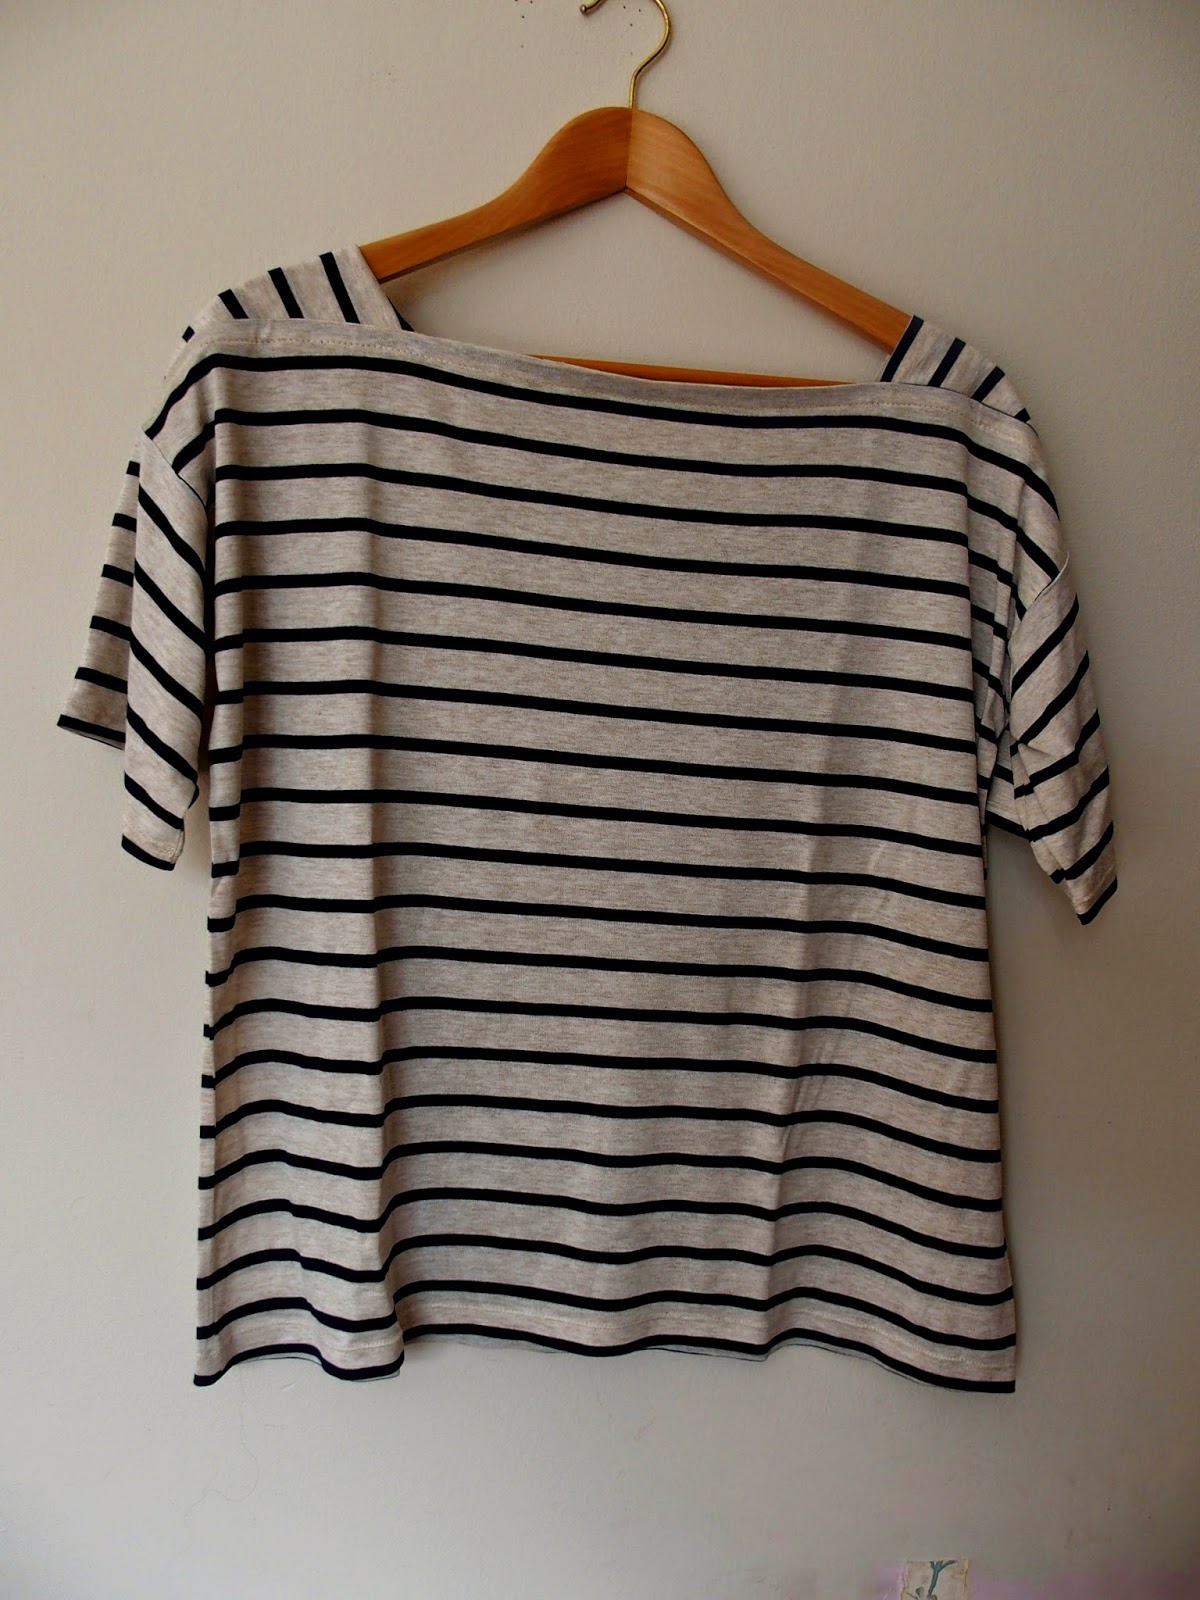
Anyway, enter a quick and easy make that only took a few hours. This is the Marilla Walker Sailor Tee, a free pattern that I only discovered last week. I've discovered Marilla fairly recently through Instagram, and while I haven't bought any of her patterns, I am considering the Maya dress/blouse. Anyway, I was off down an internet rabbit hole when I came across this pattern. I love the shoulder gussets, particularly with a striped fabric, which just add a little something to an otherwise straightforward tee. The pattern can also be made into a dress.

Marilla Walker Sailor Tee
The fabric is from the stash. No idea of fabric composition, but it's drapey and a little sheer with very little stretch. I had earmarked it for a Hemlock, but those shoulder gussets won me over.

The pattern is really straightforward. It's really just a series of squares and rectangles, and very few pattern pieces. I struggled a bit with cutting this fabric. It's really shifty and I found it hard to keep the pattern pieces on grain; with stripes it would have been really obvious if something had gone awry. I also wanted to match the stripes which added a little more complexity. So, all in all, it took me about 1.5 hours just to get the pieces cut, which I achieved by eventually cutting the fabric in a single layer. Because it was such a bugger to cut, I omitted the extraneous parts - the pocket and the underarm gussets. The fewer pieces to cut the better and I didn't necessarily feel they added to the tee. After cutting this though, I am seeing that having a rotary cutter would be beneficial. With scissors, I found it really hard to cut accurately.

Small Boy was adamant I had to copy Marilla's pose, even though I have no underarm gussets to show off!
The pattern is only available in one size, which Marilla says is roughly a UK size 12 or a medium. I'm an 8/10, so this is probably boxier on me than intended, but I'm happy with the fit. The one thing I would change next time would be to add maybe about an inch to the length of the shoulder gussets. As they are they sit a little wide, and show my bra straps. I don't actually mind that per se, but it does feel a little big so I'd alter it for next time.


I added about 10cm to the length because it's designed to be quite cropped, and as much as I like the look, after 2 pregnancies and 2 c-sections, I'm not comfortable wearing it. In the end though I cut about 6.5cm back off, and stuck to the recommended 2cm hem. Otherwise, excluding the omitted bits, I made the pattern as directed. The observant amongst you will have noticed that it doesn't particularly look like I have lengthened the tee. That is because Cautionary Tale: I DID NOT PREWASH THE FABRIC. And guess what? After one wash, it shrank!!! Gutted was not the word I employed when I realised. However, as you can see, it's still wearable, if a little short for comfort. Also the armscyes shrank, meaning it's a little tighter than meant there, and meaning my rectangular sleeves are now a bit more trapezoid in shape.


Marilla suggests using woven or bias tape to stabilise the neckline. Because my fabric is a little sheer, I thought bias tape might be too heavy, so instead I used the selvedge from my fabric. This worked. Kind of. It worked in that it provides stability, but it does mean I have raw edges on the inside, which initially showed at the neckline. I had to trim the fabric right back to the stitching line, and to try to roll the seam to the inside. It also shows more because the stripe on the stabilising strip is perpendicular to the strip running across the top - so you see the black stripes. Also, because I misunderstood the instructions initially, one of my stabilising strips is sewn wrong side out. I think it looks OK though. Ditto the stripe matching, which is not perfect but not bad for a first attempt. Although the more I look at it the more it bugs me, so I'll just stop looking. Just realised I failed to get photos of this though, so you'll have to trust me on that one!

You can see it looks far boxier in this photo than the one at the top of this post, which I took pre-wash.
Gusset, plus selvedge used to stablise neckline.
Trapezoid shaped sleeve. Sigh. Oh, and a bit of stripe matching here too!
Insides
There's not much more to say about this really. I love the tee. Super comfy, interesting and a quick sew. What's not to love? My only complaint is that although the sun has been shining a bit, the temperature dictates that I wear a cardigan, thus covering up those lovely shoulder gussets!!


I am disappointed about the shrinkage. It's not the end of the world, but that alongside the slightly unmatched stripes and the too wide neckline are making me want to remake this. I have enough fabric, which I have now prewashed, twice just to be sure. I just need to psyche myself up to cut it out again!

Are you taking part in MMM15? And if so, are you panic sewing?


SHARE:

Friday 3 April 2015

Completed: Metallic Gold Linden Sweatshirt

I'm posting out of order here, but this sweatshirt got so much love on IG this morning that I thought I'd better prioritise it. This is my new favourite top. I love it so, so, so much. It's not very often that my mental image of how something will look matches the reality. I'm usually disappointed by something. Not this time.


Let's start with the fabric since that's what this sweatshirt is all about. I was browsing the web, Etsy in particular, for French terry for a different project, when I stumbled across this metallic foil french terry in gold and grey from Miss Matatabi (she also has a few other metallic French terrys (terries?)). It was a no brainer, as my Dad would say. I instantly knew what I wanted to make - a Grainline Linden Sweatshirt, with the metallic on the front bodice and the rest in plain grey marl. I quickly double checked to make sure the front bodice would fit into half a metre - in a size 4 it does, just - and placed the order.  I then spent quite a bit of time scouring the internet for a suitable plain grey marl french terry, before finding one from a different Japanese Etsy seller, Nuttafabric. It seems to have sold out, but it's cotton with quite a bit of stretch. I also notice Miss Matatabi has a plain grey marl, so I'm going to assume that I did check that first, and that it's been recently added...


French terry, in case you are unsure, is like normal sweatshirt fabric on the right side, with a loop back, a bit like towelling on the back. It's lovely and soft and quite drapey, but thinner than fleecey sweatshirting and as a result, not overly warm - at least the stuff I bought isn't. I struggled to find any in the UK, hence buying from Japan, but I have since discovered that if you search for "loop back", or simply "sweatshirt fabric" you are more likely to have success - if you search for the latter, double check whether it is fleece back or loop back. Perhaps "French Terry" is an American term?

Before cutting out, I did have a bit of a change of mind and briefly considered making both the front and back bodice in the metallic fabric. I put the question out to IG but the overwhelming response was in favour of my initial plan, which was good because I probably would have done that anyway. I couldn't really picture it with a metallic back, and I think I made the right choice. Plus, I know the gold foil will eventually fade/wear away, so this means I can always make another! :) On that subject, I thought I would take care not to wash this too often, to ensure the foil lasts as long as possible. Best laid plans and all that: so far today it has had banana mashed into it and it has been peed on - both after these photos were taken, luckily for you!


I've made the Linden before, but this time I made the following changes:

  • Retraced the pattern pieces, this time extending the seam allowance to 1/2". The pattern includes a 1/4" SA which I just found tricky to manage on my last version, particularly as I sewed both that version and this on my sewing machine. Adding the extra SA definitely helped on this one, and where necessary (e.g. on the neck, wrist and hem bands) I just trimmed them back to 1/4" to reduce bulk.
  • To counter the gaping on the neckline on my previous version, I pinched out a dart on either side. Each dart was about 3cm in width and about 6cm in length. They could do with some finessing as they are not perfectly aligned, but this has made a vast improvement to the fit on the neck. For future versions, I may take the excess out of the raglan sleeve seam, but I quite like the look of the darts on this version. Plus I've seen similar on RTW so it feels OK to have done it!
  • Despite the reduction in the neckline circumference, I didn't reduce the length of the neck band. I used the Maria Denmark Kimono tee instructions to measure a new neckband... which strangely turned out to be larger than the original Linden neckband pattern piece. Hmmmm. So I just used the same Linden pattern piece and it seems to fit perfectly well. Not sure I really understand, so I'm just going with it.
  • I used self fabric for the neck, hem and wrist bands. I did cut them out in the same ribbing I used last time (I have a lot leftover), but it just didn't feel right to use them for this version. I vastly prefer the look of the self fabric, particularly at the neck.
  • Top stitched both the neckband and the raglan seam allowances with a twin needle.

The make itself was nice and easy, but the fabric was a little tricky. The cut edges curled badly, which made keeping to seam allowances very difficult, particularly when attaching the neck/wrist/hem band, where I had 3 layers, curling in different directions, which I was trying to straighten out while stretching the band to fit the fabric and keeping an eye on the SA. I could have done with a couple of pairs of extra hands to tell the truth. I ended up basting the neck and hem band on first. The neck and wrist bands are quite neat but the hem band is a bit of a mess with very inconsistant seam allowances. By then though, I was sewing tired. Always a bad idea. The fabric also frayed - unusual for a knit - so all seams are overlocked.


But, hem band aside, I am delighted with this sweatshirt. Absolutely love it. I love that it's casual but a bit more special. Even just wearing it as I am in these photos with jeans and converse, it makes me feel a bit more cool. I can wear a long sleeved tee(s) underneath it right now, but it will be wearable right through spring and into summer with just a cami underneath. Be prepared to see this in high rotation throughout Me Made May!

Hooray for metallic sweatshirts!!!


Shoulder dart. Also seam on neck band doesn't *quite* match up!
Top stitching


Finally, when I asked P to take photos of me outside for this post, he refused. Apparently everyone looks at him when he takes photos of me!! I would have thought they'd probably be looking at me, wondering why I'm having my photo taken, but anyway. So, it was back to me taking "self portraits" in the livingroom. Until, that is, he decided to join in...


Next up: a lesson in why you should always prewash...


SHARE:
© Grosgrain Green | All rights reserved.
Blogger Template Created by pipdig