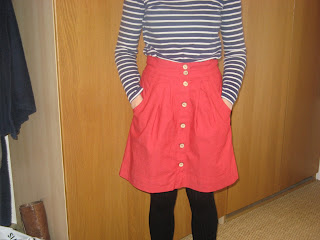
I am starting with a Megan Nielsen Kelly skirt that I made at the end of the summer last year. If I'd had the foresight to wear a me-made top with it at the weekend, when I took the photos, you could have got 2 for the price of 1. But I didn't. So you can't.
 |
| Obviously zoomed in a bit too far on this one! |
 |
| Source |
 |
| Inside the pocket |
 |
| Should really have ironed this before taking photos! |
 |
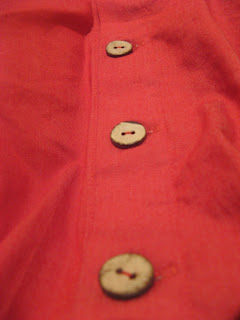
| I really, really love these buttons. |
So, to the roundup:
What I liked
The simplicity of the pattern. So straightforward! Plus it's printed on proper paper, which makes it really durable!
I could fit the pattern pieces into 1 metre of fabric, by cutting the waistband on the fold. This means a version in a more expensive fabric is viable in future!
What I didn't like
Nothing (except the size being wrong due to my own vanity).
Did I change anything?
Nope
Did I try anything new?
Contrast pocket lining (hardly rocket science) and bias bound pockets (ditto).
What would I do differently next time?
Maybe line it. The denim sticks to my tights, which is a pet hate, and I haven't yet found a slip that's the right length.
Will I make it again?
Abso-bloomin-lutely! My head is full of variations: a smarter wool version for work (thinking black/white dogtooth), a corduroy version (grey or navy) and a buttonless version (possibly more than one), inspired by these:
This is such a great basic pattern that has so many possibilities. All I need is more time to make them!
* Please don't think that I only ever buy fabric from John Lewis, but it's just so handy being in the city centre and in the past 6 months, their selection (although still very expensive) has improved by 200%, which is just too too tempting - the lady who cuts the fabric said they have a new buyer, and it shows!
Photo sources: Boden blue and white stripe skirt, Thom Dolan plaid skirt

I've been looking at the Kelly and Colette's Beignet but I'm nervous about all those buttons! Your version is really cute and I really like the contrast binding. I've never tried making my own. Was it difficult and did you use a tutorial?
ReplyDeleteHi Shar. The skirt itself was dead easy. It really is just a couple of rectangles with some pleats.
DeleteI was nervous of buttonholes before I tried them, but my sewing machine has a buttonhole stitch and foot, which means it pretty much just does the job for you. Does yours have this? I was lucky enough to get a free lesson when I bought my machine last year, so the woman in the shop showed me what to do. That, plus my instruction booklet, was enough.
My main tip would be to practice loads on some scraps before you commit to your garment. I made sure I practised on the same number of layers of main fabric plus interlining, so that it was a "true to life" practice, if you know what I mean.
I'd be happy to attempt some type of tutorial if you like (get me, a month old blog and offering tutorials already)? I'm not sure that all machines are the same, but I guess they must work along the same lines.
Hope this helps?
My machine does have both a buttonhole stitch and foot, but I'm embarrassed to say that I haven't used them since the free class that came with my sewing machine a year ago! My machine spent a lot of the last year in the basement since I didn't have a dedicated space, but this past fall my wonderful husband suggested we replace the bed in our spare room with a pull out couch and he would build me a sewing table. Ever since I've been sewing every chance I get but kept avoiding buttons. I guess I should take the plunge. Good tip on making sure to use the same fabric type and number of layers when practicing. I realized too that you did note a Colette link for bias binding in a previous post. I love Colette's tutorials and used their video tutorial to add the invisible zip to my Charlotte skirt. I think you should do tutorials on your blog. I think practical experience goes a long way in being able to explain things (especially to newer sewers like me). Thanks!
DeleteDon't feel embarrassed. We probably all have stuff we're scared to do!
ReplyDeleteOk, I'll have a stab at a tutorial. Not sure when, or how useful it'll be, but I shall do my best! :)