Wednesday, 14 February 2018

Completed: Chat Chocolat Linden


I decided a wee while back that I really wanted a dark green sweatshirt for this winter. I’ve been meaning to make the Linden again for a while – my ampersand version is literally my most worn piece of clothing, handmade or shop bought – but I’m a bit picky about fabrics and colours for sweatshirts, plus I was worried that a solid coloured version might be a bit dull. I can’t remember how I got onto them, but somehow I came across Chat Chocolat’s website and signed up to their newsletter, thinking they sold fabric directly to the public in the manner of Atelier Brunette. When they emailed their newsletter featuring their new collection, We're All Stars, I immediately fell for the forest green version. As it turns out, they only sell wholesale, but they have one UK supplier in the form of Faberwood, which of course, I had known all the time because I’ve seen their fabric on Fiona’s website before. So… being a bit cheeky, I DM’d Fiona to ask if she was considering stocking it. She wasn’t even aware of it, but because she is so lovely and has such fabulous taste, she very quickly got in touch when them and within a matter of weeks, had it on the website, alongside the solid green, should crosses not be your thing.
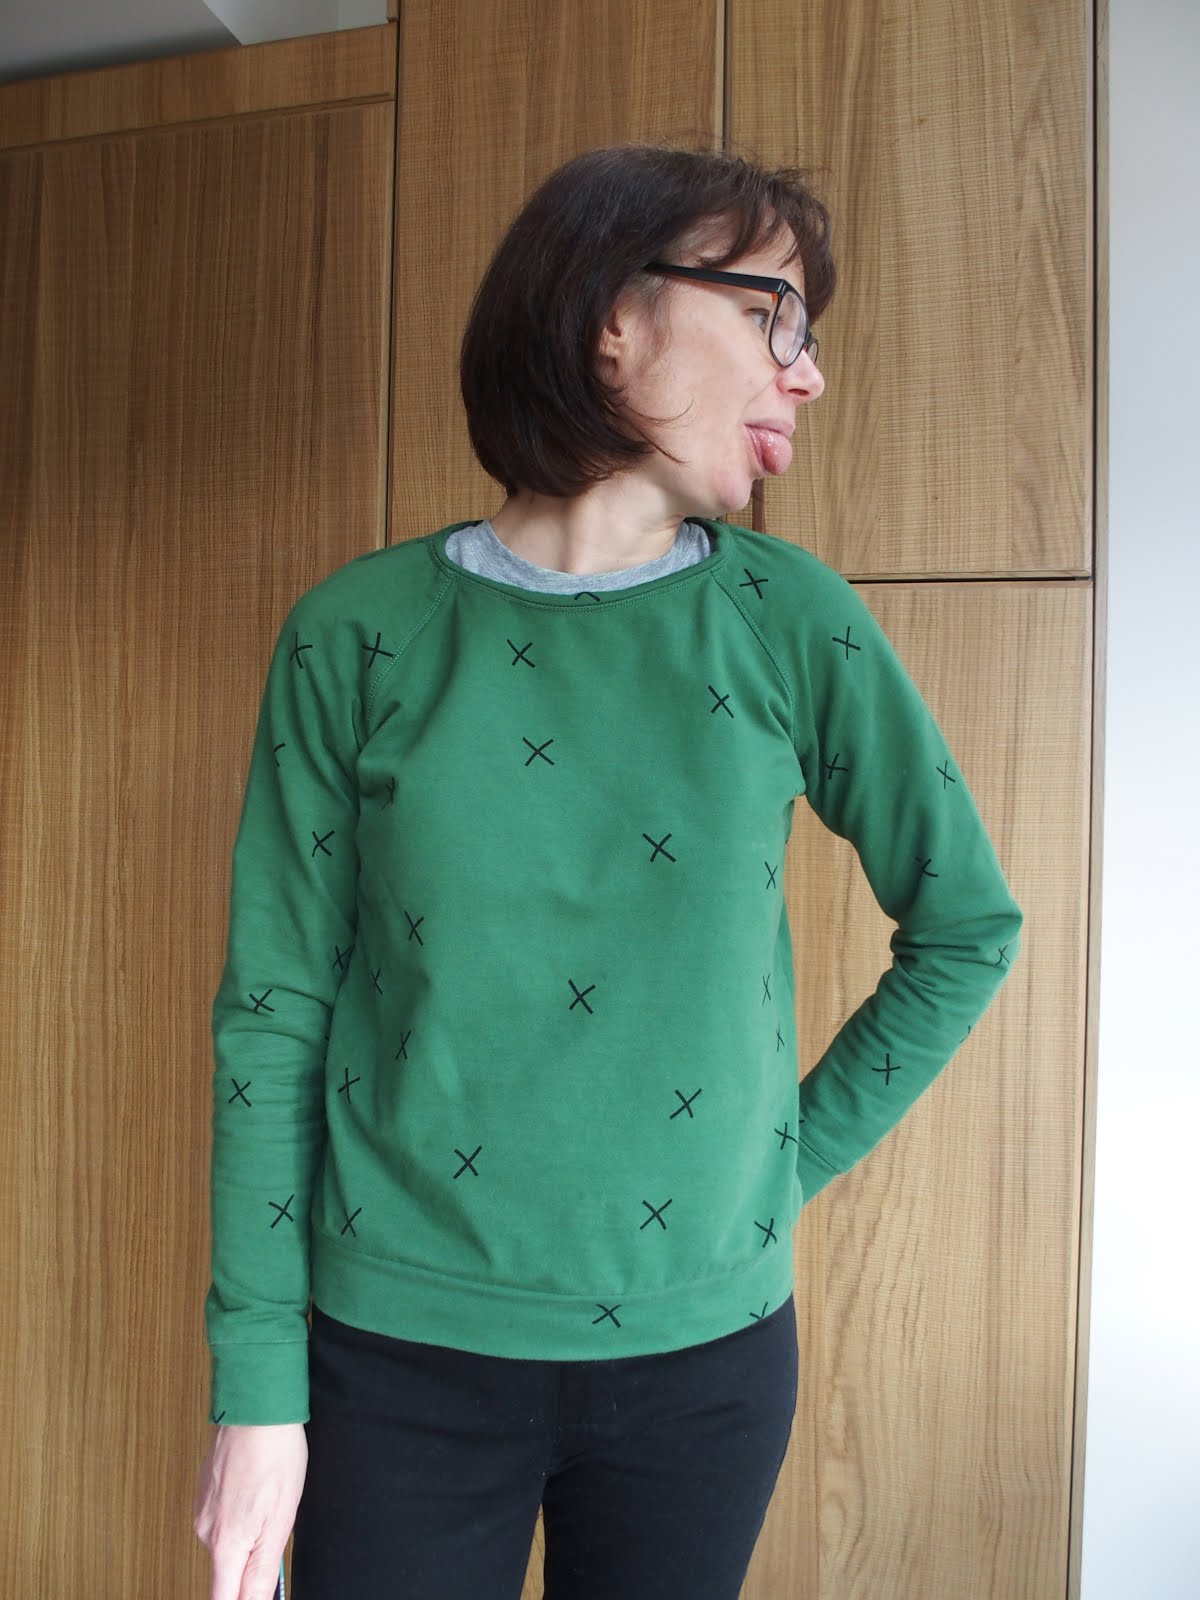

I am going to rave about this fabric, because, well it’s fabulous and also because I would feel guilty in the unlikely event that Fiona doesn’t shift the rest (she did and has since restocked it!). It’s a very stable sweatshirting with a lovely, cosy, fleecy back. It doesn’t have a lot of stretch, something I didn’t really consider, and is less drapey than say, the Atelier Brunette sweatshirting, although isn’t much thicker. The colour is a glorious forest green, deeply saturated and gorgeous.

I made a Linden, as originally planned, but with a couple of changes. I sewed the size 4, but used a ½” seam allowance everywhere, except the sleeves due to the lack of stretch in the fabric – initially I sewed them at ½” too, but they felt too tight, and I want to be able to layer other things under this. For info, the given SA is ¼” which is what I ultimately sewed the sleeve seams with. I added darts in the shoulders to fix the gaping there – this is a feature I quite like in my ampersand version, but with the smaller SA, it’s made the neckline smaller and the darts don’t sit that well unfortunately. I think I used slightly more than a ½” SA to attach the neck binding, because I wanted it narrower. All this has meant the sweatshirt is approx. one size smaller than the cut size, which was my goal. A lazy version of sizing down. It is tighter than my others, but it’s very comfortable.
It was all sewn on my sewing machine with the lightening bolt stitch and the edges were left raw although they were trimmed slightly to reduce bulk.


And that was it! I’d forgotten how quick sweatshirts are to make, but I’d also forgotten how much I hate attaching neck/hemband and cuffs. Man, I detest attaching those things. I always feel like I need at least one extra pair of hands, and as always basted before sewing them properly. Kudos to anyone to can attach them directly with their overlockers. I have no idea how anyone could do that!

Having now worn this a few times there are a few things I want to go back and fix. The darts bug me, so need altering and actually I'm not happy with the narrower neckband at all. I think it was fine until I washed it, and the raw edges have since curled, which means the neckband just doesn't sit right. I think I will go back and cut off the neckband and attach a new one with the correct SA. None of this has stopped me wearing it non-stop though. It's cosier than my ampersand version, so better suited to the winter weather, plus I just love the colour!
SHARE:

Sunday, 11 February 2018

Completed: Safran Jeans

I have 4 posts written in drafts, but I just haven't managed to get photos of anything recently. I put that right today with a major blog photo shoot, photographing 5 things in one session! The photos aren't the best, but they'll do!

Let's jump ahead with this, the most recent of makes: Deer and Doe Safran Jeans. My winter sewing has been practical but boring and this is no different. I am in desperate need of trousers for work. In recent years I've worn a lot more dresses and skirts during the winter, but this year I just haven't felt like dressing like that. For work, I've been living in my one pair of RTW black trousers, which are starting to suffer a bit. I had been planning to make a pair of black Gingers, when someone blogged about the Safrans. I had obviously seen them before, but this time around the welt pockets at the front caught my eye. I liked that they were a little less "jeansy", but equally would work as casual wear. To make them even less "jeansy", I made them in some stretch cotton twill.

I started these back at a #sewscottish meet up in November, when I sewed the whole front together, including fly and welt pockets and then they languished in the cupboard for ages afterwards until I had a day off in Jan that I could dedicate to fitting them. I initially had some reservations due to the fact that I am not the curvy shape that Deer and Doe appear to design for, but actually the fitting was very different to what I anticipated.

First things first, I cut the size 38 grading up to the 40 at the waist as per the sizing on the pattern and the finished garment measurements. This was actually my first Deer and Doe pattern, and I found the instructions to be OK, definitely not for beginners but good enough with a bit of experience under your belt. I loved the welt pockets although my second is better as I had figured out what I was doing by then. I read through both the D&D and the Closet Case Files instructions for the fly (from the Ginger jeans, a pattern I already own) and went with the latter which felt clearer and more intuitive. This meant changing the construction order a bit, but I managed to figure it all out.


I basted the crotch and side seams and got down to fitting. There was quite a lot to fix, as it turns out. I had to take a huge amount out of the waist. In the end, I took 14cm (yep, that's 5.5") out of the waist in the back and side seams and I also added darts. The Safran doesn't have a yoke and isn't darted, instead relying on negative ease for a fit. I was sceptical of this at the start and I remain so. The pattern calls for fabric with 20% stretch, and mine had that, but there was no way I was going to get these to fit without adding darts, and I'm not the curviest of people (my waist is 28/29" and my hips are 36" for reference).

I have pretty large calves and I have thighs, which is often an issue in RTW, and this pattern was no different. I let out the calves a bit at the side and inseams (not officially the correct way to do it - theoretically you should add more to the back and not change the front leg), which isn't perfect but has helped. I then moved onto the knees which had quite a lot of excess fabric gathering. I can't figure out if the knees is down to the fabric gathering because the trouser legs can't slide down over my giant calves, if it's to do with my knock knees, or if the pattern is just truly too big at the knees. In the end, I just took the side seams in a bit here (I have some really interesting S shaped side seams going on now) and called it a day. The knees still have some excess fabric, but by this point my fitting enthusiasm was waning somewhat.

Check out that side seam on the left, it's wandering about all over the place!

You can see the excess at the knees here. And a bit of pulling at the fly which I hadn't previously noticed.
The crotch isn't too bad. There are some drag lines at the front which *may* indicate I could with scooping out the front crotch curve a bit, but it's not a biggie and with the fly already done I was limited here. The back has a lot of drag lines immediately under my bum and the legs feel very tight at the back of my thighs. Not sure what to do here, but by then I was just fed up of fitting. I can't see my back anyway and in black fabric the drag lines don't show up too much. Fitting fatigue is a thing, and actually now that I look at these photos, the back actually looks fine!


The waistband proved a challenge. For some reason I decided to fit without the waistband on, and when I subsequently tried to apply the same changes to the waistband it was far too small. At this point the jeans went back in the cupboard again and Instagram was duly consulted. After a bit of advice and a bit of distance, I went back to them. I suspect there are numerous reasons why the waistband didn't work. Firstly, the waist more than likely stretched out with all the trying on I was doing. Secondly, I totally forgot that I shifted the side seams on the jeans to counter all the excess that I'd taken out of the garment at the back, and I didn't do the same to the waistband. Thirdly, I was treating a curved waistband like a straight one and was taking the same out of the top as the bottom of the waistband. Trial and error and a couple of versions later and I had a waistband that fitted well enough.


I'm really happy with these. They are *far* from perfect but at least they fit on the waist, which RTW never, ever do. They are comfy. Not lounge on the sofa comfy, as the fabric doesn't quite stretch enough for that, but they are definitely comfy for sitting at a desk for long periods of time. The legs ride up over my calves and don't slide back down, and there is still loads of excess fabric at the knees, but I like them nonetheless. I love the welt pockets and am super proud of both them and the fly. I missed the blogger-memo about recommending a stretch woven for the pocket linings and just made them in a standard bird print cotton (from Franca). This hasn't caused me any issues, but then again, the fabric's not stretching massively around my hips. Definitely one to consider if you are better endowed than I in that area. I made a mixture of version A and B: I omitted the belt loops, but kept the back pockets and cut them at ankle length to wear with ankle boots. Unfortunately the fabric is a fluff magnet, as twill always seems to be. It also feels a little rough against my skin. Not sure why. The fabric was one recommended on the D&D website and also came from France, from a seller called Mamzelle Fourni, (they don't seem to have it any more).

I don't know that I'd rush to make this pattern again. I'd like to try the Ginger jeans next, just to see how the fit compares, however I would love to incorporate the welt pockets into a future pair of jeans, even if it ends up being a mash up of patterns. But I will make jeans again, and I'll wear the hell out of these Safrans in the meantime!

SHARE:

Tuesday, 2 January 2018

New Years Resolutions - 2018

My New Year’s resolutions this year take the following form. As always I started out with a big list, but I know that it’s most effective to keep them to a minimum. I am also steering clear of negative resolutions – you know the ones, the things you aim to do because they will make you “better”, like the current you is somehow lacking. 
So, here goes:

1.       Spend more time outside. This year I’d like to spend more time in my garden. We weren’t able to do that much last year while the building work went on, and my gardening has really taken a backseat to sewing and child-rearing over the past 7 years. I’d like to return to gardening, to get more joy from both the process and the result, but I’d also just like to be outside more, whether that’s exercising, gardening, playing with the boys, going for walks or just chilling.
2.       Prioritise exercise. I know I said I wasn’t trying to self-improve, but I’m conscious that although I am thin and healthy, I am not fit. I don’t consider myself a couch-potato by any stretch, but my preferred activities do revolve around sitting, my job is desk bound, and I drive to and from work. I’m also conscious that I am often tired, stressed and anxious and I think (hope) that exercise will help with this. I also want to set a good example for the kids, and to have the energy and fitness levels to properly run around with them. Gardening will help, as will being outside (apart from the chilling aspect), but I’d also like to make a concerted effort to use the gym at work and maybe run/walk a bit more.
3.       Read more books. This doesn’t need further explanation, does it?
4.       Socialise more. I feel like I hardly saw anyone last year. The building work really took its toll on both our finances and our time and energy. Now we have a shiny new kitchen, I want to entertain more, and I want to be more proactive about arranging get-togethers with my friends.  I also want to bear in mind that entertaining doesn’t have to be a full on extravaganza. It’s about seeing people, not dazzling them with fancy food.


But what about the sewing resolutions? Well, I don’t have any. I plan to continue sewing as often as I can and to blog as and when I want to, and that’s what I do already. No changes. No revelations. No guilt about the stash, no self-reproach about what I sew and for who and no pressure to sew all the things. 

With that in mind, I have a number of things to photograph and blog that I sewed at the back end of the year, so watch this space!
SHARE:

Sunday, 24 September 2017

Giveaway - Crafts for Christmas, plus 2 for 1 offer

Hi! I hesitate to use the "C" word while it's still September, but apparently the most organised of us are already planning for it. I mean, of course, Christmas. If you are an organised person, you may like to know that Crafts for Christmas and Stitching, Sewing and Hobbycrafts is running from 26th-29th October at the SEC Glasgow and I have one pair of tickets to give away!
The show promises to bring together 150 exhibitors showcasing artisan, handcrafted gifts, supplies and festive inspiration for crafters. Visitors to Crafts for Christmas will get free entry to Stitching, Sewing & Hobbycrafts providing a festive day packed with live music, food and drink, inspirational features, workshops and demonstrations. This is the ideal spot to get Christmas wrapped up early.
Crafts for Christmas is the perfect place to pick up beautiful, finished craft and gifts for friends, family and the home.  It will bring together independent suppliers offering hundreds of exclusive handmade gifts and treats from jewellery to candles, handcrafted toys to handmade decorations, art, candles, ceramics, not forgetting delicious treats and gifts including farmhouse cheeses, specialist wines, handmade cakes and luxury chocolates.
Stitching, Sewing & Hobbycrafts is a mecca for hobbyists from quilting queens to decoupage demons. Visitors can stock up on everything needed to create a craft-filled Christmas.
There will also be 16 inspirational hands-on Workshops, Demonstrations and Make and Take sessions giving visitors the chance to create something unique.
Experts from craft associations, guilds and societies will be demonstrating the latest techniques including Japanese sewing, decoupage marbling, leather-craft and stained glass techniques, while visitors will have the chance to make their own fridge magnet, key ring, greeting cards, fun & stylish jewellery, Christmas decorations, flower arrangements and even knit and scarf without needles! 

To enter the giveaway
Leave a comment below by Sunday 1st October. Shortly after I will pull a name out of a hat. The winner will receive both tickets. It's always more fun taking a friend to this type of thing. 

2 for 1 ticket offer
If you are not lucky enough to win, you can take advantage of a 2 for 1 offer I have instead. To claim 2 tickets for the price of 1 (£9) visit ichfevents.co.uk or call 01425 277988 and use the  code GL21 when placing your order.  Advance tickets cost £9. Children under 16 go free when accompanied by an adult. 

Other important stuff
Location - SEC, Glasgow
Dates - 26th-29th October 201177, 10am-5pm (4.30pm Sunday 29th)
Tickets - Adults: £9 advance/£11 at the show; Seniors: £9 advance/£10 at the show. Accompanied under 16s go free. All advanced tickets need to be ordered by 5pm Mon 23rd October.
Contact - For tickets or more information call 01425 277 988 or visit www.ichfevents.co.uk
Facebook - Search "Stitching, Sewing & Hobbycrafts" show
Twitter - @thecraftshows #stitchsewhobby

Good luck! I'm just going to leave this last image here because, really,, I want to know what craft this is?!
SHARE:

Saturday, 23 September 2017

Completed: Denim Pleated (Faux) Wrap Skirt

I bought this fabric at the Edinburgh Knitting and Stitching show a while back to make Ginger jeans. I recently bought the pattern, cut it out and even made a pre-emptive flat pattern adjustment for my humungous calves,when I realised the fabric just wasn't right. It didn't have enough stretch, and I just wasn't convinced at all. Heather Lou does say on her sewalong that you can use lower stretch fabric but might need to size up, but I didn't want to waste the fabric and I have enough pairs of not-great fitting jeans already!

Luckily, I had a plan B. I just had to figure out how to execute it...

So, last year, I think, I found this image on Pinterest and it was love at first sight!
Isn't this just fab?
I think I pulled it off!

Obviously a fair bit of hacking was going to need to be done, but I figured that most of it would be relatively straightforward. First though, I had to find a base pattern. I considered a few options: Seamwork Osaka, which I actually own or Sew DIY Nita wrap skirt, but I don't generally like wrap skirts and I wasn't overly taken with either of those options. Eventually I found a pattern on ebay for £2 (incl postage), which is actually from Prima magazine of all places. 
I thought view 2 had potential (second from left), but I think I actually ended up making the one to the far left. It's actually a fixed wrap skirt, i.e. a pencil skirt with a wrap over the top, which I actually liked. Edinburgh is a windy place! :)

First step was to muslin. I cut the second smallest size based on my measurements but ended taking it in considerably, particularly around the hips because I don't really have any. That done, I moved on to the hacking. I did one step at a time, checking each worked before I moved onto the next. And can I say, I loved the process? It was good fun trying to work out how to make things work, particularly on the pockets and the waistband. I'm not going to do a step by step on this, but if anyone is interested in any particular aspect, please let me know. I will caveat that by saying that I have no idea if I did things the "right" way. I just went with what seemed instinctive and practical at the time. So, what did I do?


Firstly, I added the pleats to the wrap overlay. I used this tutorial, which is for trousers but it's exactly the same principal. I find it hard to visualise the change from 2D to 3D, so I used a spare bit of fabric and manipulated it to what I wanted visually, and from that I worked out how large to make the pleats and where to place them. I made 3 pleats which slightly overlap each other. The plan was to have the first pleat slightly overlapping the pocket opening, but that never really happened. The pleats were each approx 2cm wide. I love how the pleats look at the top, but as always with pleats, I have a bit too much volume at the bottom. You can see it in the photo below. I suspect here it's because the fabric has zero drape.


That done, I turned my attention to the pockets. I used the Kelly Skirt pattern for the pockets as I really like the shape. What was tricky was that the wrap overlay also has a pocket, but since there are 2 layers of fabric on that side, I couldn't work out how best to make it work without adding lots of bulk. In the end, I did away with the pocket lining and instead sewed the pocket facing directly onto the underlayer of the skirt. I probably overthought this, TBH, but it works OK and I kind of like the idea of having the wrap overlay cut away to expose the layer underneath, albeit that they are made of the same fabric, so you can't really tell...

Finally, we have the waistband. The original pattern doesn't have a waistband, but I love the detail on the inspiration post where the wrap appears to wrap over the top of the waistband at the front. Can you see it?
I really wanted to replicate that, and I spent quite a bit of time thinking about how best to execute it. In the end, I figured I'd do a faced waistband, would extend the wrap overlay at the top and then would sandwich the overlay in between the waistband and the facing. It seems simple, but I couldn't figure out in my head how to actually sew that. Oh, and I had to draft a waistband first. I remember reading somewhere (no idea where, sorry) that someone had flipped a facing up to make a curved waistband, so I gave that a try. It took a bit of finangling, but I was able to make it work well enough. I wasn't sure how to go about drafting a curved waistband from scratch, so this seemed like a reasonable compromise.

There was a bit of a struggle top stitching the waistband, given the overlay, so I just stitched as far as I could from either side. This has left a bit of a gap, which I still need to handstitch, which you can see below.


Other amendments were to reduce the hem allowance from 2.5cm to a far narrower 1cm, which mirrors the inspiration photo and feels right on denim, and to add the side split, which I wasn't going to bother with, but I kind of need due to the pencil skirt and you know, mobility.

The skirt fastens with an invisible zip at the back. I hadn't done one for a while, but this went in perfectly.

I'm really pleased with the final skirt. It's not quite perfect. I wasn't too sure why, but Paul nailed it when he said it was like new jeans. I think the denim just needs broken in a bit. Hopefully a couple of washes will rough it up a bit, but I might take a bit of sandpaper to the hems and pocket edges too. I don't really like my denim too clean, if you know what I mean?

Baby Boy's verdict? "I like it better" "Better than what?" I asked. "Than a cow" he responded. On that note, I'll leave you with a few more photos.


SHARE:

Sunday, 13 August 2017

Completed: Sointu Kimono Tee

This was one of those fabrics that you fall in love with, think about all day every day, then cave in and buy. Only once it arrives you realise you have absolutely no idea what to make with it. It's a viscose, but not a challis, more of a medium weight, which would make it suitable for a dress, but it's still a little transparent and I'm not a light coloured dress person. So into the stash it went.
I had a few ideas - there is a whole "window pane check" period in my Sewing Inspiration Pinterest board, and came across this Madewell top, which I really love, but then I discovered the Named Sointu tee and a plan was born. This was all some time ago, and it wasn't until more recently that I realised the pattern was designed for stable knits, not drapey wovens!

However, kimonos are made in drapey wovens, and the pattern has lots of ease, and if you Google Image (that's a verb, right?) the pattern, you will see that loads of people have made it in wovens, so all good. 

I whipped this top up in a couple of nights. It would have taken less time if I hadn't had to pattern match and cut flat. After the first night, when I had sewn the front and back together and added the belt loops, I HATED it! Even taking into account that it was meant to be belted, it just looked awful. Massive, too baggy, shapeless and dull. Even though I'd had this pattern and fabric matched in my head for a while, I'd had a last minute wobble about whether the pairing would work, and at this stage I started to think I should have listened to my gut. However, after a night off, I went back to it. I ignored the given construction order and made the belt first, thinking that I'd try it with that before investing any more time in finishing it off. I tried it on with the belt and it just worked! It still wasn't perfect though - cutting off the belt loops helped with that. I found them to be clunky and too low and they just looked wrong. I figured that I could go back and make thread chain loops if I needed them (like I did for my Sway dress), but having worn the top once I don't find I need them. 


I think other than the fabric and the belt loops, I made the rest as per the instructions. Oh no, there were a couple of other things. I took a slightly longer hem, so I could do a double turn - the instructions have you overlock the raw edge and turn once. Fine for a knit, but not great on a woven, IMO. So, my version is about 1cm shorter than drafted. And I cut the sleeve bands on the bias, because it was going to be impossible to pattern match them. The sleeve band has no shoulder seam, so it was never going to match up at both front and back. I like it with the bias detail, and kind of wish I'd made the belt on the bias too now. I think it's a nice contrast. 

But otherwise, as per instructions. ;)

I think this is a fabulous pattern, and it's deceptively simple. I wore it to meet a friend for dinner and Festival shows last night, and she commented that it must have been quite challenging to make - and she sews (albeit not clothes). But it's such a simple shape under that very long belt (designed to be worn wrapped around twice). The rounded v neck is a little tricky to get neat, as it's finished with bias binding, but perseverance gets there. I would suggest stay stitching the neckline though, if you do use a woven in this pattern. The instructions don't suggest it, but it's worth doing.

But the sign of a good pattern is how many more versions you immediately start planning, isn't it? I think this would be absolutely perfect in silk and lengthened to dress version. I'd also like to try it in a knit. I think it could be a great basic in a solid colour, but could be amazing in a really bold print - imagine a large scale floral on a dark background, or a watercolour type print? It's a bit of distinctive shape to be a true basic, and there is a lot of volume going on, so you need to think about what to balance that out with (it's far better with skinny jeans, than the straight leg ones I am wearing in these photos, for instance) but I think there is definitely room for another version or 3 in my stash!

Also: I had my hair cut! Not sure I love it, but time will tell. 
SHARE:
© Grosgrain Green | All rights reserved.
Blogger Template Created by pipdig