Saturday, 27 July 2019

#slowfashionseason

I've been trying to learn a bit more about sustainability recently, particularly in the fashion industry (or, lack thereof). I have lots of thoughts and feelings about this and although I am probably not the most well-informed person, I wanted to write something about this. Please do not shoot me down if I have missed anything or get anything wrong. I'm still learning, and trying to take in as much as possible.

There are 2 distinct and separate parts to this, which isn't always clear. Firstly the environmental damage - fabric production to garment manufacture to shipping, to fast fashion and the simple fact that the average garment is now only worn 4 times before it is discarded (to landfill, naturally). Some fabrics are biodegradable, but cause deforestation and excessive water usage to produce, or use damaging chemicals in the manufacturing process, and ultimately nothing biodegrades in landfill anyway because there is no oxygen, light or water, 3 of the factors required for the process to take place. And other stuff is just made of plastic that will be hanging around for the next 1000 years or so.

The second part is around an ethical workforce. This means having full transparency of where every single garment is produced, and the conditions are fair. That means paying a living wage, not using forced overtime, or child labour. It means permitting the unionisation of employees so they can ask for better conditions without being beaten up and/or sacked. When I talk to non-sewing friends and family this is the part they are least acquainted with, or maybe it's the bit they like least to think about. Who wants to think about a 5 year old making their latest £10 polyester dress?

And what seems craziest to me is that this is for fashion! It's not food, or water or roofs over our heads. It's not actually that important. Now, I love fashion and I don't mean to trivialise it's importance as a form of self expression, sense of belonging or art, but £2 t-shirts are none of those things. They are quite simply an item that the majority of people don't need. I am well aware that those on the poverty line have no choice but to buy cheaper items, but then again, I assume they are not wearing things once or twice before throwing them away.

It's such a complex argument. The planet has enough clothes for everyone already, but if we all stopped buying, this would further adversely affect those who live in traditional garment manufacturing countries, as this is now their predominant industry. And yet we can't continue as those countries are generally the worst impacted by climate change, and the individuals making our clothes are still stuck in a forced overtime/no union/underpaid/no health and safety loop. 

To that end, I have signed up for #slowfashionseason. Currently around 14,000 people across the world have signed up to not buy any new clothes, shoes or accessories for 3 months. I don't buy many new clothes these days anyway, but I do probably make more than I really need. I'm currently panic sewing 3 new items to take on holiday next week, so case in point. I haven't committed to a fabric buying ban, and I haven't committed to not sew (that way madness lies), but I have committed to only make considered items that I actually need and will wear again and again. Again, I'm not too bad at doing this, but I do still get distracted by the latest shiny pattern or fabric. If I do buy fabric, I will ensure it's as environmentally friendly as possible, so preferably tencel, cupro or organic cotton. I'm leaving this loophole in, as I'm finishing my job at the end of July and am looking for another one. If I am unemployed for a while, my wardrobe requirements will be different, and if I get another job, again, I might need something different to wear (unlikely, but possible). 

I want to document my experience, and  share any learnings or outcomes along the way. I'm not a natural activist (far too non-confrontational), so I figure sharing my experience might be educational for some. I still don't really know what I want that to look like but in the meantime am sharing occasional outfit posts, highlighting how long I've had items, and how often they have been worn. This is a guesstimate, but I'm aiming for at least 30 wears for everything eventually, and it's already got me thinking about some lesser worn items in my wardrobe. I suppose it's a bit like Me Made May but for RTW as well as handmade garments. 

The items I'm making for holiday have been carefully considered and have life beyond the holiday. I also ensured they will go with many other garments in my wardrobe, so while I'm panic sewing, I'm still doing it mindfully. This is the approach I want to take going forward, whether items are bought or handmade. I'm not quite at the capsule wardrobe stage, but for a holiday with limited luggage allowance, it makes sense.

What are your thoughts regarding the sustainability of your buying and sewing/knitting/making habits? 
SHARE:

Monday, 25 March 2019

Completed: Bowline Sweater

True fact: when Papercut first released this pattern, I thought it was only worth making in a stripe. Couldn't see why anyone would want to make this in a solid. I was actually dismissive of the idea. Thought it was ridiculous. Why would someone chose to make this in a solid? Wasn't the whole point to make a statement of the stripe direction? Hmmm.
I have been wanting to make this since the pattern came out, but it was never high up in the queue for some reason. I finally bought the pattern last year during a sale, although still with no firm plans for actually sewing it. 

This winter I've been trying to inject some colour into my wardrobe. The past few years have all been about sewing and buying all the shades of black and grey come winter. I haven't questioned it, and gone with the flow, until this winter when I didn't want that any more. Its not that I don't like my older winter wear, or that I don't want to wear it. I just don't want to wear black or grey every day. So although I don't need any new winter clothes, I've tried to be a bit more colourful in what I've made, Olya notwithstanding (it gets a pass because it was from the stash). Our office gets pretty warm and meeting rooms are like furnaces at any time of year (particularly fun in summer), so I thought a Bowline would fit the bill for long sleeve but not heavy weight top, in a colour. A solid colour. Because, Olya notwithstanding again, that's my current jam. 


The fabric is modal loopback from Guthrie and Ghani. It's not cheap, but it's lovely, and definitely worth it. It has photographed brighter than it is in real life. It's really more of a burnt orange or terracotta as Lauren describes it. It's very lightweight, pretty much a t-shirt weight which was what I was after. Its maybe slightly too drapey for the pattern as it doesn't want to hold the top of the pleat in shape properly, but I actually don't care. To go back to G&G, I haven't bought much from them, but I am super impressed with their customer care. They do offer swatches on their website, although they are hard to find. When I emailed to ask, I got a very quick response with the link. When I ordered the samples, I got them on a card with the fabric name and price and corresponding Gutterman thread colour. Isn't that genius? So, so helpful. When the fabric eventually came (ordered Thursday afternoon, arrived Friday morning), it came with a little handwritten note too. 

 My plan had been to make this a t-shirt, as opposed to sweatshirt by omitting the sleeve and hem bands, which I thought might also make it look a bit more work appropriate, but I screwed that up by forgetting to add length to the front bodice, and not having enough fabric to cut another. I did try to just hem it at the length it was, but it didn't look right (proportions, remember?), so although I had hemmed it at that length, I unpicked it and added the band. I didn't bother adding the sleeve bands and I think it looks fine without. 


Construction-wise this is an interesting sew. That pleat and dart is really cool and it's very cleverly put together. It's one of those patterns that I bought because I wanted to see how it worked. I am really intrigued by more interesting pattern drafting at the moment, partly for the fun of sewing it, and partly to learn about pattern drafting. I spend too much time trying to visualise how some RTW clothes are put together. I cannot fathom how they figured out how to put this together, but it works. There is a sewalong with photos which helps a bit too. In possibly a record for me, I finished this in a day - including printing and sticking together the PDF. I've never done that. Well, in honestly, I finished it that day, but then went back and fixed the bottom another day because it took a day or 2 to figure out why I didn't like it and how I could save it. But I could have made it in a day had I made it as drafted. 


This is only the second Papercut pattern I've made, the first being the Sway dress. My preference is definitely for PDFs with Papercut as I find their brown paper difficult to trace off, and I don't like the instruction layout on the printed pattern. I know a lot of people wax lyrical over the packaging, but it's not my preference.

I had also planned to sew this entirely on my overlocker but chickened out, and ended up sewing it with a lightening bolt stitch then overlocking the raw edges, because I'd already made the effort to change the thread. My main issue is that I'm struggling to maintain a consistent SA when using the overlocker, so a bit more practise is required, I think, particularly since this pattern is drafted with a 1cm SA. It might be easier with a narrower SA. Maybe.


Anyway, I am delighted with the final tee. It's a great colour and it's a great design. It works with a t-shirt or cami underneath, if I need a bit more warmth - in these photos it was layered over a black Lark tee. I wore it 3 days out of 5 when I first finished it, which is definitely a sign of success! It's a pretty distinctive shape, so I don't see me making millions more, but I probably still am hankering after a striped version at some point...
SHARE:

Sunday, 17 March 2019

Completed: Kabuki Tee

This is the latest installment in my current series known as "Helen Makes Paper Theory Patterns in Insanely Difficult Fabrics".

I've fancied the Kabuki tee since it was released, but it somehow never managed to get prioritised. Probably because I needed to buy both pattern and fabric, and I've been trying to not do that, in order to use stuff up. However, my very kind Mother in Law gave me a Merchant and Mills voucher for my birthday, which I had earmarked for denim, but then Carol very kindly sent me a sample of the Woolsey she had ordered, and Judith did a bit of enabling too, and I ended up going for the Woolsey in the Alta Mare colour.

This is a tricky fabric. It's a linen/wool mix and is like a double gauze in that it has 2 layers. It's pretty shifty, likes to fray and has a loose weave. It was challenging to sew. Pieces seemed to grow and stretch as they were handled, notches literally disappeared in the weave of the fabric and unpicking was extremely not fun.

The pattern is pretty cool. I love the right angles and the wide sleeves. I think you can tell it's Paper Theory's first pattern, as it's maybe not quite as polished as the others. The drafting is predictably great but there are quite a few spelling mistakes and the instructions are less thorough. Having said that, there's a video tutorial of how to sew the right angles (it's the same process as for the Olya), so it's a good overall experience. Top Tip, which I don't remember seeing on the Olya tutorial, if your fabric is prone to fraying (me! me!), put a small L shaped bit of interfacing just right at the right angle. Wish I'd known/thought to do that on the Olya.

It's a pretty easy and quick make once you get your head round the angles, and there are 4 for good measure. With the notches disappearing, I managed to sew my first sleeve on the back to front, which was frustrating since the fabric was so hard to unpick, but also because you snip into the right angle as you sew it, which is hard to do twice. I ended up trying to mend the snip with even more interfacing, which didn't really work. I think it's OK though. As you can see above, I stay-stitched all the edges. It doesn't say to do this in the instructions but I think it's worth doing.

I'm not 100% sure I liked the method of attaching the bias binding at the neck, although it was easier. You sew one shoulder seam, then apply the binding before sewing the second shoulder seam. It is far less faffy, but you end up with a bulky seam at one shoulder, which in this fabric is pretty bulky and wants to poke out at the neck (see below).


As the fabric is bulky, I didn't double turn the hems, instead I overlocked the raw edge and turned once. I actually ended up doing a double row of stitching on the hem because the first line didn't quite catch it all the way round on the bottom, then thought I'd better do the same on the sleeves. I like it although no one else can actually see it. This is definitely one of those fabrics where the stitches sink right in! Other than that, the only alterations I made were to add length to the sleeves. I'm afraid I ca'nt remember how much because I added more, then chopped some of it back off again. I left the sleeves the full width, rather than tapering them at all.


Insides-wise, it's all overlocked. Oh, wait! I have a new Overlocker! I had a bit of a payout on our work sharesaves at the end of last year and so I treated myself. What a difference! I previously had the old Lidl Singer one, which wasn't great. This one is like a dream. It purrs, rather than shakes the house down, the tension is spot on, it's easier to thread and works pretty much straight away when I do. I haven't had a lot of opportunity to use it, as I was making stuff that didn't require it, so it's been nice to use it on both this and the Olya.

When I first tried it on, post hemming and with the longer sleeves, I was completely unconvinced and thought I'd potentially wasted some pretty expensive fabric. But with the hem done and the sleeves shortened slightly the proportions started to look right. It's funny how proportions change something from awful to excellent, isn't it? I still think it's a bit too oversized on me, as it slightly shifts around when I wear it, but this is the smallest size, the 8. The hem is a bit dodgy (you can see it in the photo above when I'm side on). It seems to hang down at the sides, but when measured flat, it's even all the way round, so I'm just going with it. It's possibly the heavy and drapey fabric.


Other things to say? Just that I really love it. It's not super practical. I chose a wool mix for warmth, but the shorter sleeves kind of make that counterproductive, plus the wide sleeves don't fit under any of my cardigans or coats, so it ends up bunched up and creased. Still love it though. And our office is warm, so it's a work top until the proper spring arrives. I fully intend to make more of these in stripes, more solids, maybe a shirting, definitely linen, possibly a sweatshirt version, all the options! I am clearly now a fully-fledged Paper Theory fangirl, having made all 3 existing patterns (hacked LB Pullover not yet blogged) and I have already acquired the new Zadie jumpsuit. Just trying to decide on weather appropriate fabrics...


SHARE:

Monday, 4 March 2019

Completed: Olya Shirt

Let’s talk about stress sewing. Is it something you do? I know that I love sewing for a number of reasons, one of which is its ability to destress me. It consumes enough of my mental energy to allow me switch off from other stuff, whether it be work, Brexit, Euan’s eczema or the state of my garden. I actively seek out sewing as a distraction and a relaxant (assuming of course that a project is going well!). But stress sewing is another matter. Stress sewing is sewing in response to mega levels of stress, and in my case at least, results in a far from perfect results. Unfortunately this shirt was a stress sew.
I should probably give a bit of background here. I mentioned here that I am going through redundancy. Basically we are getting a new system, which will significantly change our ways of working. This in turn is driving a restructure. My current job won’t exist in the new world, but there are other jobs I can apply for in the new team, elsewhere in the company, or I can take redundancy and go. A week after finding this out, we also found out that Paul’s job was also under threat of redundancy. I had mostly been doing the ostrich impression (head in the sand), but with half term holidays came time off work and time to think. I am feeling all the emotions about my job. I anticipated this happening, but didn’t know to what extent or when. The idea of having to apply for a new job is anathema to me, I haven’t gone through recruitment in over 10 years, but what upsets me the most that week is that I will likely lose my flexible working. We have loads of flexibility in my current company and role. I work 4 days, finish slightly early by taking a shorter lunch, we get childcare vouchers, healthcare, an excellent pension and heaps of annual leave. I can’t guarantee my current shift in any new role, so there is a good solid chance I will need to work full time, which I know a lot of parents do, but it's not what *I* want to do. Fraser starts school in August (I know!) and I really want to be able to take him to school at least once a week. Then chuck in the additional child care requirements both term time and holidays, plus what the boys would need to give up. I've never taken working part time as a given, but I didn't have children to never see them. Told you, all the feelings. 

While I was off, I had a day’s sewing to myself, while Euan was at a Bushcraft holiday club, and so I started on this shirt. Emboldened by the success of Paul’s shirt (I know *all* about shirtmaking now!), and loving the design lines of the Olya, as well as having the perfect fabric in the stash made an obvious project, and what better time to do than to also support the So50visible challenge.


The fabric is Atelier Brunette modal challis. It was a limited edition collaboration, I think, from a couple of years ago. Its lightweight and very drapey and it feels absolutely gorgeous to wear. I actually had it in 2 lengths, having first bought a 70cm remnant and then a further metre from a different retailer at another point. The 2 lengths are actually slightly different, with one having brighter colours and the other being more muted. They also feel every so slightly different. I guess much like wallpaper, fabrics have batches! I managed to squeeze the pieces into the 1.7m by cutting the yoke on the cross grain. I even had just enough fabric to cut the collar second time (which happens when you sew the first one upside down), but the rest was minimal scraps.

Firstly, let me say this is a great pattern. It is well drafted and very clever in design and construction. At the front, the sleeves and front yoke are one piece, but at the back there is a sleeve seam attaching it to the back yoke. This requires a very cool right angle on the shoulder which is difficult but satisfying to sew. There are also concealed pockets in the seam attaching the front yoke to the front bodice pieces. The instructions definitely assume a good sewing ability and are not hand holding at all, but there is a sewalong with more details should you require it (I’d recommend it for the shoulder/sleeve seam).


Stress sewing a complex pattern with a slippery slidey fabric was not my best idea, but in fairness I didn’t actually realise I was stress-sewing at first. And actually, it’s not nearly as bad as I first thought . My topstitching is dodgy at best, but not very noticeable. I did sew my first collar upside down, but thankfully managed to cut another (although it’s interfaced in white, not black). My edge stitching didn’t quite catch all the edges, but I rescued this with a bit of hand stitching (collar stand, cuffs and part of the button placket). My pockets are a bit messy, and I had to do a bit of jiggery-pokery to get the sleeve seam to sit right, but honestly all issues were as a result of the fabric and stress-induced slapdashery, rather than the pattern, and even more honestly, literally none of these things are noticeable in the finished garment. It still needs to stand up to repeated washing and wearing, but I am absolutely delighted with it.

I was in between sizes, so picked the smallest one, the 8, as this is loose fitting. Generally my waist is the largest size if I am between sizes, but the waist is not an issue on this pattern. I made no alterations to the pattern, other than to use a different method for attaching the collar, and to sew the bottom button hole horizontally, a trick I picked up from the Fairfield. I have no idea if this serves a purpose, but I liked the idea of it! :) In terms of attaching the collar, I used my preferred method, which is to attach the outer collar stand separately, make up the collar and the inner collar stand, then attach them to the outer collar stand (better explained here). I have tried both methods and this is the only one that works for me. 


I actually forgot about buttons, so had sewn most of it up relatively quickly before realising I couldn’t do any more till I went shopping. It was only when I paused that I realised that I was doing the whole stress-sewing thing, basically sewing as a distraction (distracting me from what I should have been doing which was my CV!), but in a way that was not careful or particular and was pretty dismissive of the bits that I was recognising were crap, as I was sewing them. Ah well, I thought, it doesn’t matter. This after taking such care over Paul’s shirt.


All in all, this could be better, but I love it regardless. I do want to invest in some fray check before I wash it, as I’m nervous about that right angle’s ability to survive the washing machine (it’s sewn in a way that’s impossible to completely encase the raw edge), as I want this to last. I keep stroking myself as I wear it, it’s just so soft and silky. I will definitely make this pattern again. I love the idea of stripes or contrast stitching, something that really show off the design details. In the meantime, I am going full Paper Theory fan girl. My next project is the Kabuki!

Before, I go, I wanted to mention a few things. Firstly, Paul's job is fine, so we are good for the time being at least.

Secondly, somewhere along the line, I have stopped referring to my boys as their nicknames, probably because they are frequently named on Instagram, and probably because they really have outgrown their nicknames. Anyway, in case you don't follow me there, here's a quick key: Euan = Small Boy and Fraser = Baby Boy.

Lastly, my hair. I decided last year to stop dying my hair. There are numerous and various reasons for this, which I won't get into, but it is something I'd been thinking about for a long while. It's one of these things that's a gradual change, so I did get quite a shock when I saw the photos I took for this post. It looks different, whiter, here than it does in the mirror. I'm OK with it turning grey/white but the inbetween process is a lot more noticeable than I realised. I don't really know why I feel the need to explain myself, but at least now you know!

Thanks for reading!
SHARE:

Wednesday, 27 February 2019

Completed: Fairfield Shirt

Hello again! I took a break from Instagram this month, which has got me back into reading blogs, which in turn has apparently got me writing again. It's something I've been thinking about recently, but the writing and the photographing all take time, that I often don't have (and let's be honest, if I have time I prefer to prioritise actual sewing!). I'm not promising anything here. This year is going to be a busy one. I'm at threat of redundancy again, and I don't know what that's going to do to my work/life balance, but let's go with it for now.

I discovered I have 3 unfinished, unpublished posts that I wrote in June/July last year, plus many other projects finished but not documented, but rather than attempt to pick up where I left off, I'm going to crack on with the first thing I've made this year, a shirt.

I made this for Paul's Christmas. I know it's late, but I had other stuff to sew before Christmas, and I can't sew in secret from Paul anyway, so instead I made him a gift voucher, promising him a shirt. He's been asking me to make him something, anything, for about 8 years!

We chose the Fairfield shirt by Thread Theory - it was the only pattern I showed him, but he liked it, so that was good and he chose the fabric, with some guidance and only one rule - no checks or horizontal stripes that would need matching. I had a gift voucher for The Dress Fabrics Company, that I didn't actually win, but acquired at Edinburgh Frocktails last year (Joann won it, then gave it to Judith, who then gave it to me), so we had a look there and he found this shirting cotton. It's navy with a white pattern, which is reminiscent of a Sashiko wave pattern, although on a much smaller scale. Paul chose to have mountains rather than waves. I wasn't overly convinced about the print on him at first, it's quite different to what he normally wears, but now it's made up, I love it. It was also a dream to work with, a lovely stable change for someone who regularly tortures herself with drapey, shifty, frays like mad fabrics.

I loved making this shirt. The fabric probably helped. That plus it's just a great pattern, with excellent instructions. Shirt making is so satisfying. I've always enjoyed burritoing a yoke, but I also loved the tower sleeve plackets on this. My only previous experience of shirt making is the Archer, which has a bias binding placket and I do not like that at all. I will always do proper plackets now that I understand them, although I did cut them upside down. A stable cotton allowed me to be pretty precise, as there are some very small SAs on this pattern. This was also my first experience of flat-felled seams which were fine and slightly more straightforward than I expected, although that could be because the pattern is drafted to have them, with SAs offset in all the relevant places.

There were a few things I found odd about the pattern. Some notches that didn't match anything, for instance and I also found one of the notches on the button placket to be wrong - the pattern says it's a X seam allowance, but the notch is at the Y mark (can't be bothered to get up and check, sorry). I just ignored the notch and measured it myself.

I also didn't like the constantly changing seam allowances. I understand why the pattern is written like that, and have no alternative suggestions, but I find it hard to switch back and forth and as a result sewed more than one seam with the wrong SA, which then had to be ripped out.


In terms of the pattern, he chose the darts at the back, but no sleeve tabs. He did want the sleeve tabs, and I made them and attached them, but they didn't look right, so I persuaded him to remove them. They would be better on a summer version, I think.

I made no fit adjustments to this, and it's not bad at all. Paul has narrow shoulders, so I do need to alter the pattern here a bit, but its no worse than a RTW shirt. He must also have slightly short arms, as often shirt sleeves are too long, but he was happy with the length of them on this shirt. The collar is too tight, even though the measurements of the S matched his, but he won't do the top button up anyway, so no biggie. We made the size Small.

I had some real pattern matching wins on this. I made no attempt to match them at all (other than the breast pocket), yet the sewing gods were clearly smiling on me, with the collar matching the yoke, which in turn matches the shirt back!


Look at my pattern matching!


I added a few design details, in the form of a red button hole and the button also attached with red thread. It's a nice touch, which I stole from RTW and also Jen.


A success! Paul loves it, and I can't get over how much it looks like an actual shirt. I do realise that's a stupid thing to think and write - I make my own clothes all the time and they look like real clothes - but, and I don't know if it's the fact that this is a shirt, or if it's because it's for someone else, this is somehow different. I might even make him another!


SHARE:

Wednesday, 2 May 2018

Me Made May 2018

Well, it's here again, already! Can you believe it?

I'm just dropping in to say that I am participating in Me Made May again this year. I've pledged to wear as many handmade garments as possible each day. Realistically this will probably only be a maximum of 2, but there might be the odd day when I can manage a third.

I'd also like to take the opportunity to assess some of my makes and figure out why I don't wear them, if there is anything I can do to change that, or if not, what I'll do with them. I also want to figure out handmade wardrobe gaps. Finally, I need to do some mending, and I'd like to make a pair of jeans or another pair of trousers, but we'll see on that last one.

I'll try to do periodic round up posts, but you can see all my goings on on Instagram (@grosgraingreen).

Are you joining in this year? What's your pledge?
SHARE:

Thursday, 12 April 2018

Trouser Inspo

It won't have escaped your notice that I've been sewing trousers recently (here and here), and I have just finished another pair of Emerson/Alexandria mash ups which have yet to be posted. I've talked and thought a lot about sewing trousers in the past, but never really managed to actually do the sewing. Suddenly I can't get enough!

I think there are a few reasons for this. Firstly, I'm just wearing trousers more. Generally casually, I live in skinny jeans and at work wear more dresses and skirts, but this winter I've definitely been wearing my RTW black skinnies to death. I'm not sure what's prompted this change and I suspect that come summer (IF summer ever cometh) that my skirts my come back out to play, but for now I want to wear trouser.

Secondly, I tried on quite a few RTW trousers and didn't like them. The fit was OK, but not good enough, and I figured I could at least attempt to do better myself.

Thirdly, the more you make trousers, the less scary they seem. Actually trousers are not difficult at all to make. Just hard to fit.

Lastly, there seems to have been an explosion of Indie trouser patterns in the past few years, which makes the whole thing easier still, albeit with some limitations (see below).

What I will say though, is that I am fussy about the shapes and styles that I wear, and none more so than trousers. I can't always put my finger on what I don't like about things, I just know they aren't right for me, and sadly from the sewing point of view, often I can't identify this until I've actually tried them on. Case in point the Alexandria pants and more recently the Calyers, which I muslined and then rejected (same problem with fabric volume as the Alexandria). This quickly becomes an expensive hobby (the Calyer pdf cost £10), so I am trying to come up with some ways to identify whether a pattern is likely to be a winner or not, BEFORE I make the purchase. This still needs some work, but in the meantime, I thought I'd share some lovely trouser inspiration with you. This is by no means an exhaustive list, but it's some of the patterns I have my eye on currently, in that "my eyes are bigger than my sewing ability" way we all know.

Wide Legs

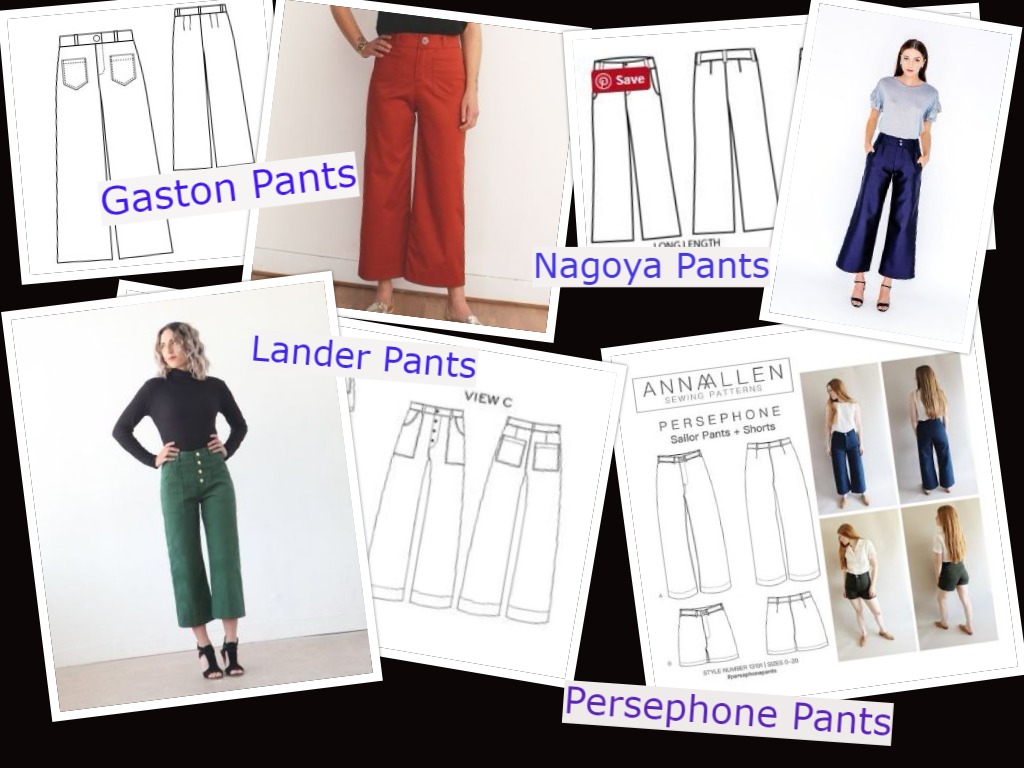
I love the cropped wide leg look, and am keen to recreate a pair I tried on in Jigsaw a couple of months ago but didn't buy because they were dry-clean only and itchy wool. This is a selection of patterns I've been considering. I have previously made and do like the True Bias Emerson pants (not pictured), but would like to move away from an elasticated waistband. I think I like the Anna Allen Persephone and RDC Gaston's best, due to the covered fly and the slightly wider leg, but the others, the True Bias Lander Pants and the Papercut Nagoya Pants are strong contenders. I prefer that the Lander has back pockets, but they are easy things to add to a different pattern. I'd like to make a black pair for work (fabric tbc, but maybe a canvas?) and also a pair in denim. I LOVE Novita's version of the Persephones. So gorgeous.

Aside: I mentioned above about elastic waists. I actually never thought I'd write this, but I have nothing against elastic waists per se, however there are a lot of Indie trouser patterns out there with elastic waists, whether full or back only, and I'm wondering why. They are definitely easier to sew, so perhaps easier to tempt trouser-making newbies in (plus since elastic waists go with baggier trousers, less potential fitting to be scared of?), but given it's more than likely that most people will make skirts or dresses before they make the jump to trousers, they will have sewn darts and a zip or 2, making trousers with a side zip not insurmountable. Personally, with well written and illustrated instructions to follow, I don't find a fly that difficult either. Do pattern designers themselves dislike fly front or side/back zip trousers and assume their customers feel the same? Or do they actually want to avoid writing the instructions, which I can imagine are probably difficult to describe for a fly zip, and while there are some very good tutorials out there, you can't really produce a pattern and then direct your customer to someone else's tutorial. Or, actually, is it just that elastic waists are trendier/have become more socially acceptable in recent years? I have no idea, and I have no strong feelings about it. It's just something that I've been thinking about since I've been looking for some patterns without an elastic waist.

Peg Legs and Pleats

Obviously I've made a few peg leg and pleated trousers with some mixed results. I REALLY love teh look of them, but I struggle with the wearing of them. My successes have all been with the pleats of the Emerson, which are pretty shallow and short. This combination doesn't seem to give me the excess at the front crotch and thigh area, which I find problematic. This is why I think the Orangeuse Patterns Bruges Trousers might work for me. I'm not convinced by the side stripe on the legs, but that's optional, and I really like the rest of the pattern. No back pockets again, but I'm sure I could add welt pockets (she said, never having sewn welt pockets in her life). The RDC Claude Trousers interest me, but they look quite different depending on the version you see. I do like the versions that Christine has made here and here. I even dreamed about them (true story)! Finally the Papercut Patterns Guise Pants. I really wish these weren't elasticated at the back, but I suspect the pleats are probably going to be a problem anyway, so it's highly unlikely I'd make these. But they look nice, don't they?

Skinnies and Jeans

Dead easy to wear, there will be room in my wardrobe for skinnies for a while yet. I've been meaning to make the Closet Case Ginger jeans for a while, I have the pattern and one of my RTW pairs has just gone through at the knee, so it's inevitable they wiill happen. If I like them, I might also try the Sashas which are made from the same block. I chucked the Papercut Patterns Starboard jeans on there too as it has some interesting details.

Finally

I've been a bit obsessed with the Elizabeth Suzann Clyde Pants for a while. They have an elasticated waist, so I might not actually like them on me, but I love the drafting. No side seam with a capacious scoop shape pocket and a tapered leg. I even like this weird khaki colour. Unfortunately they are RTW, sold in the US and out of my price range. I recently came across the Sew Liberated Arenite Pants on Instagram and while I wouldn't wear this slouchy, relaxed shape, it has a lot in common with the Clyde pants. So much so, that I am considering buying the pattern to hack. I'm not sure how easy it would be to do with no side seams, but if I could reduce the ease enough, it could work. It's not a priority, but it would be an interesting experiment.

So, there you go. That's the round up of what's going on in my head at the moment. I wonder what, if any I will actually make?! :)
SHARE:
© Grosgrain Green | All rights reserved.
Blogger Template Created by pipdig