Wednesday 31 July 2013

1950's Petticoat - A How To

I don't feel I can really call this a tutorial. To do so would be fraudulent. The tutorial was written by someone else, and I'm just telling you what I did differently!

Apologies for the lack of photos, but due to time constraints when making this, and a certain lack of belief that it would come good, I didn't take any.

First, as Cilla used to say, here's a quick reminder:


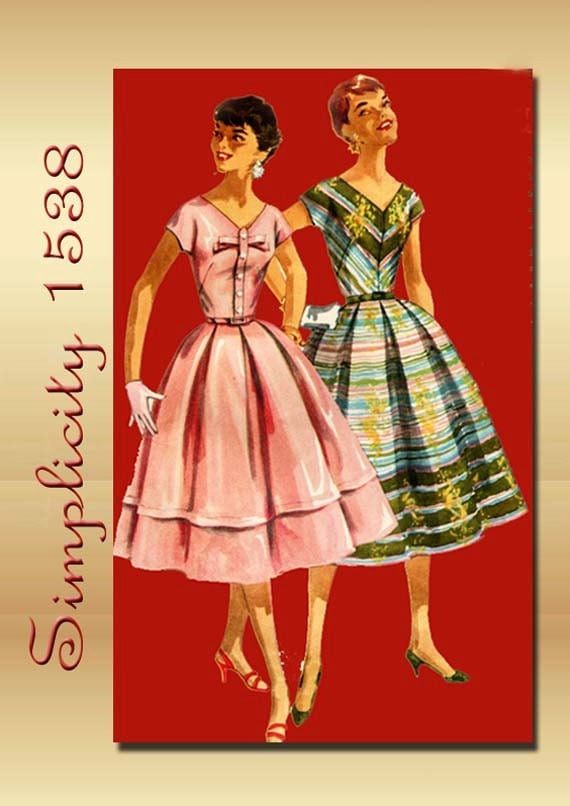
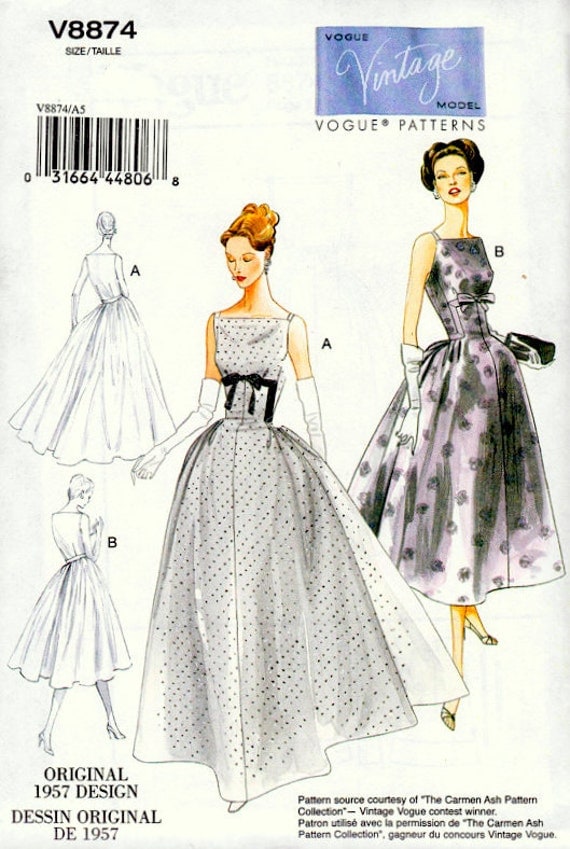
The first version I made was a 3m length, double layer of tulle, gathered and attached to the above photographed underskirt at hip level. The reason I didn't like this was because it gave me too much bulk at hip level and more of a straight out and down (square) shape, rather than the desired (and more subtle) shallow inverted triangle shape given in the photo above on the right.

I Googled images of 1950's petticoats and established that they were pretty much all tiered, giving that triangular shape, so I went back to the Sugardale tutorial that I'd originally found. I didn't make her version exactly, but I based mine loosely round hers. I would say her tutorial is actually excellent, but I didn't need (and didn't have the time or the supplies for) the quality of finish she describes. She recommends you read her tutorial in it's entirety before starting. I had to do this a few times to get my head round it, but then I'm not always great with written instructions for practical things.

The first thing I did differently, was to create an underskirt. Tulle is really scratchy against the legs and I wanted this to be comfy. I made the underskirt from some unbleached cotton I had in my stash (£1.75 per metre from Ikea - excellent muslin material). I used the width of my fabric, which was about 150cm. I measured my dress from waist to hem and then cut the same - I obviously wanted the underskirt to be shorter than the dress, however I knew seam allowance and the casing for the elasticated waist would take care of that. So the underskirt is basically a wide tube, with a narrow casing sewn at the top for the elastic (1/4 inch, I think). I didn't finish the edges,  I included the selvedge instead. This is fancy dress, remember! The underskirt sits on  my natural waist. Actually, if you were making this following my instructions (really? you are?), I'd leave the elastic off at this stage and add it at the stage marked below. It will just make things easier.

I then followed Sugardale's tutorial. Not sure of the best way to present my instructions with Sugardale's tutorial, so I'll just tell you what I did differently, referring you to the correct point in her tutorial. Make sense?

STEP 1 Things you will need
1. I used tulle rather than crinoline. Guys, I recommend this. Tulle doesn't fray, which makes life so much easier. Therefore, no Fray check required.
2. I substituted yards for metres (they're not that different). I got confused when cutting my tulle (yes, really), so my bottom tier was only just over 7.5m but I think that was fine (she recommends 8 yds). The middle tier was the recommended 4m.
3. I skipped all the ribbon and twill tape. I didn't have it and it would have taken so much time to apply. If you were making a petticoat you wanted to wear regularly, I'd recommend it. It does look better, and it would probably make it last longer. But for fancy dress/relatively little wear, I think it's fine without.
4. As mentioned above, I did an elastic waist. Quicker, easier and comfier than hook and eye, although not hugely authentic.

STEP 2 Math(s)
As I'd already made the underskirt, I measured that (61cm) and divided it by 3. I didn't actually make the top tier from tulle. I already had the bulk from the underskirt and didn't want any more, so that acted as my top tier. I made my second tier 20cm and my third 25cm. I  kept the bottom tier longer as, due to time, I knew my cutting and stitching wouldn't be hugely accurate and I wanted to include a margin for error, plus a bit for seam allowance. This meant once the underskirt was finished, I hung it from my wardrobe and just trimmed the bottom tier to the same level as the underskirt. Very lazy, but it worked, because TULLE DOESN'T FRAY!!!

STEP 3 Drawing, gluing and cutting
Pretty much as described but without the Fray Check. I also didn't actually mark the fabric with pencil and instead used pins. I don't recommend this route. Pins fall out of tulle and you get wonky cutting lines. Obviously, as stated above, I didn't cut the top tier.

STEP 4 Sewing and finishing the seams
I didn't finish the seams. No need. I used really small seam allowances too, about 0.5cm. Did I mention tulle doesn't fray?
Because I didn't do the top tier, I missed out the bit referring to the opening at the waist.

STEP 5 Basting and gathering
Do what she says! It might seem insignificant at the time, but when it comes to matching the tiers and gathering, it all makes sense and makes it so much easier. I couldn't do this because I pieced bits of tulle together to get my 8 and 4m lengths which just made things more difficult. More difficult is not a good thing at 11pm when you are tired and emotional.
I sewed 2 rows of basting stitches using a 4.5 stitch length. 3 rows would probably be better, if you can face it.
Tip - if you plan to be thorough about removing your basting stitches once the gathers are sewn in place, it might be an idea to put a different coloured thread in your bobbin, to the top of your machine. Because the tulle is basically net, the threads have a habit of pulling through to one side, making gathering more difficult, as it was harder to identify the bobbin thread. For those of you who haven't gathered before, you want to pull on the thread from the bobbin. If it's a different colour, it will be easier to identify.

STEP 6 Finishing the hem
I skipped this.

STEP 7 Gathering each tier to the next
Do what she says again! I did this, but not having evenly spaced side seams made this more difficult, as mentioned above. I skipped the ribbon. After basting 8m of fabric with 2 rows of stitches I was glad to!
What Sugardale doesn't make clear is, when attaching the bottom to the middle tier, whether to attach right sides together, or to lay the top tier (wrong side down) over the right side of the middle tier. I did the latter, as it seemed the intuitive thing to do.
When it came to stage 6 here, I obviously didn't have the top tier. Instead, on my underskirt, I measured 20cm down from the top of the waistband (that being a third of my total length), marked it and stitched the middle tier onto the underskirt at this point. This would have been easier if I hadn't already put the elastic in.

STEP 8 Finishing the top
If you haven't done so already, now insert your elastic, using the usual safety pin method (or something fancier if you have it).
I skipped the ribbon...

STEP 9 Closures
No need! Hurrah! All done!!! Except for that pesky, lazy hem line trimming bit. But you are a neater marker and cutter than I am, so probably don't need to do this.

STEP 10 Look it over
Ah. Yes. There will be a lot of loose ends. You might want to be thorough about removing your basting stitches, particularly if you've used different colours. I just removed the ones that pulled out easily and cut the ends off the rest - ivory thread on ivory tulle is really difficult to unpick. But also really difficult to see!

As you can tell, Sugardale's skirt is a bit fuller looking than mine. Not sure if that's just because I had a bit less than the full 8yds on the bottom tier, or due to the difference between crinoline or tulle, or maybe the ribbon on the bottom adds some structure? Not sure. If you find out, or think you know, feel free to let me know! Either way, I was quite happy with mine.

I hope this all makes sense. If you have any questions, feel free to get in touch. If you do make this, please let me know how you get on!!!!


SHARE:

Monday 29 July 2013

1950's Petticoat

I made my petticoat! It was a bit of a thing in the end, because I made one version, decided I didn't like it and then ignored it until the night before the party. Cue finishing at midnight, many a threat of abandoning it and nearly some tears along the way! I was really glad I did it though because I felt amazing in my outfit!!!

Here it is:


And here it is, as part of the finished outfit:


It didn't make my skirt huge, but then I didn't want it huge - and actually it felt quite big wearing it. I'm surprised at how small it looks in photos to tell the truth! However, if it had been much bigger, I think it might have felt a bit cartoonish and I was going for elegant!

I think this might be the second time in my life I've felt elegant - after my wedding day!
I wore the dress with a pearl necklace that may or may not have been real, may or may not have been my Gran's, and may or may not have been the one I wore when I got married. My mum has 2 and can never remember which is which! I'm fairly sure it's the fake one and it's not the one I got married in (too long). I have no idea if it was my Gran's but I suspect they both were, so it potentially pre-dates the 50's. The beaded cardigan I have had for years, originally bought to wear to a winter wedding about 10 years ago. It's just from Oasis so not actually vintage, but I absolutely love it! It's wool though, so very warm to wear in summer. It didn't last long on!

I am absolutely useless at doing hair, so I was particularly proud of this achievement:


I followed a tutorial on Youtube, which was meant to be a proper full updo with more pin curls. The rest failed but the front one seemed to be happy to stay in place. I thought I might do a half up-half down type style, hence the feather/jewel-y thing, which is totally un-50's (from Urban Outfitters about 4 years ago and it has also passed for 1920's style previously) but then decided I preferred a ponytail, which gave the illusion of a hair up from the front and left the feathers in because I like them! 

I think I can confidently say, I was the most authentically dressed person on the night, mainly due to the hair and the petticoat! Everyone made a really good effort, and there were lots of glamorous 50's style dresses, and a few who focussed more on the "summer" part of the theme, with pineapples proving very popular! I did feel a little overdressed, however, better to be over than underdressed. I thought I looked great and I got a lot of compliments!!! :)

Danielle has asked for a tutorial on the petticoat. I don't feel I am really qualified to write a tutorial on this (nor to teach Danielle anything), however I will write a post on how I made it, including the very excellent tutorial I loosely based it on. I'll do a separate post on that to keep things simple, so stay tuned!

SHARE:

Wednesday 24 July 2013

Completed: Bunting!

I have been doing some sewing for Small Boy.

I have been meaning to make bunting for his bedroom since before he was born! I know bunting can verge on the twee, but I thought in some nice bright colours it could look quite cool. And that was as far as I got, because, you know. Then, when we were on holiday, my sister bought some handmade bunting for my niece's bedroom. I wish I'd taken some photos of that in the shop* because it was really well designed. Each of the little pendants had letters appliquéd on, plus some ribbony decorative bits too. So far, so typical bunting. The interesting bit was when you came to attach the pendants to the bias binding/twill tape. Rather than thread the tape through a tube at the top of each pendant, the pendants had a button at each of the top 2 corners, and the tape had button holes right along it's length. You simply buttoned the pendants in place, meaning it was really easy to change things around. The woman in the shop suggested buying numbers to use for birthday parties and changing the number each year. My sister stopped short at that, but it was nice idea. I would ask my sis if I could take photos of the stuff she bought, but I suspect she may not want my niece's name out there on t'internet.

* This is when I realise I am such a rubbish blogger. It honestly didn't occur to me that I could have asked the woman in the shop if I could have photographed it there and then, and then done a wee "feature", but I actually got back from my holiday. I need to get more with it!

Anyway, my sister's purchase spurred me into action, realising that I had better get making bunting before Small Boy is old enough to have an opinion about interior decor!

Ta dah!


 I am really pleased with this! You don't really need a tutorial to make bunting, but I did refer to this one just to get an idea of what size to make the pendants. I thought it might be a bit of a boring project, sewing all those triangles, but it was actually quite relaxing and strangely addictive! I did all the cutting out and sewing the triangles together in one night, accompanied by a glass of red, and Dates. I didn't measure how many I needed, I just cut triangles until it looked like quite a large pile, with a good mix of colours/patterns. The fabric is a true amalgamation of stuff I bought for the purpose (way back when) and scrap stash busting. Using scraps was a really nice way of doing it, because when I showed Small Boy, he immediately said "that's your bird dress, Mummy", "that's my car bag" and "this one has lighthouses". His favourite is the bird fabric - that's my boy!


 I used any fabric that I had, the only restriction being that it had to be bright colours. Anything too pastely was vetoed.

 I bought the bias binding on ebay. It's the horrible scratchy poly cotton stuff, but perfect for this, and was only £3.40 incl postage for 10m. God knows what I'll do with the rest of it!


I made around 5m in the end, which wasn't quite long enough, but it looks OK. I might do a bit more another time. My sister is also planning to borrow it to help decorate the hall for my nephew's 4th birthday party on Saturday! I really should have made more!


 While we are on the subject of selfless sewing, I thought I'd share some other bits and bobs I have made for Small Boy over the past few years.


The cushions were made with leftover fabric from his curtains (which I also made, but just couldn't photograph well), which I made when pregnant. I made the patchwork dog following instructions from Cath Kidston's Patch book. But I didn't make it in expensive CK prints! You will spot some of the dog's fabrics in the bunting!


Strawberry print oven glove made to go with his little kitchen. I just made this up as I went along. Again, you'll spot this fabric in the bunting!


Finally, a Noodlehead widemouth bag, made in a car print, with gingham lining (both in the bunting). I made this to hold all some of his small toys - peg puzzle pieces, cars etc. It actually doesn't get used that much, but I really like it!

My next selfless sewing plans are to make another oven glove for my niece (it was meant to be for my nephew but since he's nearly 4, I'm not so sure he'll be interested) and a dress for my niece's 2nd birthday in September. That's the plan anyway. We'll see!


SHARE:

Sunday 21 July 2013

Quick pleated summer skirt

Thanks everyone for your very lovely comments on my last post! So nice to get such lovely feedback. It all gave me a nice warm glow!

I mentioned in my previous post that I'd made a very quick summer skirt last week. Fuelled by the comments on my earlier post about having few summer clothes, I dug through my stash, and came across this piece of fabric that I'd completely forgotten about. 

It's furnishing/curtain fabric and was a remnant I bought for £2 about a year ago. I measured the remnant for the purposes of this post, but then lost the bit of paper I wrote the measurements on. Sorry! I think it was about 1m by about 76cm? It certainly wasn't a full width, as it only had one selvedge. 


It's a cotton, not too heavy weight. It looks textured (not that you can see that here), as there are beige/cream flecks on the white background. I was planning to go down the dirndl/gathered skirt route, but realised that a) I didn't really have enough fabric to make a waistband, and wasn't sure you could have a gathered skirt without one, and b) the fabric is probably a bit heavy, and therefore bulky, for a gathered waist. I played around with it for a bit, trying to figure out what to do, when I remembered a skirt in this book that I own.
Link
I bought this book years ago, before I really got into sewing, as I saw it featured in a magazine and thought it looked kinda cool. I have never made anything from it, until now!

There aren't many projects in this book that I'd ever wear (the problem with buying a book online is that you can't have a good flick first!), but there were one or two things that appealed, one of which was a "rough and ready pleated skirt"The instructions really would have resulted in a very rough and ready skirt, with no waistband, just a simple turned over hem at the top, and poppers to fasten. I decided to use the basic idea but to improve it a bit, to make it look just a little more polished (and... er... like I can actually sew). The instructions actually called for the fabric's width to be 1.5 times my hip measurement, I had nowhere near that, but went with it anyway - I just figured I'd have less volume.

I started by removing the selvedge and then cutting the fabric in half horizontally. I lined the floral print up as much as I could, so they were aligned horizontally, but I stopped short of proper pattern matching at the seams. I couldn't afford the wastage. 

Sorry for the dearth of photos in this post. I didn't photograph it as I went along.

I sewed the 2 pieces together down one side seam and then started pleating the top. I did spend about 2 minutes trying to work out how big to make the pleats so they were even, then gave up. This is "rough and ready" remember, and even the instructions said to eyeball it. So I did. I started by making the pleats more or less 5cm (2 inches), and then played around with them to get the fit right around the waist. I pinned the pleats in place and then added an invisible zipper. I did this before sewing the pleats in place, as I wanted to make sure the placement around the zip looked OK. I did need to fiddle around with the pleats after adding the zip and once I was happy with them, I basted along the top of them to hold them in place, before topstitching down each pleat by about 4cm (1.5 inches). There was no logic to this measurement, I was just making it up as I went along.

I added some grosgrain ribbon to face the waist. There is no waistband. I placed the right side of the fabric to the wrong side of the ribbon, stitched it's length and then folded over. So from the inside, the ribbon looks topstiched on, but you can't see the topstitching on the outside. I then did a slipstich by hand to secure the bottom of the ribbon. I did consider topstitching the ribbon in place, but liked the look without the stitching. By happy coincidence, the 4cm topstitch on each pleat pretty much perfectly matches the width of the ribbon, so that almost acts as a waistband, the skirt flaring out beneath that point.

Unfortunately I got to the stage of stitching the top of the ribbon, but not quite the hand stitching, before trying it on - and it was too big!!! The pleats must have shifted when I basted them in place! It fitted my hips, but I wanted a higher waist on this skirt. I'm afraid to admit I took the lazy way out - I unpicked half the grosgrain, unpicked about 4 pleats at the back and adjusted them, before resewing them and then the grosgrain. It means I have a greater number of pleats, and therefore a bit more volume, at the back than the front, but I'm not hugely bothered. Certainly not bothered enough to redo it.

Once happy with the fit, I finished the hem with a small double turned over hem. The insides were finished as I went along with the overlock stitch on my sewing machine. 

And that was it!!!

P's sister and her family are currently over visiting from New York, where they live. On Friday they came over to Edinburgh (the rest of P's family live in Glasgow) and the two families took a trip to Edinburgh Castle. I had tasked P with taking some photos of me in my new skirt, thinking a change of background and a bit of culture might be nice for you lovely readers, however we both completely forgot. So, instead you get these:

Me with small boy and P's niece. You can see the skirt full length here.
Nice family pic. You can better see the pleating here. And check out that blue, blue sky!!!
As you can see from the top photo, the pleating is not very full. With a wider piece of fabric, you could really go to town here and I think I might make a more voluminous version in future.

One regret on this skirt is that I didn't think to add pockets until I'd pretty much finished. And then of course I couldn't be bothered to unpick it all. Another one to remember for next time!

I have no flat, or interior photos, or any back shots (sorry Nessa! :)). It's too dark now to take any more tonight. Plus, as you can see I carried Small Boy quite a bit that day - we did a lot of walking - and my skirt became filthy from the dust on his shoes, so the skirt went straight in the wash after one wear. So, another reason why I don't have any more photos, sorry.

Once the skirt is laundered, I'll take a couple more photos and post them on Flickr, so you can see this better. I really am happy with this skirt. I'm not sure how much more wear I'll get from it this summer, as apparently our hot spell is now over, but hopefully I'll get to wear it at least once more! Fingers crossed!

SHARE:

Thursday 18 July 2013

6 months and counting

Today is my blog's 6 month anniversary! When I started this blog on 18th Jan this year I doubt I expected to still be doing this 6 months later, having written and published over 50 posts. When I started I was aiming for a minimum of one post per week. I've pretty much doubled that, which really pleases me! I'm also really chuffed to now have 66 followers on Bloglovin and a small group of regular commenters that I count as friends. I've said this before, as have most other sewing bloggers, but it really lovely how much this, and you guys, have become part of my life!

I had planned to celebrate this mini anniversary by giving you a tutorial, my first! But that hasn't gone to plan. Some of my photos are just not clear enough, and I've realised I really need to use some type of illustration tool. I have both Illustrator and Photoshop on my laptop, but don't have the first clue how to use either. Illustrator seems to be the most intuitive, however it doesn't appear that I can upload an illustrator file into Blogger, whereas I can with Photoshop. I'm not sure if that is necessarily true, I just haven't figured it out yet, and not being hugely technical I will need to enlist the help of P. Unfortunately neither of us have had the time yet. If anyone has any clues, please feel free to let me know!

This week, though, I have managed quite a bit of sewing - every evening this week, in fact. I have made a quick summer skirt, which I hope to photograph tomorrow to show you. I am really chuffed with it, as it was a true stash buster! I've also been working on some bits and bobs - I've started my 50's style petticoat. I'm not sure that's working so far, so I may need to start again, but that's OK. I have 6 metres of tulle to play with!

In other news,  I now have an end date for my job - mid October. It has been indicated that there may be an internal opportunity on the horizon, which would be great. Failing that, I applied for my first external job today. It's all starting to feel quite real. I've done my CV, I've started to think of examples for interview questions, some of my team have secured roles already, and I've started the transition to the new team. I feel OK about it all. I haven't done a great deal of job searching, and what I have done has been quite half-hearted, but knowing there is something out there that looks viable, has given me confidence. Plus, October is still a good few months away and anything can happen in that time!

Finally, I have signed up to Kollabora. I haven't really done much with it yet, as I still need to explore it and get my head round it (and understand why it's different to say Flickr or Burda), but all the cool kids seemed to be doing it and I hate to be left out! :) If you want to follow me on there, I'm on there as Grosgrain Green.

Update - I have just remembered that once again, I have failed to acknowledge that I have been nominated for another Liebster! This time by the very lovely and talented Kathryn from Kathryn's Busy Town. Thank you, Kathryn. I promise I will answer your questions some time soon, and I'm very sorry for not mentioning this before now!

Thanks for the past 6 months and here's to the next!
SHARE:

Saturday 13 July 2013

1950's Miami

Wow guys! Thanks so much for all the love for my floral Charlotte! That was the most comments I've ever received on a post, and every one of them was lovely! I also got some love directly from Elisalex via Twitter.  That always makes my day, getting some nice feedback from the pattern designer. It seems like I made the right choice with that dress/skirt!

A good friend of mine, Suzanne, is having a summer party at the end of this month, with a Miami 1950's theme!


Our mutual friend is coming up from London for it. We have a babysitter booked. There will be a silent disco (always wanted to go to one of those!), and I can't wait to go. Now... what should I wear?!!!

My first thought was: how cool would it be to go wearing just a Bombshell Bathing Suit and some heels?!!!! It would be fabulously era and theme appropriate, but would definitely require someone with much larger cojones, not to mention much better legs than I! It would also require actual Miami-style weather, and despite her super-event-organising powers, I doubt even Suzanne can manage that! Having said that, part of me really does like the idea of going down the beachwear route and I was wondering if I could incorporate that somehow?
Absolutely love this combo. Is it a playsuit with over-skirt? Or shorts under a dress?

Isn't this gorgeous?
But I didn't want to be the only one turning up in beachwear, while the rest of the guests have gone for prom style 50's, so perhaps I needed to consider an alternative route? I love the picture that Colette Patterns featured on their 4th July post. Isn't this dress just stunning? It feels really summery, but also party-appropriate. I love the stripes and what looks like a drawstring halter neckline. Not sure how bra or boob-friendly this style this would be though.


Some other '50s inspired summer dresses I came across that I loved:

Source
Source
I think my favourites are the striped blue, red and white one at the top and the bottom one with the bow.

HOWEVER, I then remembered that I already have this in my wardrobe:


I bought this from Zara for my cousin's wedding, back in 2007! And I still fit into it. As long as I don't need to eat or breathe, I'll be fine. And that leads me to a dilemma. I actually don't have a lot of time to make a dress to wear, and I can't afford to spend much money on making what's essentially fancy dress (albeit one that could probably be worn IRL). Would wearing the Zara dress be the sensible, stress and cash free option? I no longer love the print (the colours are a bit dull), and I have nothing to go with it, but the shape is right. It even has a self fabric belt! With a proper petticoat underneath it would be just the job.

But then I am the girl that sews her own clothes, and there will be expectation, by some friends at least, that I will make something. Will I feel a bit rubbish not making something? Does it actually really matter, and am I using this party as an excuse to show off a bit/have my ego stroked ("Wow, did you make that?!")?

Regardless, I have decided to make a fluffy, foofy petticoat. I did find this great tutorial online, which I was going to use, however I popped into Mandors today to pick up some thread and zips and bits and bobs, and got talking to the guy who works there. As a result, I ended up buying 6 metres of off-white tulle as well! He described to me a much simpler and less involved way to make a petticoat, which I'll give a try. I'll let you know how I get on.

Somewhat bizarrely, my parents have been invited to a 50's and 60's inspired party the week following my party. My mum is planning to make a dirndl skirt (so thanks Kathryn, for that link to Gertie's skirt. That will be perfect for her!) to wear with a blouse. It did occur that if I made a petticoat, she could also then borrow it. She's a bit bigger and taller than me, but an elastic or adjustable waistband would make that possible, and better to be too short than too long!

So, what do you think? Do I spend time and money sourcing patterns and fabric and then making a dress AND petticoat, or do I focus on making a petticoat, save myself the time and money by wearing my Zara dress and then crack on with my Peony/those sleeveless blouses and capri pants I've been promising myself all summer? What are your thoughts?

*Lazy sourcing - all photo sources can be found via my 50's Miami Pinterest board, unless otherwise stated.
SHARE:

Thursday 11 July 2013

Is it a refashion? Is it an FO? It's a floral Charlotte save!

Please don't be cross!

Remember my Joan inspired Mad Men Elisalotte dress? This one.


Remember how I wasn't very happy with it? And that the fit is pretty bad on the top half? And the insides are finished terribly? Well, I decided to revisit it. I hauled it out the wardrobe and tried it on. And do you know? It wasn't that bad. For 2 mins and then I started to see all the things that annoyed me about it. I tried to look at it objectively, from the point of view of an innocent, non-sewer bystander, but all I could see was a badly fitting dress. I didn't feel comfortable, or attractive or confident in it. And no one wants to wear anything that makes them feel uncomfortable, unattractive or self concious.

So, I decided to see what I could do to fix it. Um... OK, actually I didn't. Time to be honest. For ages I've fancied a floral print pencil skirt. I Pinned a good few way back in Spring, with the intention of making a floral Charlotte.

 
When I was making my Elisalotte dress, and was fitting the skirt part, I did think "yes, I really need to make this skirt at some point, this is really nice", so being totally honest, as soon as I realised I wasn't happy with the dress, way back in April, and was vaguely thinking about how to fix it, it did occur to me that I could just remove the bodice and add a waistband....


And so I did! It took me 3 evenings. One to unpick the bodice and the zip (unpicking a zip is time consuming!), one to re-install a new, shorter zip and to properly finish the insides with my sewing machine's overlocking stitch, and finally last night to cut and attach the waistband. And I had a shiny new skirt to wear to work today! Which I LOVE!


In all honesty, it still could fit better. The waistband gapes ever so slighly, so it could probably be taken in just at the very top of the skirt, immediately below my waist. Looking at the top photo here, I do look a little straight up and down, but it's still unlikely that I'll do it. It's not hugely obvious and doesn't look daft, and it's probably comfier this way.

I attached poppers to close the waistband, but added a button for decoration. I had planned to do a proper buttonhole, but at the last minute decided poppers might be easier. It also means that if I do decide to change the waistband fit, I can do so fairly easily.


It's not my best invisible zipper ever, and there does seem to be a small gap between the top of the zipper and the bottom of the waistband (you can see it in the top picture here). Not sure why that is. But if someone is looking that closely at that part of me, I have bigger concerns!

Close up of zip closed. You can see it, but I'm not hugely bothered.
Front, flat view
Back, flat view
Better seam finishing on side seams, and hem tape, which I'd already done.
I really love this skirt. I got a few nice compliments about it today too. It is summery, so addresses my summer wardrobe issues, and it might be OK with tights and a darker top when it gets a bit more Autumnal out there. Maybe. My main issue is that the yellow top I'm wearing here, is the only thing I have that actually goes with it. So you know what that means... make more blouses!!!! :)

I did feel slightly like I was letting you all down by doing this, myself included. You really all were so supportive, helpful and complimentary about this dress, and I did feel that maybe I should have pushed myself to make this good, as a learning experience. However, the joy of having a wearable, gorgeous skirt that I love and will actually wear outweighs all of that! I hope you agree?!

Sources for Pinned images: 1. Preen 2. Oasis 3. Stella McCartney
SHARE:

Wednesday 10 July 2013

Hot, hot, hot!

Wow, what gorgeous weather we've been having this week! Sun, sun and… oh, OK then, just a little more sun, please! I am not good in excessive heat, but I am keen to avoid complaining about it because it’ll be over before I know it. It’s so rare to have several consecutive days of such lovely weather, that I will find a way to cope. Thankfully the evenings are cool and our house generally doesn't get much direct sun during the day, so we've had no problems sleeping.


And what a difference it makes to our lives. I feel like I'm on holiday. Meals are eaten outside. I take a lunch-break at work. My mood is just generally better. When it’s warm, my favourite part of the day is first thing in the morning. If it’s warm then, and I'm wearing something summery, it takes me straight back to our family holidays as a child. Pretty much every second year we’d go camping in France (the alternate years, we’d go camping in England). 

Butter wouldn't melt - my sister and I in our tent
Camping obviously meant being out and about in the fresh air first thing in the morning: sauntering to the showers, strolling over to the campsite shop to buy baguettes and croissants, eating said baguettes and croissants (followed by reluctant ambling to the central dishwashing area to help Dad clear up), getting organised for the days’ activities. There is something about the smell and feel and the stillness of the air, early in the morning that is completely different to the rest of the day. Add in some warmth, and I’m straight back in a campsite in the Dordogne eating raspberry jam on baguette, smelling my parent’s coffee, listening to the sounds of the other campers and caravaners starting their day, and very probably fighting with my brother and sister.


Clearly not breakfast, from the bottles of beer on the table
Unfortunately the lovely weather has highlighted some serious gaps in my wardrobe. I have no summer clothes! I have my bird dress, my recent refashioned Venice skirt, one RTW dress* and um… that’s it. Evidenced by the fact that today I am wearing the RTW dress, and it’s the third time I’ve worn it since Saturday!

 *I have just realised that this RTW dress is technically a refashion, so I will blog that some time.


I’m not sure what happened. I used to have a summer wardrobe. But then, I used to go abroad on holiday. I haven’t been abroad for 4 years now. A pregnancy, maternity leave and subsequent limited funds have ensured that. And since then, I’ve changed shape, gained and lost weight, changed my style and my preferences and had some clear outs. As such, I have a few “holiday” skirts that no longer fit me properly and very little else. I do have shorts, which are fine for kicking about the garden, but are far from work appropriate. I do have plenty of summer blouses – my Violet, my Sorbetto, my kimono sleeve linen tee and my pink sleeveless blouse, not to mention other RTW blouses and tops, but I don’t have anything really summery to pair with them! And while we’ve had some lovely “staycation” holidays over the past 4 years, the UK has just not had enough consistent good weather to justify either buying or making summer dresses, skirts or trousers!


There is no shortage of lovely summer appropriate skirt and dress patterns out there to tempt me, but I am conscious I don’t want to spend limited time and money making items that I won’t really wear. My answer? I don’t really have one. I guess it might be sensible to make more dresses and skirts that can cross seasons. My bird dress, which I really must write a post about, is a good example. It’s a light cotton and a bright colour, so definitely works as a summer dress, but it has sleeves and is a colour that doesn’t look daft with tights (with a slip underneath) and a cardigan, and can therefore equally work for a spring/autumn transitional look.  Of course, if I’d stuck to my summer sewing plan, I’d probably have a much larger selection of summer and work appropriate items to wear, but I haven’t. Too many distractions!


Source

Another problem I’ve encountered is with my underwear, specifically bras. I chucked out all my old bras and went shopping for more back in May. I am ashamed to admit that the bras I was wearing up until then were ones I’d bought before I was pregnant (Small Boy is now 3, remember?!). Due to limited funds, and the fact that underwear is so blooming expensive, I bought 3 new bras: one white, one black and one nude. I’ve not really owned nude bras before, mostly because the nude colours on offer were horrible. This one is a nice almost peachy shade and, oh my goodness, it is useful! I rarely wear the white one because it’s just a colour (technically not a colour!) that I wear. The black will get loads of wear once the weather cools down, but the nude just goes with everything summery (all 3 things! :))! Previously I had specific bras bought to wear with specific sheer blouses, or I chose colours that worked well within my wardrobe, or occasionally it just worked by happy co-incidence – a burgundy one went really well with my lace collar pink blouse, for example. But it seems that nude goes with everything vaguely summery, and, as a result I need more!!!


So there you go. My summer wardrobe, or lack thereof, in a nutshell. I’m currently just finishing off a skirt, which I hope to show you soon, which will work for summer. The next project I am planning is a Peony in some fabric that I bought back in February at the quilt show (below), which should make a nice summery dress (although almost definitely won’t work with tights). And I am loving By Hand London’s new dress pattern. I also have a “do” at the end of this month, that I am considering making an outfit for, but that’s a whole other post. Busy, busy, busy!


Fabric to make my Peony

SHARE:
© Grosgrain Green | All rights reserved.
Blogger Template Created by pipdig