Sunday, 6 November 2016

Periodic Table Wall Hanging

In lieu of another sewn thing to show you, I thought I'd share this. I actually don't know what to call it. Picture? Print? Wall hanging? Artwork?


This is actually wrapping paper. I bought it from an independent homewares and gift shop in Edinburgh, called Homer. It cost me £2.50. Pretty expensive for wrapping paper, but I bought it with the idea to put it on the wall, as I loved the retro and nerdy look of the periodic table. It's actually been in the cupboard since about January, because I couldn't figure how out to display it. A frame was going to cost a fortune due to the size. I don't mind paying for a decent frame, but for a £2.50 piece of giftwrap?!


Finally the answer came when in Anthropologie one day. They had these display prints (below), which had a very similar feel to my periodic table. They weren't for sale, but the sales assistant let me take one down to have a look at how they were put together, and to take a couple of pictures.

If I were a proper blogger, I would have taken pictures as I went along, and written a proper tutorial, but I haven't. Instead I can give a very brief description of what I did, which is all you need really. It took me about 15 mins to put together.
What you need:
Your print/giftwrap/poster
Round dowelling - mine was about 6mm diameter. It cost a couple of quid from Homebase.
Small hacksaw, or something to cut the dowelling with.
Fine sandpaper
Pencil
All purpose glue
String

1. Measure the length of the top edge of the print. Decide how much of an overhang you want on either side - I did 3.5cm. Take the measurement of the edge of the print and add your 2 x your overhang measurement.
e.g. print = 70cm + (3.5cm x 2) = 77cm.
2. Using your hacksaw, cut 2 lengths of the dowelling to the above measurement. So, I cut 2 lengths, each 77cm. Gently smooth any rough edges with the sandpaper.
3. Measure in 3.5cm (or your own overhang measurement) from each end of each piece of dowelling and mark with a pencil. This is so that you can easily centre your print on the dowelling.
4. Take the all purpose glue and run a very thin line along the top edge of the print. I did it on the back of the print, but you could do it on the front if you wanted the wood to show.
5. Using your pencil marks as a guide, quickly stick the dowelling onto the glue line. Apply pressure to the dowelling along its length to ensure it's properly stuck all the way along.
6. Leave to dry for a couple of minutes, then repeat steps 4 and 5 for the bottom of the print.
7. Leave for about 10 mins to ensure it's properly dry, then attach string to the top for hanging.
8. Bang in a nail, hang your artwork and admire!!! :)


SHARE:

Saturday, 30 January 2016

Tutorial: How to change your favicon

How to change your what?!

As part of my recent blog renovation, I got a bit obsessed about having my own favicon. A favicon is the little symbol that appears at the beginning of the tab, before the name of a website. You've probably seen them before, but if not, see the photo below.


Of course before I started, I had no idea what this was called, but Google is a wonderful thing. So, favicon apparently means "favourite icon" and it basically acts as an identifier, drawing the internet surfer's eye to the tab containing your website or blog. You will already have one, but it will be Blogger's favicon - that white and orange B you can see above. Actually creating your own in Blogger is quite straightforward. In case you are interested, I thought I'd write a little tutorial. Sorry I can't help out the Wordpress or self-hosted users, but as I said before, Google is a wonderful thing, and at least you now know what to search for. :)

First up, you need to create your image. I chose to use letters for mine. You can use an image, but bear in mind it's going to end up very small, so I'd choose something very simple and clear. The image also needs to be square. I used Picmonkey, a free online photo editing tool, to create my image. Open up Picmonkey and select Design from the top of the page.

This will bring up a square blank page. If it gives you a different shape, don't panic, you'll need to crop your image anyway.

If you want to create an image using letters, select Text from the menu on the left hand side (it's the Tt), then click on Add Text.

This will bring up a text box. Type your text (remember: keep it simple! I'd say 1-2 letters at the most!), and then play around with colours and fonts to get the look you like. I chose a green colour and the font Didact Gothic, as it mirrored the font on my blog theme.


This next step might not be necessary, as you are going to crop the image anyway, but I then made the letters as large as Picmonkey would let me.

If you want to use a photo, or similar image you can still select Design and then just upload your photo/image. The following steps will still apply.

Now crop the image. Go back to the left hand menu and select the Basic Edits (the top one) and then crop. Go to the drop down that says "No fixed proportions", and select "Square", then crop the image as much as possible. You want your letters/picture to fill the image as much as possible.

Once you are happy, click Apply and save the file to your computer.

Now that you have your image, you need to convert this to a favicon file - a .ico file. You can do this through a favicon generator. There are loads online. I used favicon.co.uk.

Select Choose File and then find and select your image. You can select your Favicon size, but I have to confess that I don't really know what size is best. I selected 16 x 16, but not really for any particular reason.

Then click Generate Favicon. Once it's generated, it will give you a preview. If you are happy, download the .ico file and save it to your computer.

Now that you have created your favicon, you need to upload it to your blog!

Open Blogger and go to Layout. You will see there is a box called Favicon at the top left of the page.

Click Edit, then Choose File and upload your favicon. It will display your image. Click Save, then Save Arrangement.

If you now open your blog, you should see the Favicon, and I did read that it can take a while to update, but after a couple of days mine still hadn't uploaded (I didn't intend to leave it that long - I was just busy!). Further Googling revealed this final stage.

Have your blog open. Open another browser page and type the following into the address bar: http://[your blog url]/favicon.ico. Refresh the page and the favicon on this page should update to your image. Return to the your blog and refresh. Your blog should now have your favicon!

Hopefully this will work for you too! Do let me know if you give it a try!


SHARE:

Sunday, 28 June 2015

How to make wrapping paper bunting.

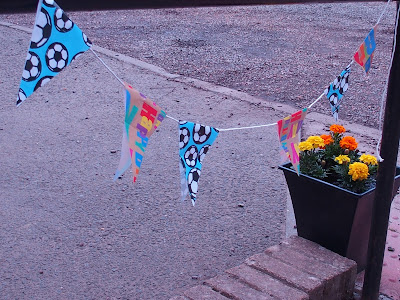
I'm not sure this can really be called a tutorial, but I thought I'd share how I made this for Small Boy's birthday recently.


I didn't come up with the idea myself - I borrowed the construction method from someone else (I saw it at a friend's house) - but I did come up with the idea of using wrapping paper myself. Aren't I a clever girl?

You could absolutely choose any type of paper for this. The inspiration bunting was made from brown parcel paper, and some pink paper that looked to be of equal weight, which were strung onto ribbon. It was far classier, and prettier than my version. But I wanted to make this for a 5 year old, to brighten up the Scout hall where we had his party, so bright, colourful and cheap were the order of the day. You could use wallpaper, coloured paper, newspapers or magazines or even an old telephone directory. Or you could go all Jackson Pollock (or let the kids do it) with some paint and a big roll of white paper.

You will need:

Paper
String, twine, or ribbon
Scissors
Cardboard to use as template (cereal packet will do)
Pen/pencil

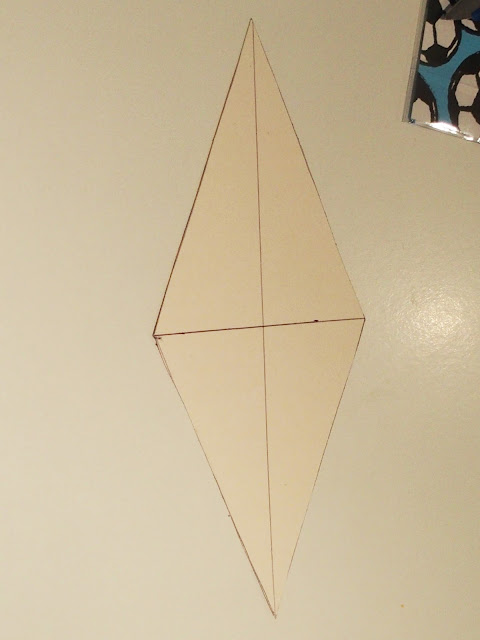
First make your template. Decide how big you want your "flags", or triangles to be, and then draw onto cardboard. Then, along the top of the flag/triangle, draw another triangle, upside down, which should be the same size. So you end up with a diamond shape. My flags were 10cm across, by 13cm in length, so my diamond measured 26cm in length. The width obviously remained 10cm.

This looks assymetric, but that's just the angle I took the photo at.
Use the template to draw round and then cut out lots of diamonds from the paper. I used the wrapping paper that comes folded, with 2 sheets (and gift cards)  in a pack. I got 36 flags from one pack. I also cut it folded once, so I was cutting 2 at a time, much like cutting fabric!


Fold the diamonds in half, creating triangles.


Fold the diamonds/triangles over the string, and then staple in place, spacing the flags as you prefer. I used one staple, but for larger flags, you might want to do two. You can staple the flags to the string, but I stapled to one side of the string, so I could slide the flags up and down as required.


Leave long ends on the string, to tie the bunting up, and then cut string to length.


Hang and enjoy!!!


SHARE:

Wednesday, 31 July 2013

1950's Petticoat - A How To

I don't feel I can really call this a tutorial. To do so would be fraudulent. The tutorial was written by someone else, and I'm just telling you what I did differently!

Apologies for the lack of photos, but due to time constraints when making this, and a certain lack of belief that it would come good, I didn't take any.

First, as Cilla used to say, here's a quick reminder:


The first version I made was a 3m length, double layer of tulle, gathered and attached to the above photographed underskirt at hip level. The reason I didn't like this was because it gave me too much bulk at hip level and more of a straight out and down (square) shape, rather than the desired (and more subtle) shallow inverted triangle shape given in the photo above on the right.

I Googled images of 1950's petticoats and established that they were pretty much all tiered, giving that triangular shape, so I went back to the Sugardale tutorial that I'd originally found. I didn't make her version exactly, but I based mine loosely round hers. I would say her tutorial is actually excellent, but I didn't need (and didn't have the time or the supplies for) the quality of finish she describes. She recommends you read her tutorial in it's entirety before starting. I had to do this a few times to get my head round it, but then I'm not always great with written instructions for practical things.

The first thing I did differently, was to create an underskirt. Tulle is really scratchy against the legs and I wanted this to be comfy. I made the underskirt from some unbleached cotton I had in my stash (£1.75 per metre from Ikea - excellent muslin material). I used the width of my fabric, which was about 150cm. I measured my dress from waist to hem and then cut the same - I obviously wanted the underskirt to be shorter than the dress, however I knew seam allowance and the casing for the elasticated waist would take care of that. So the underskirt is basically a wide tube, with a narrow casing sewn at the top for the elastic (1/4 inch, I think). I didn't finish the edges,  I included the selvedge instead. This is fancy dress, remember! The underskirt sits on  my natural waist. Actually, if you were making this following my instructions (really? you are?), I'd leave the elastic off at this stage and add it at the stage marked below. It will just make things easier.

I then followed Sugardale's tutorial. Not sure of the best way to present my instructions with Sugardale's tutorial, so I'll just tell you what I did differently, referring you to the correct point in her tutorial. Make sense?

STEP 1 Things you will need
1. I used tulle rather than crinoline. Guys, I recommend this. Tulle doesn't fray, which makes life so much easier. Therefore, no Fray check required.
2. I substituted yards for metres (they're not that different). I got confused when cutting my tulle (yes, really), so my bottom tier was only just over 7.5m but I think that was fine (she recommends 8 yds). The middle tier was the recommended 4m.
3. I skipped all the ribbon and twill tape. I didn't have it and it would have taken so much time to apply. If you were making a petticoat you wanted to wear regularly, I'd recommend it. It does look better, and it would probably make it last longer. But for fancy dress/relatively little wear, I think it's fine without.
4. As mentioned above, I did an elastic waist. Quicker, easier and comfier than hook and eye, although not hugely authentic.

STEP 2 Math(s)
As I'd already made the underskirt, I measured that (61cm) and divided it by 3. I didn't actually make the top tier from tulle. I already had the bulk from the underskirt and didn't want any more, so that acted as my top tier. I made my second tier 20cm and my third 25cm. I  kept the bottom tier longer as, due to time, I knew my cutting and stitching wouldn't be hugely accurate and I wanted to include a margin for error, plus a bit for seam allowance. This meant once the underskirt was finished, I hung it from my wardrobe and just trimmed the bottom tier to the same level as the underskirt. Very lazy, but it worked, because TULLE DOESN'T FRAY!!!

STEP 3 Drawing, gluing and cutting
Pretty much as described but without the Fray Check. I also didn't actually mark the fabric with pencil and instead used pins. I don't recommend this route. Pins fall out of tulle and you get wonky cutting lines. Obviously, as stated above, I didn't cut the top tier.

STEP 4 Sewing and finishing the seams
I didn't finish the seams. No need. I used really small seam allowances too, about 0.5cm. Did I mention tulle doesn't fray?
Because I didn't do the top tier, I missed out the bit referring to the opening at the waist.

STEP 5 Basting and gathering
Do what she says! It might seem insignificant at the time, but when it comes to matching the tiers and gathering, it all makes sense and makes it so much easier. I couldn't do this because I pieced bits of tulle together to get my 8 and 4m lengths which just made things more difficult. More difficult is not a good thing at 11pm when you are tired and emotional.
I sewed 2 rows of basting stitches using a 4.5 stitch length. 3 rows would probably be better, if you can face it.
Tip - if you plan to be thorough about removing your basting stitches once the gathers are sewn in place, it might be an idea to put a different coloured thread in your bobbin, to the top of your machine. Because the tulle is basically net, the threads have a habit of pulling through to one side, making gathering more difficult, as it was harder to identify the bobbin thread. For those of you who haven't gathered before, you want to pull on the thread from the bobbin. If it's a different colour, it will be easier to identify.

STEP 6 Finishing the hem
I skipped this.

STEP 7 Gathering each tier to the next
Do what she says again! I did this, but not having evenly spaced side seams made this more difficult, as mentioned above. I skipped the ribbon. After basting 8m of fabric with 2 rows of stitches I was glad to!
What Sugardale doesn't make clear is, when attaching the bottom to the middle tier, whether to attach right sides together, or to lay the top tier (wrong side down) over the right side of the middle tier. I did the latter, as it seemed the intuitive thing to do.
When it came to stage 6 here, I obviously didn't have the top tier. Instead, on my underskirt, I measured 20cm down from the top of the waistband (that being a third of my total length), marked it and stitched the middle tier onto the underskirt at this point. This would have been easier if I hadn't already put the elastic in.

STEP 8 Finishing the top
If you haven't done so already, now insert your elastic, using the usual safety pin method (or something fancier if you have it).
I skipped the ribbon...

STEP 9 Closures
No need! Hurrah! All done!!! Except for that pesky, lazy hem line trimming bit. But you are a neater marker and cutter than I am, so probably don't need to do this.

STEP 10 Look it over
Ah. Yes. There will be a lot of loose ends. You might want to be thorough about removing your basting stitches, particularly if you've used different colours. I just removed the ones that pulled out easily and cut the ends off the rest - ivory thread on ivory tulle is really difficult to unpick. But also really difficult to see!

As you can tell, Sugardale's skirt is a bit fuller looking than mine. Not sure if that's just because I had a bit less than the full 8yds on the bottom tier, or due to the difference between crinoline or tulle, or maybe the ribbon on the bottom adds some structure? Not sure. If you find out, or think you know, feel free to let me know! Either way, I was quite happy with mine.

I hope this all makes sense. If you have any questions, feel free to get in touch. If you do make this, please let me know how you get on!!!!


SHARE:
© Grosgrain Green | All rights reserved.
Blogger Template Created by pipdig