Tuesday, 24 December 2013

Last Minute Christmas Crafting

Hi! A just-in-the-nick-of-time pre-Christmas post to share some last minute crafting that's been going on around here. I decided we needed some Christmas tree bunting, as generally our Christmas decorations are the tree and... well, that's it. With a Small Boy in the house, I am trying to branch out more, and bunting seemed just the ticket. This was a quick and relatively easy make across 2 evenings although it could easily have been one, if I hadn't decided to make 2 at once.


I free handed a Christmas tree shape on paper, traced it onto the back of a cereal packet, cut it out and then drew round it onto my fabric. The fabric was all from my stash - well, some of it was purpose bought about 2 or 3 years ago, but because I didn't make the bunting then, it became part of the stash. The rest was scraps and an old RTW blouse that shrank some time ago.

The only the I had to buy was the green thread! I was in town on Saturday to get my hair cut, so popped into John Lewis to get the that, and while there, the little star shaped buttons caught my eye. It was nearly £6 for the pack, but I think they really make the bunting!
I cut the fabric using pinking shears, placed them wrong sides together and sewed around them. The shape was a bit tricky to sew around, as my machine has a tendency to chew up fabric when I sew very close to the edge, and some of the lighter fabrics suffered more from this than the others. As a result the seam allowance is a bit wobbly and inconsistent to say the least! But I say just don't look too closely! I originally cut 9 trees for each string of bunting, as I like odd numbers, but I didn't have enough bias binding, so this was reduced to 8. Luckily I only had 8 different fabrics so was going to repeat one, so no fabric was made to feel left out!


The second strand was a present for my sister and her family. it's exactly the same as this one, but the trees are in a different order. They recently completed an extension to the back of their house, so it was a Christmas themed extension warming present! One which she will probably not want to put up because she won't want pin marks in her freshly plastered and painted walls!


I love ours. It honestly gives me real pleasure every time I see it! Daft, but true! That's Christmas for you!


The fireplace, "dressed" for Christmas. All artwork by Small Boy. The thing that looks like a tissue is actually the reindeer dust (see below). The random jar on the mantelpiece is a home made snow globe. 

So I think we are now all organised for Christmas. The Small Boy has done his shouting up the chimney (a family tradition from our side - you shout up the chimney, rather than write a letter, to ask Santa to bring you what you want), we've sprinkled "reindeer dust" (a nursery invension: oats mixed with glitter) on the fireplace and in the garden, where it will surely have blown away already, and the mince pie and brandy (lucky Santa Claus) and carrot have been left out! All that is left is for me to post this, finish making the truffles that are currently cooling in the fridge, wrap one more present and then chill!


Shouting up the chimney

Snacks for Santa and Rudolf 
This will probably be my last post for a couple of weeks, so I'll take the opportunity to wish you all a very Merry Christmas and a Happy New Year, when it comes! Have a good one! X
SHARE:

Wednesday, 11 December 2013

Completed: Sequin Scout

Generally this is how Christmas pans out for me. October: “too early for Christmas”. November: “ too early for Christmas”. December: PANIC! I have nothing bought. No cards, no presents, no paper, no advent calendar, no ribbons, no tree, no party outfit… For some reason this year I was quite organised on the paper, cards, advent calendar and even some of the presents. Not so on the party outfit. Particularly given my Xmas nights out this year are early – 5th and 7th! And this year was made doubly hard in that I can’t just rely on some old thing to wear, because it will not fit me! I’m now in that hinterland of looking like I’ve eaten a few too many pies. That stage where people are scared to ask, for fear of offending! Not big enough to justify maternity wear, just big enough to have outgrown “normal” clothes. My original plan of a chiffon zinnia went out the window a long time ago.
I have been mildly obsessed with sequin tees (and skirts and even trousers) since last Christmas, when I saw one (I think, in Topshop), didn’t buy it, then couldn’t find it when I decided it might be nice after all. I did a bit of searching around, at the time, but then decided on some other party outfit. But since then I’ve been collecting sequin images on Pinterest. I wasn't going to, and couldn't afford to spend around £70 to £100 plus on one, so making one seemed the obvious solution!
I couldn’t get the fabric I really wanted in a local shop and I didn’t have time to shop around, or to order online (although I did come across this website, which might prove useful in future). What I really wanted was what Danielle just used for her sequin skirt. A fabric well-covered in matt sequins in either a copper colour, or navy. Particular inspiration was these:
Source
Source
The Cloth Shop only had black, which I didn’t want. John Lewis only had the fabric that I bought. It was labelled as gold, but it looks more silver. The sequins themselves are small and quite sparse – they don’t overlap at all. I thought this might work in my favour in terms of ease of sewing, and I was probably right, however in the cold light of day and now made up, it does look quite cheap. Which is annoying considering it cost me £23 for 1.3 metres!  

I didn’t have much to go on for working with this fabric. The lady in John Lewis told me that might break my machine and that I should hand sew it all. And obviously not to go near it with an iron. It wasn’t the normal JL lady that I know and trust, so I chose to ignore her advice and went with machine stitching, very slowly, with a longer stitch (3.5, the default is 2.5) and a very sharp needle. This worked a treat. I got a small amount of puckering on the side seams, but this pressed out OK. Yes, I pressed it! I used my iron’s lowest possible setting, and in lieu of a organza pressing cloth, used an old baby’s muslin. I also only pressed the wrong side, just in case. The sequins are sewn onto a poly chiffon, which gives the fabric a lovely drape, but the sequins themselves add body, making it relatively easy to handle and sew. What was particularly nice was that with right sides together, the sequins provided traction, meaning the 2 layers didn’t slip about at all. Particularly handy since pins refused to stay in place!
I went with the Grainline Studios’ Scout as I know it and like it and it has so few seams. I thought the fewer seams the better. I used a silvery-grey poly lining fabric scrap from my stash, in place of self-bias binding, and at the last minute decided to show the bias, rather than only using it as a facing. This works reasonably well, but if I’d thought about it in advance I would have bought something of better quality, and would have made the bias binding wider. Still, it gives a nice subtle contrast. I had wanted to raise the neckline on this version, but I forgot when cutting it out, so it remains loyal to the pattern. Although bizarrely it seems to sit lower and wider than my previous Scouts. I left the pattern as is - without removing any width - to accommodate the small bump. Again in hindsight, I should have added some length, but it works fine as is. And here it is:

I did read Heather Lou from Closet Case Files’ recent post on sewing with sequins. Her advice was to remove sleeve ease, because gathered sequins look like “disco barf”. Having no great desire to find out what “disco barf” looks like, I followed her advice, and the tutorial she used. This worked well. I am always scared of any pattern alterations as it involves maths and rulers and looks too complicated. But this took me 20 mins tops! Super easy. It was still a little big, but again, I followed her instructions to remove the remaining excess, which also worked fine.
The sleeve and bodice hem are sewn by hand, as was the bias binding. I didn't remove any sequins in the seam allowance, but the seams sit just fine, albeit they are a little bulky. A blessing again of the sparsity of the sequins. The insides were finished by overlocker. Wait? What? Oh, yes, I forgot to tell some of you that Santa has been early to my house, via Lidl, and I am now the proud possessor of a Singer 14SH754 overlocker! It’s good. I like it, but am still getting used to it. It took me an hour to change thread colour to make this blouse! But I will write another post on this at a later date.
Some more photos:


Excuse the background, which is dead herbs against our neighbour's extension wall. My usual garden backdrop wasn't an option because our fence blew down in the gales last week. I hope my poor climbing rose has survived!
The blouse wasn't finished on time for Thursday, but, after frantically handsewing the hem at 6pm on Saturday night, it was for my night out then: dinner at Harvey Nichols with my antenatal group. I wore it with maternity leggings (thick, ponte ones) and gold heels. My friend, Jo, something of a fashion expert and a very classy dresser, proclaimed that my top looked like it was "from French Connection and cost £100". That made me very happy! :) Clearly it does not actually look cheap!
In other news, it was my birthday on Monday. I turned 39! I have been reading with some interest, Roobedoo's "49 before 50" series of posts, as she has recently entered her 50th year. I vaguely toyed with the idea of something similar, before realising that pregnancy, recruiting my mat cover, giving birth, breast feeding, coping with no sleep, juggling a baby and a toddler and finally weaning, was probably enough to be getting on with for next year!  Although to them, I might add: becoming less scared of proficient on my overlocker, continuing to sew as often as possible, and attending my first blogger meet up (February, in Glasgow. Sooo excited!).
I received some lovely gifts including a gift voucher for one of my favourite independent Edinburgh shops, Curiouser & Curiouser from P, The Great British Sewing Bee book from my sister and Megan Nielsen's Ruched Maternity Tee pattern from my mum. The GBSB book has some lovely patterns, and I can see myself making a few of them further down the line. I don't see the point in going crazy for specific maternity patterns - the finished makes have too short a shelf life - but I thought this would be a good basic shape on which to base a few mods. It will also give me good practise on knits and the overlocker!
So that's me for now. Are any of you sewing Christmas party outfits? If so, what are you sewing? 
SHARE:

Friday, 22 November 2013

Refashion: Skater Dress

This can't really be called a refashion. The dress was merely toyed with!


I was given this dress by a girl at work. Somewhat bizarrely I thought. Apparently it didn't fit her and she thought it might fit me, which was lovely of her, but it still had the tags on, so presumably she could have returned it!? Anyway I am not one to turn down free clothes, especially pretty ones, and after offering payment and all sort of other compensation to her, I graciously accepted it FOC.


It's a simple skater style dress from Boohoo.com, in polyester. Not my favourite fabric, but I repeat: free dress. It's labelled as a size 12, but seeing as it fits me fine, and I'm normally a 8 or a 10, I think it was labelled wrongly - proven by the fact that the tag called it a "Peter Pan Collar Skater Dress". I am no expert but I don't see any collar, peter pan or otherwise. You get what you pay for! 


As I said the dress pretty much fits well, but the sleeves which were 3/4 length, were ridiculously tight. So tight in fact that I could only just get my arm in there, and once it I couldn't raise it to do up the zip at the back. I managed to get P to zip me into it to check the rest of it was OK. It was. So I cut 9cm off the sleeves, took up a narrow hem and err... that was it. Told you it wasn't much of a refashion. But the result is a dress I can now wear. To be honest, the sleeves are still very tight, and I suspect they won't tolerate a lot of movement - so not one to wear while doing yoga, gardening or cleaning the house - but it should be able to cope with a day at the desk. I could have shortened the sleeves further, but liked the elbow length for winter, even though it will almost pretty much always be covered by a cardigan. I can always shorten or even remove the sleeves in future.

Tights!
As my tummy is already expanding, this dress won't fit for long, but it will be a nice addition to my autumn/winter wardrobe for however long it does fit!
SHARE:

Wednesday, 20 November 2013

Completed: Another Scout!

Firstly, thank you all so much for your lovely comments on my last post! So sweet! :)

And now on to another make. This has been a long time coming. I started it over a month ago, and it should have been a very easy, quick and straightforward make. Yes, it was relatively easy and straightforward, but early stage pregnancy exhaustion, plus my forcing myself to do my "best sewing" meant it was anything but quick. Hey ho, that's how life is at the moment.


This blouse was ripped off from inspired by this blouse I have had Pinned for a while, by Chinti and Parker (it's no longer available) which I thought was really pretty and looked very much like Grainline Studio's Scout Woven Tee, with a couple of variations.

Source: Chinti and Parker
Actually, I have only just realised that I forgot about the pocket!!! Doesn't matter. The bit I was most interested in was the ruffle at the back. I am not a huge fan of ruffles and flounces on myself. I find they just get in the way of life, but I do like a bit of added interest, particularly on the back of a garment. And this is not too ruffley.

Back in the summer, I bought a beautiful silky cotton voile in this delicious berry colour from The Village Haberdashery. I managed to snaffle the last 2 and a bit metres, so it's no longer available. At the time I really swithered* between the berry and this pumpkin colour which is still available, but in the end I felt the berry would suit me better. How gorgeous is the pumpkin though? I may still need to purchase some of that! I wasn't too bothered about the pink or the white of the original inspriration garment. I don't really wear either of those colours, particularly not white. And it's just as well, seeing as this garment never made it to fruition until November!

The make, as I said, was really straightforward. I decided to omit the back seam on the original because I didn't need it, so it was just the ruffle. On the inspiration picture, it looks like the ruffle starts at the model's natural waist, so using my back neck to waist measurement, I measured the pattern piece, remembering to factor in seam allowance at the neck and to add seam allowance at the waist. I then cut the pattern piece straight across at this point. For me, this ended up coincidentally being right on the shorten/lengthen line!


I cut the top back bodice piece, and the rest of the pattern pieces, as normal. For the ruffle, I used the bottom back bodice piece as a guide for shape, but I widened it (horizontally across the width of my back). Initially I increased the width by 1.5 times, as I wasn't sure how much volume I wanted it to have. I gathered the piece and pinned it to the top back bodice piece, but there was too much volume for my liking, and compared to the Chinti and Parker version, so I reduced it until it looked about right for me. I didn't measure it, or take pictures of this stage, sorry, as I was at my sewing class and I just didn't think. I tried to keep the curved shape of the bottom of this pattern piece on the extended piece, and of course I added seam allowance at the top.

The side seams, underarm seams and the ruffle seam (attaching it to the back bodice piece) are all French seamed. Before I attached the sleeves, I tried it on and decided it was too volumey. The fabric is lovely and silky, but it's not overly drapey, so it stood away from me and looked really boxy. So in the end I took it in at the sides. This meant unpicking and re-doing those lovely French seams, which was annoying, but worth it. I took the sides in 3cm (about 1.25 inches) at the bottom, tapering this out to nothing at the bottom of the armhole. It hasn't taken loads off, but it hangs a bit more nicely now.

Was quite obviously taking these photos myself, hence lack of head!
In the end, looking at the finished garment, the ruffle is about 1.5 inches wider than the pattern piece. Adding 1.25 inches back onto that (that I removed for fit) means my ruffle was probably 2.75 inches (or about 7cm) wider than the pattern piece originally (once I had adjusted it to my preference). Hope that makes sense?

The sleeve seams were finished using my machine's overlock stitch. All fairly standard for me.

When I came to finish the neckline, I realised I had either failed to read, or failed to understand the instructions for my first Scout. For that one I enclosed the neckline in the bias binding, but this time I realised the bias binding was to be used as a facing. Both work, and actually I think I might prefer the exposed bias binding as a finish, given you end up with a topstitch around the neck anyway.


I am really happy with this blouse, it's exactly what I was hoping to make (minus the forgotten pocket). The voile is a little sheer but I can wear a pale bra underneath without it being seen. Plus for autumn/winter I have a couple of cardigans that go with it. I'm preferring a cropped cardi with it though, just so you can see the ruffle a bit more! It's great with black trousers for work, or with jeans and boots at the weekend, so it really is very versatile. Jenny  from Bobbins and Whimsy would be proud!

Because this is still a roomy style, I think it will do me for a good few months of pregnancy, with a bump band or cami underneath once it starts to become a bit too short. And it's worth bearing in mind that another version of the Scout, without the fit adjustment and with added length could be a good maternity option for later too.


* Spell check doesn't like "swithered", so I'm wondering if this is perhaps just a British, or possibly even Scottish, word. If so, to "swither" means to be indecisive. Then again, it might be a normal word that everyone uses. After all, spell check doesn't like the word "blog"...
SHARE:

Wednesday, 9 October 2013

Completed: Small Girl Dress - Selfless Sewing!

I actually finished this before my Fall for Cotton blouse, but didn't get round to posting it at the time. This one was a little longer in the making. Other than my sew-fest the other Friday, I've been really only sewing at my class for a couple of hours a week recently. But this was enough to have managed to complete this dress for my niece's birthday at the end of September.

I made Butterick B4176, and yes, again I made it in Liberty Tana Lawn. This is becoming a bit of an obsession.


I made view B, which is the pink dress above with the cap sleeves.


 Isn't it cute?! As the tana lawn is fairly lightweight and we are headed into autumn, I underlined it with black cotton voile. Black wasn't my preferred choice, but it was all they had and actually it looks OK now that it's made up. The double layer of fabric made the pleats a bit bulky but with a bit of pressing and some steam they flattened themselves down and behaved nicely.


As you can see, I used little turquoise buttons - those at the front are decorative and there is one with a fabric loop, made from bias binding, for fastening at the back neck. The pattern suggested a thread loop but I felt that would be too fiddly when trying to get a wriggly 2 year old dressed in the morning.


The dress was really straightforward in it's construction. Nothing difficult at all. I French seamed the insides, and overlock stitched the sleeves. I hand stitched the hem and also the turned back seams at the back opening.  The neckline is faced with bias binding and the sleeves finished with a turned up seam encasing elastic. This part proved problematic, as the pattern instructions called for me to measure the arm to gauge the length of elastic required. Straightforward yes, but not if you are making this dress as a surprise! Small Boy was called into action as a stand in. Although he is over a year older, I figured their arms wouldn't be too different, and I was right!

The buttons were flat, but I decided to give the one at the back a thread shank, just to help with looping that fabric loop over. I hadn't done this before, but found a kirby grip (bobby pin?) a great help!


 As this wasn't for me, I took extra care - why do we do that? Are we not good enough for our "best" sewing? - and as a result am really pleased with the dress. Unfortunately I kind of usurped Gran's present! My niece arrived at my parents (same day as I wore my Fall for Cotton blouse) wearing her present from Gran - a lovely Boden dress - which lasted until we arrived, our present was opened and Auntie Helen's dress was duly tried on. And stayed on for the rest of the day! So, obviously it was a success!

So, making small clothes versus making adult clothes? Less fabric is nice. It was cheaper (I only used about 70cm of each fabric), and I was able to cut it out on the table, instead of the floor, which was wonderful. It was quicker to make due the smaller seams. But on the downside, it was more fiddly. I found setting the sleeves in much harder because there was less room to manoeuvre. The pattern had me set in the sleeves last, but if I were to make this again, I would leave the back seam to last. I think this would make setting the sleeves that bit easier.

As a parting shot, here is the little lady herself, modelling it.


SHARE:

Monday, 30 September 2013

Completed: Fall For Cotton Vintage Blouse

I am just scraping in at the finishing line here, but I have managed to complete my Fall for Cotton challenge, just in the nick of time. I actually finished the blouse on Saturday morning, but this is the first chance I've had to blog about it. And what good is it if I've finished it on time, but then don't post on time?


So, quick reminder: Fall for Cotton is a challenge hosted by Rochelle, of Lucky Lucille, and Tash of By Gum By Golly. The rules are simple: sew a Fall (Autumn) appropriate garment from a vintage or reproduction pattern during the month of September, to be made in 100% cotton fabric.

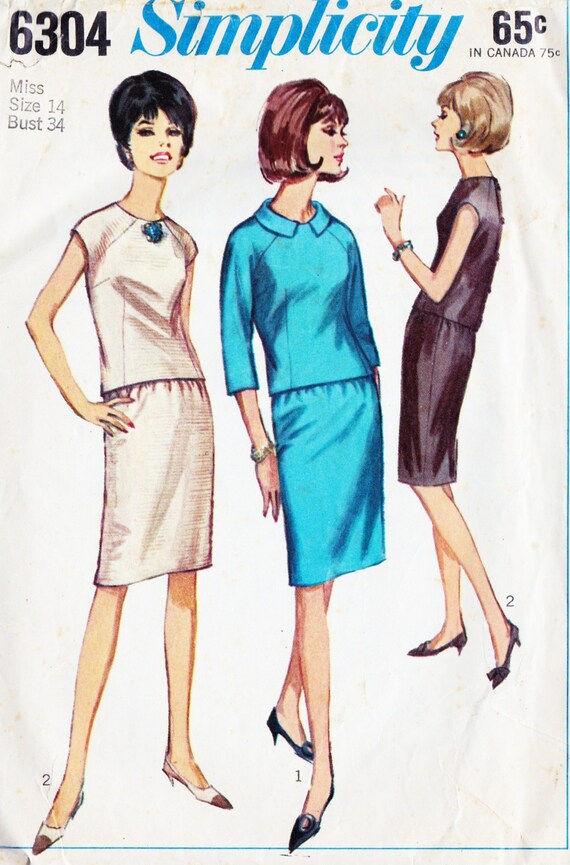
Both hosts favour 1940's as their vintage era of choice. I went for something a little later - mid 1960's - with Simplicity 6304.

I opted to make the blouse in view 2, with no collar and short sleeves, and I made it from Liberty Tana Lawn.

This was my first ever vintage pattern, and I found it, on the whole, very easy and straightforward. I was on holiday on Friday, so started this at about 1pm that day, thinking there was little chance I'd get it finished on time, but it sewed up really quickly, and I finished it on Saturday morning. It probably helped that I didn't muslin it. Bad, I know, but I just couldn't be bothered. I did a tissue fit of sorts. Well, I held the bodice pattern piece up to my torso in front of the mirror, established that the bust darts looked OK but that the waist darts looked a bit long, and then just winged it from there.

Apologies for the creasing - this was after a day's wear, and a big lunch!
As you can see the fit isn't perfect. I shortened the waist darts, but they seem to have somehow turned into release pleats, which is fine, but I'm not sure that it looks the most flattering here - my bust looks a little odd!. It's a little short for my liking, especially to wear with jeans, but it will probably work OK teamed with a more high-waisted bottom half, as it's designed to be worn.


I used covered buttons at the back. The first time I've ever used them and I like the effect. They are not the neatest, and I'm unsure how many turns in the washing machine they will withstand, but they look nice for now. Also, because they are shank buttons, I have to be careful where I sit, otherwise they dig in a bit!


It's a little roomy at the waist, and could probably do with being taken in a little here. This is not the most flattering view.

The fabric feels a little stiff and as you can see is a nightmare for creasing. Strange, because this is not my experience with Liberty tana lawn previously. I stupidly forgot to pre-wash the fabric, so hopefully it will soften up over time. And not shrink!

As I said the construction was fairly straightforward. The only things I didn't like were the sleeve facings. I wasn't sure they were necessary and because this is a raglan sleeve design, there are already 3 seams meeting at the underarm, which causes quite a bit of bulk. Adding a facing here, creates even more bulk, introducing a fourth seam in the same place. It's really messy here as a result. If I were to make this again, I would omit the facing and either use bias binding, or would just add a little length and turn it up. I'm not sure a facing here adds anything, other than time and frustration!

You can't see it in my photos, but the fabric is not a solid colour. Rather it's a repeat pattern of 2 heads kissing:


I like the fact that the fabric is not just plain, but because it's not a very obvious print, it will go with a number of things. Hopefully!

I have no pics of the guts, but insides are either overlock stitched or pinked.

So in summary, this is not my favourite blouse ever, but I do like it and I will get some wear out of it. And I am glad I managed to finish it on time. And it's proven to me that vintage patterns are not scary - not sure why I thought they were, but I did! Just as well I've got over that fear, because I am planning a coat this winter from another 1960's pattern. Watch this space!

A final photo just to show you it is autumn appropriate, with a cardigan!
These photos were taken at my Mum and Dad's this weekend. My brother was up from London, so we were all over for a family lunch. And yes, we were sitting outside, in Scotland, at the end of September. It was glorious, and doesn't my Mum's garden look amazing?


SHARE:

Friday, 6 September 2013

Completed: Silk Scout!

I finished it. And I LOVE it! Why did it take me so long to buy this pattern?

I bought the pattern and ordered fabric online, intending to make a different version, but then remembered about this fabric in my stash. 

Strange light in the garden that evening - last days of summer!
I originally bought 1.5m of this silk, from John Lewis, intending to make a Colette Violet blouse, however after I brought it home, I realised it had a sort of scallop pattern in amongst the ditsy floral print. I love the scallop, and I decided I didn't want to break it up with a button placket - or have to pattern match it, as I didn't have enough fabric for that, so it joined my stash. For a while it was going to be a short sleeved Mathilde, til I realised I probably didn't really have enough and that the pintucks would still break it up. Then, I bought the Scout pattern, and had the brainwave! 

This pattern is perfect for the fabric. No darts, no seams other than side seams. There is nothing to break up the fabric. It would be great for a large scale print. Plus it's a simple straightforward pattern for a troublesome fabric.

On the whole the fabric wasn't actually too bad, and it certainly wouldn't put me off silk in future, but it was more tricky than I have experienced previously. The fabric did seem to become harder to handle after I pre-washed it, which makes it lovely and drapey to wear but tricky to sew. The main issues were that it moved when I cut it, pins fell out all the time and it was really hard to press.

You can best see the print here
The fact that it moved during cutting out was probably the most frustrating piece about the whole thing and almost certainly the cause of most of my issues. The hemming issue I had originally is better now, but not perfect, and the neckline doesn't sit quite straight. I think both these issues are caused by the fabric slipping while cutting and therefore one side is not cut perfectly on grain. It's not massively off, but it probably shows why these things are important.

I french seamed the side seams and used my overlock stitch on the armholes, which is fairly standard for me these days. The bias binding is machined down as are the sleeve and bottom hem. Although this is fancy silk, it's a casual shape and I felt that machine stitching added to that casual feel. That's my excuse.

This was after a day's wear, hence the creases.
I cut the size 4, which matched my bust and hip measurements perfectly When I made the muslin, I had some excess fabric at the shoulder/upper bust area, just next to the sleeve. I also felt it was a bit loose below the bust, so I took out about 0.5cm all the way down from the shoulder to the hem. This felt fine on the muslin, but on the finished garment it feels a little tight now across the upper back and at the bottom front of the armhole. I'm not sure if the armhole issue is related to the adjustment or whether this is a separate issue. At first it annoyed  me, but having worn the blouse for a whole day, I found it actually didn't bother me that much. For my next version, I may try just taking the excess from the shoulder and leaving the rest. Anyone have any other suggestions?

I love this blouse already. It does feel a little summery, but it will work well under a cardigan, so I will probably get quite a bit of wear out of this.

I have grand plans for this little pattern. I already have 2 pattern hack ideas, one based on the original RTW inspiration:

Chinti & Parker Voile tee - no longer for sale

and the other based on another pattern. That might be a bit awful considering it's another Indie pattern company, but I'm not sure I can justify the purchase of both, if I can do it myself. IF I can do it myself, that is.
Sinbad & Sailor Dove Tee
I do realise both of these are quite summery, considering we're into autumn, it was 10°C today and I have 2 other things to make before I even get started on these. They might end up not happening til next summer now, but that's OK.

So, there we go. Next up, my niece's dress and Fall for Cotton!
SHARE:

Saturday, 17 August 2013

Completed: Green Graphic Print Peony

Colette's Peony was the first independent pattern I ever encountered. I found a reference to it on online, followed the link which took me to Colette's site, and the worlds of independent pattern makers and sewing blogs. And yet as much as I loved the pattern, I didn't buy it. Instead I bought the Rooibos (still to be made) and the Violet (only made once). And of course I've made a Sorbetto (not blogged) and my Laurel.

I know enough now from experience, and from others' blogs, to recognise that the fit on Colette patterns can be a bit of a challenge. And although I was mentally prepared for this, my Peony was no exception.


I cut a size 4 and made a muslin of the bodice, plus sleeves. The waist darts were very odd, giving me lots of excess fabric at the bust. I moved these out (towards the sides) by about 1.75cm and also reduced the height (length?) by about 3.5cm. The bust darts seemed OK on the muslin but now that the garment is finished I think they are ever so slightly too high (probably about 0.5cm ) - this is unusual because previously on a size 4 in Colette the bust darts have always been too low - and also, I think too long. If they were at the right height, they'd go right to the nipple (sorry, "apex"), and I'm not convinced they should? Am I wrong about that?

I tapered the back seam in at the back neck - I can't remember the measurements but have adjusted my pattern piece for future reference. I did similar with my Laurel. I thought the bodice was too long, so added 1.5cm to the length, which I then had to remove on the finished garment. Clearly my long torso issue is completely imagined because this is the second time I have done this. I added 3cm to the skirt, which made the skirt sit right on my knee, which I quite like.
Please ignore the giant crease just above my waist. It sits fine in real life, honest!
I duly sewed up the dress, which went together very easily. I French seamed the bodice, used my overlock stitch on the arm holes and the waist and pinked the rest. I would have French seamed the skirt but I couldn't figure out how to do to that AND incorporate the in seam pockets. This is the first time I've pinked seam allowances. It appears to work for Roisin, so I thought I'd give it a go. Plus I didn't really have enough thread to overlock everything (and, gosh, it's boring to do!).
A seam "junction" showcasing 3 types of finish. I'll come to the elastic in a bit...
The bodice and sleeves went together and I started to add the skirt to the bodice. The skirt has 2 little areas of gathers on the front waist and the instructions have you gather these to fit the bodice. I did this, but the skirt didn't really need any gathering to fit. Strange, I thought. I sewed the skirt to bodice and tried it on. Too big! Like several inches too big! I went back to the pattern pieces and realised that when I'd moved the waist darts, I'd inadvertently reduced the width - however this wasn't the whole reason. I measured the original pattern pieces and it appears there is a whole lot of ease in there. With the help of my sewing teacher, we re-looked at it - trying to fix it without having to unpick too much. I unpicked the waist seam and looked at the bodice. We added more width to the waist darts and used a 2cm seam allowance at the back seam.

Now, the problem with my sewing class is that there aren't any full length mirrors, so I was reliant on my teacher telling me what looked OK, and me determining what felt OK. My teacher reckoned it all looked fine, so off I went to make the amendments, sewing skirt back on to bodice and inserting the zip - this time, there was more gathering required, which made me feel a bit better. I finished the zip off at home and then tried it on again... and it was still too big! By now I was starting to get frustrated. I had just inserted my BEST EVER concealed zip and really didn't want to have to unpick it, or anything else. Then I remembered a post I'd read the previous week by Ami of The Little Tailoress, where she used shirring to add waist definition to a boxy playsuit. I didn't have any shirring elastic, but I did have some 1/4 inch elastic leftover from my 50's petticoat. So, using a 3-stage zig zag stitch, and stretching the elastic as I went, I sewed the elastic onto the seam allowance at the waist, starting as close as I could to the zip, and basically sewing a bit, trying on, sewing a bit and trying on again until I was happy. In the end, I used about 11cm of elastic on each side.
Yes, I am aware that on one side my seam allowance is pressed up and on the other it's pressed down - the right side got caught when I inserted my zip, and as I said, I have no intention of unpicking this zip!
This worked a treat! The fit is perfect now, and the elastic makes the skirt very comfortable. It accommodated last night's dinner very well! It does have it's drawbacks - the side seams are now pulled backwards and this makes it a bit trickier to access the pockets, but it's saved a lot of unpicking, which I am pleased about!
Can you see the concealed zip? Thought not!
You can see here that the side seams are pulled towards the back.
And here
I am really happy with this dress. The fabric is lightweight quilting cotton, bought at The Quilt Show back in February. I love the colour and the retro graphic print. The shape of the bodice is really flattering, once you get the fit sorted. I love a boat neck: it's my favourite neck shape. The bodice would look lovely with a number of different skirt variations - I fancy a half circle skirt next, in a slightly drapier fabric.


You can see here that the neckline gapes a bit at the front. I'm not too sure what to do to improve this. I could obviously add some pleats next time, but if I wanted to keep the neck simple, how do I remove this excess? Any ideas? If I get the bust darts positioned correctly, is it possible to rotate this out from the neckline and into the bust dart?

I wore this dress yesterday. P and I took the day off, put the Small Boy in nursery (followed by a sleep over at Gran and Grandad's), and did some Festival stuff. In August, Edinburgh's population swells to what feels like 100 times the norm, as the whole world flocks to the Edinburgh International Festival, the Fringe Festival, the Book Festival and so on and so on. Some locals hate it, and avoid town at all costs, but I love it. Although I'm not from Edinburgh, I grew up about 20 miles away and my mum always made a point of taking us to something every year - even if it was just to see the free street performers. At this time of year, Edinburgh feels so cosmopolitan. Some of the main roads are closed to accommodate temporary venues, meaning cafes and bars can spill out onto the street (weather permitting). The whole place just feels like it's on holiday. Yes it's an absolute nightmare if you are in a rush, and if you want to park your car, forget it, but give yourself plenty of time, take the bus and it's cool. Yesterday we wandered into town about 3ish, took in the Man Ray exhibition at the Portrait Gallery, followed by drinks outside the Udderbelly, Sean Hughes at the Gilded Balloon, and finally dinner at Spoon. We've taken Monday off too, and we are taking Small Boy to see Tiddler and then to see the street performers. For his birthday I got him this book, which features street performers (number 7, I believe), so he is keen to see them IRL. Last year I took him to see Hairy Maclary, and he enjoyed it so much, he demanded "again" at the end of it. And then cried for a full half hour when I couldn't make it come on again!

Deformed foot and an interesting hat. Also, some very pretty verbena bonariensis in St Andrews Square. All the cool bloggers are featuring verbena bonariensis these days... just check out Roobeedoo!
So, overall, I am delighted with this dress! Yes the fit was a challenge and there are further improvements to be made, but I feel like I have learnt something in the process. There will be future versions of this dress. A lovely wool version, with 3/4 sleeves would be lovely for winter. And the aforementioned half circle skirt version will no doubt make an appearance too.

If anyone has any solutions or suggestions on how to resolve these fit issues, they would be gratefully received!

Next up, a Scout woven tee!
SHARE:
© Grosgrain Green | All rights reserved.
Blogger Template Created by pipdig