Thursday, 30 April 2015

Completed: Kit the Boy Doll/SHB Sewalong

Gah, I'm slightly panic blogging here, desperately trying to get this in for the end of April deadline for SHB Sewalong.

Cutest sewalong badge ever!
So, the SHB Sewalong (SHB = Small Human Being = infant) has been hosted by Cation Designs, amongst others. The premise is simple: during April sew something for your wee one. The only rule being the little one has to be 1 at the very most. Still in utero is fine! I am literally scraping this make in in 2 senses: 1, I only just finished it before the deadline and 2, Baby Boy is only under 1 for another week.

Hey, there!
This project is pure nostalgia for me. The doll is a boy doll kit, from Clothkits. My mum was a big fan of Clothkits in the 70s and 80s so my sister and I were often decked out in their stuff, and we owned several of the ragdolls. If you're not familiar, the company sells kits to sew stuff*. Human clothes and rag dolls. The pattern is printed directly onto the fabric, so you just cut round the pieces and sew them together. I really, really wish I'd had the foresight to have some photos to show you of me in Clothkits garments, or even just with the dolls, but I'm not that organised. Next time I'm at my parents' I will see if we can dig any out and I'll do a follow up post.

* They also sell fabric and patterns.
Kit's body comes pre-printed with pants and vest, socks and shoes.
In 2008 Clothkits was resurrected and I seem to be on their mailing list for some reason. I recently received an email with an offer on the ragdoll kits. Cue trip down memory lane, and an impulse buy of boy doll kit, called, approriately, Kit. Boys can play with dolls too, right?

I decided to make this for Baby Boy's birthday, as I thought it would get more mileage that way. Small Boy definitely has designs on him, but since he (Small Boy, not Kit) starts school this year I thought he might grow out of dolls sooner. Either way, both will enjoy playing with him for a while.

The kit came with thread, shirring elastic, poppers and the preprinted fabric which makes the doll, jeans, shirt, waistcoat, pyjamas, hat and bag. All in the most fantastical 70's prints you have ever seen. So far I've made the jeans, shirt and waistcoat. I didn't have time to finish all the garments.


Pre-printed fabric

Helpful labelling included.
The instructions were... variable. Some were really clear, others clear as mud. Even with (handdrawn) diagrams, it wasn't always obvious what they wanted you to do. However, I changed the construction on a few things anyway to make things simpler. For example, the instructions have you handsewing on the legs and to close the body. I machine sewed these, which admittedly doesn't give such a good finish, but I think it will be sturdier. With the clothes, they instructed you hem in the round, which I think would have been tremendously fiddly, so I just hemmed everything flat to start with. And speaking of hems - they ask you to turn 0.25cm, then another 0.25cm to hem. Seriously? Er, no thanks. I overlocked the raw edges to an approx 0.5cm seam allowance and turned once.

70's digital watch included as standard.
In the jeans I used 1/4" elastic from my stash rather than shirring elastic, which seemed faffy. I used a 3 step zigzag to attach it to the wrong side. And on the shirt I used velcro rather than the given poppers, as it will be much simpler for little fingers. Annoyingly I only had black velcro on hand.


I love the detail they've included.
Shoes are so cute!
So, this is absolutely not my best sewing, but it's absolutely passable for children. I enjoyed sewing it, but sewing dolls and their clothing is not something I want to do too often. That said, it did occur to me it might be nice to make him something a bit more modern: a t-shirt and sweatshirt maybe? As Kerry said on Instagram, it's a good way to use up scraps. So, you never know. There might be more doll sewing on the horizon!!!
SHARE:

Monday, 30 September 2013

Completed: Fall For Cotton Vintage Blouse

I am just scraping in at the finishing line here, but I have managed to complete my Fall for Cotton challenge, just in the nick of time. I actually finished the blouse on Saturday morning, but this is the first chance I've had to blog about it. And what good is it if I've finished it on time, but then don't post on time?


So, quick reminder: Fall for Cotton is a challenge hosted by Rochelle, of Lucky Lucille, and Tash of By Gum By Golly. The rules are simple: sew a Fall (Autumn) appropriate garment from a vintage or reproduction pattern during the month of September, to be made in 100% cotton fabric.

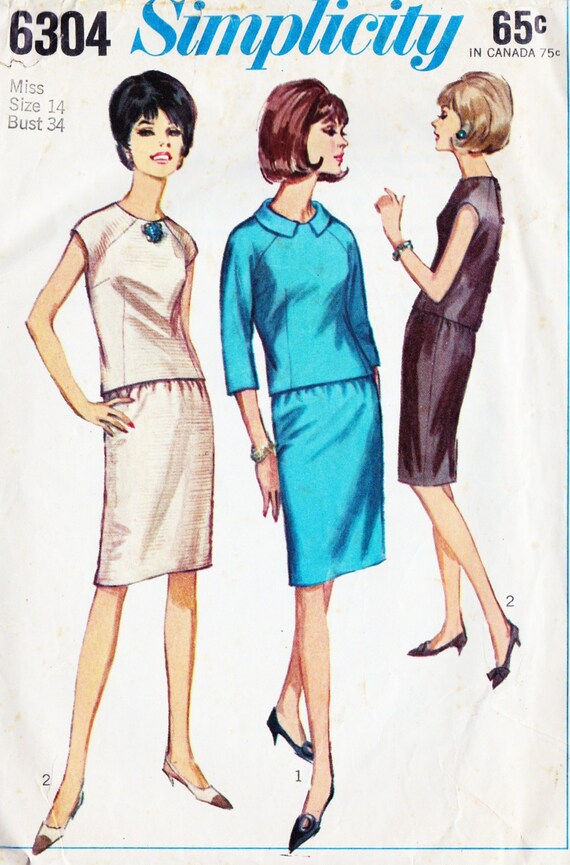
Both hosts favour 1940's as their vintage era of choice. I went for something a little later - mid 1960's - with Simplicity 6304.

I opted to make the blouse in view 2, with no collar and short sleeves, and I made it from Liberty Tana Lawn.

This was my first ever vintage pattern, and I found it, on the whole, very easy and straightforward. I was on holiday on Friday, so started this at about 1pm that day, thinking there was little chance I'd get it finished on time, but it sewed up really quickly, and I finished it on Saturday morning. It probably helped that I didn't muslin it. Bad, I know, but I just couldn't be bothered. I did a tissue fit of sorts. Well, I held the bodice pattern piece up to my torso in front of the mirror, established that the bust darts looked OK but that the waist darts looked a bit long, and then just winged it from there.

Apologies for the creasing - this was after a day's wear, and a big lunch!
As you can see the fit isn't perfect. I shortened the waist darts, but they seem to have somehow turned into release pleats, which is fine, but I'm not sure that it looks the most flattering here - my bust looks a little odd!. It's a little short for my liking, especially to wear with jeans, but it will probably work OK teamed with a more high-waisted bottom half, as it's designed to be worn.


I used covered buttons at the back. The first time I've ever used them and I like the effect. They are not the neatest, and I'm unsure how many turns in the washing machine they will withstand, but they look nice for now. Also, because they are shank buttons, I have to be careful where I sit, otherwise they dig in a bit!


It's a little roomy at the waist, and could probably do with being taken in a little here. This is not the most flattering view.

The fabric feels a little stiff and as you can see is a nightmare for creasing. Strange, because this is not my experience with Liberty tana lawn previously. I stupidly forgot to pre-wash the fabric, so hopefully it will soften up over time. And not shrink!

As I said the construction was fairly straightforward. The only things I didn't like were the sleeve facings. I wasn't sure they were necessary and because this is a raglan sleeve design, there are already 3 seams meeting at the underarm, which causes quite a bit of bulk. Adding a facing here, creates even more bulk, introducing a fourth seam in the same place. It's really messy here as a result. If I were to make this again, I would omit the facing and either use bias binding, or would just add a little length and turn it up. I'm not sure a facing here adds anything, other than time and frustration!

You can't see it in my photos, but the fabric is not a solid colour. Rather it's a repeat pattern of 2 heads kissing:


I like the fact that the fabric is not just plain, but because it's not a very obvious print, it will go with a number of things. Hopefully!

I have no pics of the guts, but insides are either overlock stitched or pinked.

So in summary, this is not my favourite blouse ever, but I do like it and I will get some wear out of it. And I am glad I managed to finish it on time. And it's proven to me that vintage patterns are not scary - not sure why I thought they were, but I did! Just as well I've got over that fear, because I am planning a coat this winter from another 1960's pattern. Watch this space!

A final photo just to show you it is autumn appropriate, with a cardigan!
These photos were taken at my Mum and Dad's this weekend. My brother was up from London, so we were all over for a family lunch. And yes, we were sitting outside, in Scotland, at the end of September. It was glorious, and doesn't my Mum's garden look amazing?


SHARE:

Monday, 2 September 2013

A catch up

Hi! How are you all? Gosh, it's been over 2 weeks since I last posted, which is most unusual for me. I haven't been on holiday or anything exciting like that, life has kind of just taken over for a bit. Here's what I've been up to since I completed, and wore, my Peony.

1. Work
Work has been, to put it bluntly, horrific recently. It's been unbelievably stressful. We've now lost over a quarter of the team, but up until last week were still doing the same amount of work (which, quite frankly, was already stretching us with a full team), were having to deal with several ongoing projects that are going horrifically, horrifically wrong, were having to field requests for new stuff (Finance: "we need you to change the files to support us better". Us: "with what spare 5 mins? Bugger off"), and were trying to transition our roles to a team who were willing, but had absolutely zero system access. It culminated with me in tears and as a result, a divide and conquer strategy. You'll be unsurprised to learn that this left me worn out, exhausted every evening and actually I just needed to take some time to do nothing for a change. "Nothing" included no blogging.

On a more positive note, I have been recognised with a company award for the work I have completed on the transition, and so am £250 richer as a result! And the new team finally received system access on Friday, so it feels like we are starting to move forward again.

2. New job
Nothing to report on this front, but I am still looking! D day is mid October, so I still have time.

3. Silk
The one at the top
Gah! Silk. So beautiful, so drapey, so irresistible, so... silky, so difficult to sew. So, "nothing" doesn't actually mean absolutely nothing - you didn't think I hadn't even picked up a needle in the past fortnight, did you? I haven't done a lot, but I have been attending my sewing class every week. It's a good stress reducer, it's fun and it forces encourages me to sew for at least 2 hours every week. I have been working on a Grainline Scout in a green/turquoise ditsy floral silk. The fabric is stunning, but sooo slippery. I had hoped to have a finished garment to show you last week. In fact I did finish it on Thursday night ( I squeezed a couple of more hours in last week), tried it on and thought "oh, the hemline looks a bit wonky. But it's probably not that noticeable to non-sewers". However, when I did my "tah-dah" twirl for P he said "the bottom looks a bit weird". "Yes", I said, "it's a high low hem. See?" (Standing sideways and pointing.) "Long at the back, short at the front". "No", he said "the front bit is a bit... squint?" If a non-fashion-interested, non-sewist man can spot it straight away, it needs to be re-done. I have unpicked it. It seems when I cut it, I haven't cut it one layer straight, so it will need some neatening up, before I re-hem it.

4. Small boy
We have been toilet training since July with mixed results. This is not helping the stress levels. He absolutely has the ability to do it, but he can be wilful and has quickly established that if he's not receiving the attention he seeks, weeing himself will go some way to improving that situation. I won't bore you (or put you off your tea) with the details, but it is ongoing. In addition, he has really been working on his tantrum skills, which are coming on a treat! This is just a phase, right?

We have also been sorting out his bedroom, getting rid of some of his outgrown toys and successfully selling his changing table on Gumtree. Yay to some positive stuff!

5. Jam

Last week we went fruit picking. It wasn't the sun filled, beautifully photographed trip featured recently on Coletterie, rather a mud-filled, cloudy but humid day spent in poly tunnels. But we had fun anyway! We picked raspberries, blackcurrants and some weird purple and green runner bean type beans, which disappointingly turned back to green when cooked. We had a few days of raspberries and ice cream for pudding, and then I made jam with the rest.

6 Making sewing plans

I don't really need a sewalong in my life at the moment, as you can tell already, there is quite a lot going on, but I have been lurking the Fall for Cotton Flickr group and despite my best intensions, I have chosen a pattern and bought some fabric. I can't really ignore a sewalong that is tagged as "a vintage sewalong for cotton lovers". It's perfect for me. And after the silk, I need a nice well-behaved cotton to work with. However, I am being realistic. I have another sewing deadline this month which takes precedence (details below). I am not going to allow myself to become stressed by the sewalong. If the blouse becomes too difficult or challenging, or it's not working in anyway, I will leave it. Similarly, I'm not going to be bothered if I don't finish for the end of Sept. I will eventually have a blouse, and I will eventually have sewn a vintage pattern and they are challenges enough for me.


I bought the pattern from Miss Betty's Attic on Etsy a while ago. I won't be making the two piece, just the blouse, due to lack of time and lack of fabric - there simply wasn't enough remaining on the bolt, which was just as well because I couldn't really afford it if there had been: I am making it in Liberty Tana Lawn.


This one to be precise. Isn't it amazing? Having Googled it tonight, I have discovered this is from Liberty's A/W11 collection inspired by musicians and artists and called Liberty Rocks:


"A Boy Dreams Liberty Print was created from original drawings by Blur guitarist and solo musician Graham Coxon. The final design is reminiscent of rock poster artwork of the 1960s, with wood cut line work and the vibe of Esher and Mucha. Coxon is a multi instrumentalist credited with being one of the most gifted guitarists of his generation. He has also created artwork for Blur’s album covers as well as his own."
I love the 60's vibe which will work well with the pattern, which itself is from 1965. I will make view 2, the short sleeve and I think I'll use self covered buttons for the back.

And so to the other sewing deadline of September. I am making a dress for my niece's 2nd birthday at the end of this month. I have chosen a pattern but have yet to find fabric. I won't share this project on the blog until after her birthday as I want it to be a surprise for my sister. I don't think she really reads my blog, but just in case! The birthday dress is clearly higher priority than the Fall for Cotton sewalong but I am hoping I can manage both. I do hope this is not a recipe for disaster.

What about you? What are you sewing and are you joining in with Fall for Cotton? Or even the By Hand London Anna Sewalong?
SHARE:

Monday, 15 April 2013

Joan dress. AKA Mad Men Challenge. AKA Elisalotte.

AKA the fabric dilemma dress.

AKA the catharsis dress.

Whatever I call it, it's done. C'est fini.


Please ignore the wonky hair in these photos. I thought I'd make a token effort at looking a bit more Mad Men - hair up and a bit more eyeliner!. As you can tell, hair styling is not my area of expertise! :) and P neglected to tell me it was wonky before he took the photos.

I'm in a state of ambiguity about this dress. I want to love it, and mostly I do, but there are some fit issues and the inside is a mess, so it is not as "nice" as I would have liked for a relatively smart dress.

The Good
I LOVE the fabric. I am so glad you guys talked me into buying the more expensive one because it was so right for this dress. It was lovely to work with, it give some structure as it's fairly thick, its comfortable as it has a slight stretch and it looks smart as it has a slight sheen to it. And the print is extremely forgiving of errors! Although I am noticing in these photos, it's making me look strangely one dimensional, like some type of paper doll!

I love the shape of the dress. It feels quite classy. I already knew I liked the Charlotte skirt, once adjusted for my lack of hips, and the princess seams of the Elisalex bodice are extremely flattering. And it has 3 of my favourite design features: boat neck, interesting back and 3/4 sleeves. Oh, and P LOVES it! :)

I think it totally fits the bill for a Mad Men dress and I am really pleased with the similarity to the inspiration photo. Other than the colour, and my lack of curves to fill it out, I think it's pretty spot on.

My first ever self-drafted neckline facings worked well! :)
The ONLY pic you are getting of the inside of this dress and only because it's my first ever self drafted facing.
The Bad
OK, so I could leave it there and not point out the flaws and we could all pretend it is the perfect dress. But it's not and I'm keen to get your views on what's gone wrong. So here goes.

Fit: It fits perfectly from the hem to the top of the bust and then it all goes slightly weird. There is too much fabric from that point up to the neck line. The neckline is too wide and so drops off my shoulders and the sleeves just don't sit right. Also at the back, there is some gaping at the neckline if I stand up really straight. My thought is that it's just too big in this area. What do you think? I cut a 12 for the bodice and skirt, based on my bust and waist measurements, and it fit fine here without any adjustments needed (other than for length of bodice, but we'll come on to that). I was meticulous about stay stitching the neckline, so it can't have stretched (plus that wouldn't explain the sleeves, would it?). I did adjust the neckline, but I did so based on a pattern that is my size (although, admittedly, I haven't actually made that dress, so can't say for sure it fits me). But I only widened the neckline. I didn't touch the shoulders. The armscyes/armholes should be exactly where they were intended to be.

Here you can see gaping at the back
I did make a muslin of the bodice, which seemed OK, but I really only focussed on checking the bust and bodice length and so never attached the sleeves, or really paid much attention to the shoulder or above bust area.

Looks like there is some excess fabric across the back, just above the waist, which I hadn't even noticed before!
Too much material above my bust makes it look like I have zero chest whatsoever! Although, on the plus side, I can't see the excess fabric that appears in the above photo. And from this angle, my hair looks pretty good! :) And thinking about it, I'm wearing a pre-pregnancy strapless bra, which probably doesn't actually fit that well...
So, what do you think? Should I have maybe graded down a size in this area? And crucially, is there anything I can do to fix this now? On the plus side, it can't actually fall off my shoulders as it's too tight. It does feel a bit weird though, wearing a strapless bra with a dress with sleeves!

You can see it's nearly hanging off my shoulders here
The Ugly
Second negative: the inside is a mess. I opted not to line the bodice (the pattern has you do this) as I didn't know what to line a stretch fabric with. Instead I drafted a neckline facing, which worked pretty well - see above photo. So, I should have bias bound the raw edges. I would have been the right thing to do. But I didn't. I didn't have any bias binding tape and I couldn't be bothered to make it, and with all those seams it would have needed metres and metres! And if truth be told, I actually just couldn't be bothered. I've written previously about my frame of mind when making this. So I zigzagged all those seams! It's not the end of the world, because actually no one will see that, but I feel the inside doesn't match the outside and it takes something away from the dress. Especially since seeing Katy's Tessuti dress, which is beautiful both inside and out. Something to bear in mind for next time, I guess.

Oh and I'm extremely embarrassed to admit that there are at least 4 different colours of thread on this dress. I know! Cardinal sin of sewing! But I was trying to use thread from my stash, so I started with a dark purple, which ran out (all that zig zagging), then moved to a lighter purple, then managed to get an aqua colour in there too (bizarrely, my bobbin ran out, and the machine seemed to just carry on with the thread that was underneath almost without a gap. How odd! And it was the facing and is inside and it seemed pointless to unpick it all again...), and finally a white thread for the skirt and sleeve hems!

The darts on the skirt don't match up with the princess seams on the bodice. This actually isn't a biggie. I did make an attempt to move the darts slightly, but then adjusted the length of the bodice a couple of times, by which time, the darts were off again. But that busy print really obscures this. On a plain fabric it would look noticable, but on this fabric you can't see it. As I said, not a biggie.

I had a few nightmares making this dress. As I mentioned above, I lengthened the bodice by 2 inches, then sewed the bodice and skirt together, zig zagged the edges then tried it on. And realised the waistline was about 1.5 inches too low. It took a couple of attempts to get it right, but I got there in the end. After quite a bit of unpicking.

I also had some issues with the zip. Some of you may remember I initially planned to move the zip to a side zip, just because I fancied it. But then I realised that this would mean I'd need more fabric than I had bought (as both the back bodice and back skirt pieces should really then have been cut on the fold), and that it would also mean I couldn't have a vent at the back of the skirt. So, I reverted back to the original back zip, replacing the exposed one with an invisible zip. I like invisible zips. I think they look sleek and professional and I have never had a problem inserting one. Until this dress. Again, I don't know if this was my frame of mind, or just carelessness or lack of luck, but I kept getting it wrong. At one point, I even managed to sew on top of the zipper coil, which I can tell you was a nightmare to unpick! I got there in the end and the zip is now fine.

Back to a positive: I did use seam binding for the skirt hem, which looks nice and neat, and makes me wish even more that I'd bias bound the raw edges!


I found the making up of the bodice sometimes problematic. None of the notches seemed to match. No one else has mentioned this in their reviews, so it may well be a tracing error on my part. I will need to check this before I make this again. And there will be another one. Next time, an unadulterated version. I love everyone else's versions, so I am super keen to make myself one that I'm happy with.

In the meantime, what do I do with this? Do I wear it as is? Can I fix it? Do I order more fabric and re-make the bodice and sleeves? Or do I cut off the bodice and just wear the skirt? It would be a fabulous skirt and I probably have just enough fabric left to make a waistband! Any suggestions, gratefully received!

And finally, can we all just pay particular attention to my new shoes?

Please excuse the "pealy-waly" (pale) Scottish legs!
Guess how much? Go on, guess! £8.50 from our super-cool new local charity "boutique", which opened on Saturday. Jo has blogged about it here.


SHARE:

Saturday, 9 March 2013

HELP! And my swap partner revealed.

I received my International Craft Swap partner's details yesterday. I have been paired up with Louise from Elsie May and Bertha.I wasn't familiar with Louise's work or blog before, as (determined from a quick squiz at her blog) she mainly crafts rather than dressmakes, however it's always nice to meet someone new, and to gain access to more inspiration, insight and skills! Louise describes herself as a maker and says she would do it full time if she could, which is ever-so-slightly daunting, as I describe myself as doing zero crafting, so I'm hoping she'll be very tolerant of my very simple effort! Just need to pick up a couple of notions and then I'm hopefully ready to get going on that.

Rather sweetly, Rachel (from House of Pinheiro) opted to match me with Louise to provide me with support, which I really appreciate! It also makes me think she must have spent a LOT of time ensuring she'd made the right pairings! I'm impressed.

HELP!
On another note, I need some help! I am really struggling with my Mad Men Challenge/Elisalex sewalong dress. Not the dress itself which should be fine (although I still only have half a muslin made, so perhaps I'm being overly optimistic there), but I'm really struggling to make a fabric choice. As a reminder, here is the inspiration dress, which is from season 5 (set in 1967, according to Wikipedia - I don't watch the show, sorry. Is that sacrilege?)

Source
I don't want, or need, to be too literal on this, but if I go for a really different fabric, then it's just a random shift dress, as it has no real period distinguishing features. The fabric of Joan's dress is a kind of floral/paisley print on a purpley-grey background (looks more grey in the bottom pic). 

Here are my issues:
  1. I've never been a huge fan of paisley print and while I probably could find something similar I'm not sure I'd actually want to wear it once made.
  2. The colours here are fairly wintery and we'll be well into spring once the challenge is finished (mid April)
  3. I actually have no idea where or when I'm going to wear this dress. All the fabrics I've liked so far give more of a formal vibe (for me, anyway) and I have no upcoming formal events. I hate the idea of spending time and money making something I won't wear any time soon. 
  4. I fancy a stretch woven fabric to make it more comfortable (and therefore more "day"), but as I'm using the Elisalex bodice and it's lined, the stretch won't work unless I also line it in a stretch fabric. Won't that make it too bulky?
  5. If I don't go for a stretch, do I go for a cotton voile? or would a heavier-weight quilting fabric work for this (I suspect not...)?
  6. Don't want to spend a lot on this. If I could get fabric for less than £20 I'd be happy. And I will need at least 2m, if not a little bit more.
  7. Because of princess seams I don't want the hassle of having to pattern match.
  8. Probably something else, but now I can't remember!
Here are a few serious contenders so far:

Liberty cotton lawn from Stone Fabrics. Gorgeous, but 40's inspired, not 60's! Would be maybe a bit less formal? Not stretch.
Lightweight cotton from Stone Fabrics. Like this, but maybe a bit more formal? Not stretch.
Cotton poplin from Stone Fabrics. Really nothing like the inspiration dress. Not stretch, but quite fun and maybe a little bit 60's?
Stretch cotton from Fabric Godmother. Really like this, ticks all boxes, but £16 a metre!
Stretch cotton sateen from Stone Fabrics. Colours are right, print is wrong, but I got tired of looking at florals.
Cotton voile from Raystitch. Not stretch, but suddenly I'm feeling it for this one, AND it's reduced to £9.95. Would a a whole dress of this be too much? And I'd need to pattern match.
Cotton poplin from Stone Fabrics. Wrong colours, but right kind of era. Loving the summery-ness of this. But what is cotton poplin? Will that work for a dress? Not stretch. Does it look a bit too much like a tablecloth?
I have tons more on my Pinterest board if you're not bored already!

So, what do you think? Do I completely deviate from the inspiration dress in favour of something more "me"? Do I forgo stretch (and comfort) for a pretty print?

If I knew how to do it and had enough regular readers, I'd do a wee poll here, but I don't and I don't, so if you have a strong opinion, can you please let me know in the comments? I'd really appreciate some input on this, as I am really, really struggling! Thanks in advance!

H x
SHARE:

Tuesday, 19 February 2013

A challenge, a sewalong and a swap!

Isn't it lovely that the mornings and evenings are getting lighter again? It was light this morning when we left the house, and light still when I picked Small Boy up from nursery. It makes such a difference to my mood! And the snowdrops and crocuses are starting to come out. Winter is nearly over!

The more eagle-eyed of you may have noticed a few new buttons on my sidebar!
Source
Yep, I have signed up for Mad Men Challenge 2, the Elisalex sewalong AND House of Pinheiro's International Craft Swap. I may have over-committed myself, slightly! However, I have a cunning plan... I talked about my Mad Men inspiration and thoughts here. My dress will be based on the Elisalex (bodice and sleeves at the very least), so that, in my opinion, also qualifies it for the Elisalex sewalong! 2 down, 1 to go!
Source
I have no idea what I'm going to do for the International Craft Swap. I don't really sew much apart from clothes, I don't do other types of crafting (can't knit or crochet). And I never sew for anyone other than myself! But I love the nautical theme, and am tempted by the thought of getting something shiny and new through the post (just hope my swap-ee isn't too disappointed by my effort!). I'm going to a quilting show this weekend, so hopefully that will provide some inspiration. Failing that, there's always Google and Pinterest! It's exciting though.
Source
I haven't made a lot of progress with any of my projects this past week. I spent a couple of evenings trying my coat muslin on again, to check I really was happy with the fit (I am) and then cutting out my lining and interfacing. I was going to start cutting my fabric, but of course need to pattern match and need to be sure my fabric is absolutely straight, so spent about an hour, tacking/basting the folded fabric at about 40cm lengths to ensure the stripes stayed straight. I then played around with laying the pattern pieces, but gave up as it was late and I want to make sure I do everything as perfectly as possible on this project. I haven't yet gone back to it.
Poorly lit pic of my lining pieces cut.
Last night, however, I wanted to do something, but was tired (an 8 children/5 mum playdate/coffee session yesterday afternoon - including one runaway child (mine) - made sure of that!) and wanted to do something simple, so I traced my Elisalex bodice and sleeves pattern pieces and cut out my muslin. Annoyingly I don't have as much of the muslin fabric as I thought I did, so won't have enough to do the skirt. But I can crack on with the bodice in the meantime.

Previously I have not traced patterns and just cut them, but have since realised that tracing makes sense, not only to preserve the pattern (and potentially re-sell, pass on or giveaway) but to allow for changes in size, or more likely, allow for cutting the wrong size in the first place! Since then I've been trying out various different tracing papers. This time I used greaseproof paper, thinking it most like waxed paper that I've read about. This worked well, as it's very easy to see through, but it's quite narrow meaning for larger pieces, you have to tape it together. The other downside was that the usual tape I use to tape e.g. PDF patterns together, masking tape, doesn't  stick to greaseproof paper. I used sellotape instead, but of course you can't write on sellotape.
Re-drawing the neckline. You can just see the vintage pattern piece underneath.
I changed the neckline of the dress by tracing the Elisalex bodice, and then laying the tracing over my vintage pattern with the batteau neck, matching up the centre folds and the shoulder seams, and drawing the new neckline on. It seemed very simple, so hopefully this will work. I can't think of a reason why it won't, but you never know with these things (or at least I never know!).

I spoke previously about wanting to move the zip to the side. Not sure why I have this in my head, but I'd like to give it a try. Stupidly I forgot about this when cutting out my centre back piece, but later in the evening when I went back to look at the pieces, I noticed that the CB line is not on the grain! This isn't something I've come across before, and I thought it was going to scupper my planns to cut the CB piece on the fold as one piece. However, I dropped an email to Elisalex (the lady, not the dress) this morning, who explained:
"About the side zip/grainline at CB, I don't see the problem in cutting the CB in one on the fold - just remember to remove the seam allowance! The reason that the CB is slightly off grain is basically just to accomodate the cinched waist - extra full hips - tapered hem. But it's no biggie really."
I probably could do with all the help I can get on the hips, but I think I will sacrifice that for the seamless back. What do you think?

SHARE:

Thursday, 7 February 2013

Chevron Charlotte

Today, Debi is talking about sharing our Sew Grateful projects, and this coincides with my first finished make on the blog!

And here it is, my Chevron Charlotte!
Why do my legs look so stumpy?
This is my Sew Grateful project for a number of reasons. Firstly, I am grateful to my mother-in-law who gave me the pattern for my Christmas this year. Secondly, I'm grateful the girls at By Hand London for being so lovely when I realised I had the wrong pattern in the right packaging. And thirdly I am grateful for my husband's patience during this make, whilst I scattered black threads throughout the house, cursed while I made stupid mistakes and stayed up til 11.30 last night to finish it - and for his appreciative comments once made (he likes me in something fitted! What can I say!).

And so, to my review. This was quite a painful make. Nothing to do with the pattern, which was so straightforward I could have made it without instructions. No, it was because, as I said here I chose fabric woven by the devil himself! Loose weave, frayed like mad, pins got lost in it or just fell out, it stretched, it disappeared before my very eyes, it was HORRIFIC and nearly impossible to unpick...
Another stumpy legged shot...
I made some really daft mistakes during this make, like sewing the front on inside out (darts on the outside are not a good look), taking it in too much at the sides and chopping a bit too much off the bottom, so a fair bit of horrific unpicking was required. Normal 5/8 inch seam allowances proved not to be enough (as I discovered too late), as the fabric frayed right into, and sometimes beyond that. This means that I have some very dodgy looking seams (luckily only visible close up).

Very shiny bias binding, in blue, which doesn't go with my plum coloured lining!

To counter the fact that I cut too much off the bottom, I hemmed it with bias binding. This is something I've not done before, but actually really like the look of. Unfortunately all I had kicking about was some royal blue, shiny bias binding, which doesn't really "go", but it does the job, so I don't really care. I will use this method again though, because a) it looks nice (provided you chose something that coordinates) and b) it had the happy coincidence of reducing what would otherwise have been a very bulky hem.

Please excuse the poor quality photos - we have a terrible camera and no natural light on winters evenings!

But... I nevertheless do love this skirt. I wore it to work today and it was really comfy and felt quite grown up and glamourous. I do love the look of the fabric and that textured detail, which brings some interest to the plain black colour. It's lovely to finally have a pencil skirt that fits, as I am quite slim hipped proportionally and so RTW versions never do. I'm not convinced it'll be around for long as the material will be very prone to pulls, and I have a toddler who has already ruined all my tights with his velcro fastening shoes. Plus it's a wool mix, the label said dry clean only, and I didn't pre-dry clean, so god only knows how it will respond when I do eventually need to clean it: a day which will come soon due to the prevalence of jammy/toothpasty/cheesy/humousy* (*delete as appropriate) fingers in our household.

So, to sum up...

What I liked
Straightforward pattern, with really clear instructions, although not sure how a true absolute beginner would get on.
I finally have a pencil skirt that fits on the hips! And I do really, really love this skirt!

What I didn't like
Fabric choice
My daft mistakes
The unhelpful comments from my boys (Husband: "it's too long and too short". Small boy: "it's like a plate, mummy"!!!!).
Update - a couple of others which I only just thought about (but not biggies):
I made this in a size 12 and it comfortably fitted within 1 metre of fabric. To do this, I folded my waistband pattern piece in half and placed that fold on the fabric fold laying it horizontally (length of waistband lying perpendicular to the selvedge). The instructions have the waistband piece laid vertically  (parallel to selvedge), which doesn't work with a directional print/weave such as mine, and just uses more fabric. Even a narrower width of fabric (think mine was around 150cm wide) would fit well within 1 metre. As I said, not a biggie, but it might be more difficult for a beginner to figure out.
For a British company, why are all measurements imperial only? I do tend to work in a weird mixture of both imperial and metric, but UK fabric shops sell in metric, and it's just a pain to have to work it out (inevitably I buy too much fabric as I just translate yards to metres as 1:1 for simplicity/lazyness).

Did I change anything?
Took in quite a lot at waist and hips (didn't write down how much though!)
Took 4 inches up at bottom (but that was too much)
Lined the skirt.

Did I try anything new?
Bias binding as hem tape - really liked this as it reduced bulk and looks nice.
Used pins to mark dart location. Liked this method and will use again.
Replaced the darts on the lining with pleats, as per Karen's advice. Unsure if this made a difference or not, but it was easy to do, so probably would do this again.

What would I do differently next time?
Make a more considered fabric choice.
Make a muslin - so I don't have to keep re-fitting me every time I make it.
May try a centered waistband with zip running through the waistband or no waistband at all. This version has turned out to be very high waisted, but I think that's to do with how I fitted it before I put the waistband on. Again, a muslin would help sort this out.

Will I make it again?
Yes! I really fancy a nice bright version for spring like this, or maybe even a print.

SHARE:
© Grosgrain Green | All rights reserved.
Blogger Template Created by pipdig