Sunday, 8 May 2016

Completed: Birthday T-shirt for Baby Boy

What's the curse of the sewist? Too many plans, not enough time? Killer stash avalanches? Pins in the sofa? Or is it that little thought that needles its way into your head at 7.30 in the evening, which says "of course you have enough time to make and stencil a t-shirt for Baby Boy's birthday tomorrow..."?

So, guess what I did on Thursday night?
I literally have no idea where the birthday t-shirt desire came from. I previously felt no need to make him anything, although I have had this particular t-shirt planned in my head forever. But anyway, after we put the boys down that night, I dug out the stuff and got cracking! 

The pattern is the Titchy Threads Rowan Tee. Such a great pattern, with so many variations, and I always go for basic view A every time (here and here). Anyway, I already had age 2 cut out with the exception of the short sleeve piece - so, no need for faffing around sticking PDFs together - and there are only 4 pattern pieces, so I was on to a good start.
The fabric is repurposed from a maternity t-shirt, I've had in my upcycling stash for a while. In my memory, the fabric was actually a bit nicer. In reality it's about 70% polyester, 30% cotton, which wouldn't be a my first choice for the boys, but the weight was good, and the plain grey marl was a good canvas and is boy friendly. I managed to squeeze all the pattern pieces in and even was able to reuse the ribbing at the neckline. Win!

I reused the bottom hem to save on time too. As this was a maternity tee, it had a dipped hem at the front, but it wasn't too pronounced, so I used that for the back pattern piece, thinking a slightly dipped hem at the back would make more sense on a kids tee, and used the back for the front. The original sleeves were cuffed, not hemmed, so I couldn't do the same there. No biggie, though.
Pre-smudging. Look how neat it was!
I've made this pattern 4 times now, so it was dead easy and went together without any problems. I sewed it with the lightening bolt stitch and left the edges raw. The sleeves and top stitching at the neck are done with a triple stitch, which is sturdier than my twin needle, particularly for boys clothes. The original hem was sewn with a coverstitch so it doesn't match, but really, who's going to notice that? I do kind of wish I'd done the topstitching in red to match the print, but that would have meant taking a lot longer over the topstitching, as it would have been visible. Plus I never thought about it until I'd done the sleeves and unpicking triple stitching simply wasn't going to happen.
I came across the stencil on Tara's blog a while back, and have coveted it ever since. I think it's so cool. She has a few that I love - I've definitely earmarked the stormtrooper one for Small Boy. It took a bit of time to trace and then cut out - those narrow lines are pretty fiddly. As with last time, I used freezer paper, and the speedball block printing ink, this time in red. 

It all worked really well, and I was very pleased with it.  I finished at about 11pm and left it to dry overnight, and as the ink felt dry in the morning, I put him in it. However, about half an hour later, P noticed that the ink was running a bit, and sure enough it had smudged, over the t-shirt and over one of the (white, obvs) pillowcases on our bed!!! Now, this is totally my fault. As I've mentioned before, the ink needs to cure for 5-7 days before it can be washed. I naively assumed that once it was dry, it was completely dry and that he could wear it as long as I didn't wash it. NOT THE CASE! 
With smudging. Sorry, design feature.

I took it off him immediately (and got the pillowcase straight into a basin with some Vanish!). Initially I was really annoyed. The freezer paper gives such a clean edge, the ink looked perfect and pretty professional. But, there wasn't much I could do about it. I took a photo later and popped it on Instagram and all commenters said either the smudging wasn't obvious, or that it added to the look. So, now it's a design feature! But not one that I will be repeating. Lessons learnt? Follow the instructions. And be more organised. And call mistakes design features, and then move on.

Baby Boy loves it. "Monks" (his word for milk - all liquids are plurals right now) is his favourite drink,which he demands as soon as he wakes and as soon as he gets out the bath at night. I remember Small Boy weaning himself off his cup of milk in the morning and afternoon, but Baby Boy is reluctant to give it up just yet. So, no doubt, he'll be looking forward to wearing it next week at some point, once the ink is truly dry and cured. 

And now, because this post is a bit photo-light, here's a photo of him blowing his birthday candles out. Sweetie that he is! 

Happy Birthday, my special boy. xxx
SHARE:

Monday, 14 March 2016

Completed: Ampersand Sweatshirt

I have a bit of a thing for ampersands. I think the word "ampersand" is rather lovely - it's my favourite after "haberdashery", and I love the swishy elegance of them.

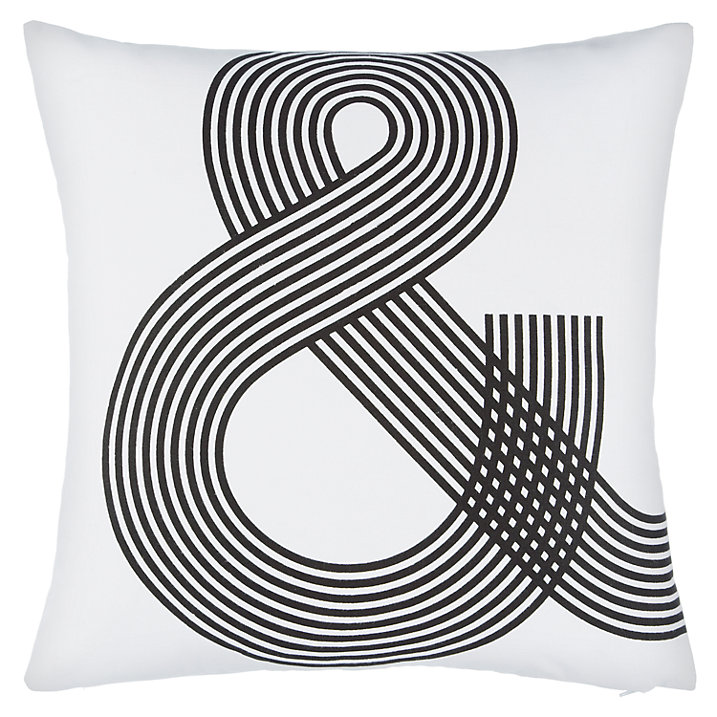
It seems I am not alone. I have since found Pinterest board after Pinterest board dedicated to them. All of which I am now following, obviously. Anyway, when I came across this cushion in John Lewis last year, inspiration struck.
Source
You might recognise this sweatshirt if you look closely. The front used to be covered in gold foil. Sadly, but as expected, the gold foil has worn away. It is just not possible to own a garment that can't be washed often when you have young children. I am forever covered in goo.

But that's OK. I still have enough of the gold French terry to make another, once I buy some more plain grey marl terry. And while it also hasn't stopped me from wearing this Linden, I do feel like the sweatshirt has lost its edge and is now borderline scruffy. Which is where the ampersand comes in.

Do you ever find yourself with a million plans, but without the confidence to execute them? That's where I was with this. I mean, I had all the necessary tools: freezer paper, fabric paint, a printer, an iron, a sweatshirt, but I was always worrying about the what if. What if it didn't work out? What if it was difficult? What if it was messy? What if? What if? 

Then one evening I just forced myself. I dug out the Freezer paper and the fabric paint, browsed ampersands and fonts on Pinterest, and just got on with it! And what do you know, it worked!
I found the below image on Pinterest - I quicky realised that as lovely as the JL cushion might be, it would take FOREVER to cut out with all those lines. I copied and pasted my image to Powerpoint, where I resized it. I then traced and cut it out with a craft knife, which was very enjoyable and made me feel like a REAL CRAFTER. As there were quite a few middle bits that I needed to not lose, I numbered them, so I could remember where they were to go.

Source
I had intended for the ampersand to be dark grey, but I had some issues with paint application which apparently took up so much of my brain that I forgot to mix some white in. I still think dark grey would have been softer and less "in your face", but I do love it as is. I'm particularly pleased with how clean the lines are - very little bleeding at all. There is one bit that bugs me, but I'm not going to point it out, as there is nothing I can do about it now!

The paint now needs to "cure" for up to 7 days, and after that I will be able to wash the sweatshirt with no fading or removal of the paint. Unlike that pesky gold foil! 

SHARE:

Tuesday, 25 March 2014

Completed: Take two men's poloshirts...

...and create two loose-fitting woman's tees!


My friends, and some of you, are expressing surprise that I am still sewing. To tell you the truth, I feel like I'm doing less and less, but I've been due some time off work recently and have chosen to dedicate that time to sewing. Rather than, say, hoovering, or you know, getting organised for the baby coming.

So here are a couple of refashions that I rustled up yesterday afternoon. Each one took probably about an hour and half to complete, and most of that was trying on, adjusting, trying on adjusting, trying on, adjusting. Sorry, I forgot to take "before" pictures, so you'll just have to use your imagination on those.

I've had this tutorial from Cotton and Curls pinned for ages, and I've also had 2 of my husband's polo shirts in my refashion pile for nearly as long. I think I put these off because I was scared of getting them wrong and therefore "wasting" the polos, but then it dawned on me that they would just be going in the bin anyway, so what did it matter.


I made this one first using a Gap polo shirt, in a lovely stable cotton with very little stretch. I particularly love the colours. I'm really really happy with it! I don't know how much longer it will last me, as it's already a little tight over the bump (what can I say, I have a thin husband, so his shirts are not particularly oversized...), but it will work well post-pregnancy. I think my only change was that I didn't curve the bottom. I wanted to, as I think that would be more flattering, but the polo suffers from having twisted side seams as a result of having been cut off-grain. I figured any shaping would make this even more obvious, so I opted to leave the finished hem of the polo. Once less thing to do! I'm not convinced it looks right, but I'm unsure what else to do with it. Any suggestions?


As per Liz's suggestion, I changed the original buttons, which were grey, for something brighter. I had 3 turquoise buttons in my stash and they match perfectly, picking out the smaller turquoise stripe.


Some notes on construction
I love Liz's makes but I don't always find her tutorials all that clear. I think she assumes a certain knowledge, and it's probably just her style of writing versus my style of learning. I do know she puts a lot of work into her tutorials, so I don't want to take away from that, however if you are thinking of making this, here are my observations:
  • When cutting the neckline, it's actually easier to first sew up the button placket. Even if you don't plan on adding more buttons, I'd still do this, as it just keeps the neckline more stable.
  • If you plan to change the buttons, remove the old ones before you sew up the placket. It just makes it easier. No pesky buttons in the way of the presser foot!
  • I top stitched the front of the placket closed, and then slip stitched the inside part closed.
  • When top stitching the placket, start from the bottom and work towards the neckline (ensures it all matches up correctly - same principal as when inserting a zip!).
  • It would probably be helpful if you could copy the desired neckline from an existing tee, but if you do, remember to add 1/2 or so seam allowance. If you don't want to copy from an existing tee, start with a small amendment and keep trying it on and trimming a little at a time until you get your desired neckline. Again, remember seam allowance!
  • Similarly if you plan on taking in the sleeves and sides, either copy from an existing garment, adding seam allowance, or do small increments until you are happy. Trying on inside out and pinning helps, although is quite tricky to do under your own arms, and can result in some injuries*
  • When sewing the sleeves, start from the cuff and work towards the "bodice". This ensures your cuffs match up nicely.
  • When sewing the neckline, there will be a LOT of bulk at the placket. Where possible, I trimmed some of this away and my machine still struggled.
  • Liz added additional buttons but didn't say what to do about the lack of buttonholes. I considered making a third buttonhole, even if it was non-functioning, because my buttonholes had contrasting thread, but in the end didn't bother. As I sewed the buttons on with contrasting thread, I don't think it matters too much.
  • My polo had a pocket. I decided to leave this in place, but top stitched the top closed. Having a functional pocket on the back seemed slightly weird.


I loved this so much, I had to make a second, straight away! Talk about instant gratification!


I didn't want 2 tees that were identical in shape, so I drew inspiration from Miss P's recent tutorial, and cut the sleeves off, to make a kimono style sleeve. For this, Portia's tutorial is really comprehensive so I have nothing to add. My drop sleeve isn't quite long enough (again, the curse of the narrow husband), so it kind of sticks out, but you get the idea. I decided to keep the neckline higher on this one. In fact, after removing the collar, I didn't alter the back (original front) neckline at all, and cut the front (original back) neckline to match, widening the neckline as I went to give a kind of bateau neck look.

No buttons yet!
This one is an Old Navy polo, again in 100% cotton, this time with zero stretch. I don't like this one quite as much. The fabric is a bit stiffer, which doesn't work so well with a pregnant tum, and it makes the sleeves stick out. Plus it's mostly white which is a colour I usually avoid like the plague! I will still wear it though, and again it will serve me well post-pregnancy (assuming it doesn't show the baby puke too much!). I don't yet have buttons for this. I did consider some gold anchor buttons from my stash but they didn't look quite right. I think I want a real contrast - mustard or orange - as per Liz's original tee, and I don't have anything like that in my stash, so will need to buy some when I next get a chance.


Pregnant or not, this is a refashion that is really quick and easy and looks great! If not pregnant, you can just take the sides in more, to make it as loose or tight fitting as you prefer. Definitely worth a try!

*Injuries sustained whilst sewing: 1 giant scratch to right arm!


SHARE:

Friday, 22 November 2013

Refashion: Skater Dress

This can't really be called a refashion. The dress was merely toyed with!


I was given this dress by a girl at work. Somewhat bizarrely I thought. Apparently it didn't fit her and she thought it might fit me, which was lovely of her, but it still had the tags on, so presumably she could have returned it!? Anyway I am not one to turn down free clothes, especially pretty ones, and after offering payment and all sort of other compensation to her, I graciously accepted it FOC.


It's a simple skater style dress from Boohoo.com, in polyester. Not my favourite fabric, but I repeat: free dress. It's labelled as a size 12, but seeing as it fits me fine, and I'm normally a 8 or a 10, I think it was labelled wrongly - proven by the fact that the tag called it a "Peter Pan Collar Skater Dress". I am no expert but I don't see any collar, peter pan or otherwise. You get what you pay for! 


As I said the dress pretty much fits well, but the sleeves which were 3/4 length, were ridiculously tight. So tight in fact that I could only just get my arm in there, and once it I couldn't raise it to do up the zip at the back. I managed to get P to zip me into it to check the rest of it was OK. It was. So I cut 9cm off the sleeves, took up a narrow hem and err... that was it. Told you it wasn't much of a refashion. But the result is a dress I can now wear. To be honest, the sleeves are still very tight, and I suspect they won't tolerate a lot of movement - so not one to wear while doing yoga, gardening or cleaning the house - but it should be able to cope with a day at the desk. I could have shortened the sleeves further, but liked the elbow length for winter, even though it will almost pretty much always be covered by a cardigan. I can always shorten or even remove the sleeves in future.

Tights!
As my tummy is already expanding, this dress won't fit for long, but it will be a nice addition to my autumn/winter wardrobe for however long it does fit!
SHARE:

Thursday, 11 July 2013

Is it a refashion? Is it an FO? It's a floral Charlotte save!

Please don't be cross!

Remember my Joan inspired Mad Men Elisalotte dress? This one.


Remember how I wasn't very happy with it? And that the fit is pretty bad on the top half? And the insides are finished terribly? Well, I decided to revisit it. I hauled it out the wardrobe and tried it on. And do you know? It wasn't that bad. For 2 mins and then I started to see all the things that annoyed me about it. I tried to look at it objectively, from the point of view of an innocent, non-sewer bystander, but all I could see was a badly fitting dress. I didn't feel comfortable, or attractive or confident in it. And no one wants to wear anything that makes them feel uncomfortable, unattractive or self concious.

So, I decided to see what I could do to fix it. Um... OK, actually I didn't. Time to be honest. For ages I've fancied a floral print pencil skirt. I Pinned a good few way back in Spring, with the intention of making a floral Charlotte.

 
When I was making my Elisalotte dress, and was fitting the skirt part, I did think "yes, I really need to make this skirt at some point, this is really nice", so being totally honest, as soon as I realised I wasn't happy with the dress, way back in April, and was vaguely thinking about how to fix it, it did occur to me that I could just remove the bodice and add a waistband....


And so I did! It took me 3 evenings. One to unpick the bodice and the zip (unpicking a zip is time consuming!), one to re-install a new, shorter zip and to properly finish the insides with my sewing machine's overlocking stitch, and finally last night to cut and attach the waistband. And I had a shiny new skirt to wear to work today! Which I LOVE!


In all honesty, it still could fit better. The waistband gapes ever so slighly, so it could probably be taken in just at the very top of the skirt, immediately below my waist. Looking at the top photo here, I do look a little straight up and down, but it's still unlikely that I'll do it. It's not hugely obvious and doesn't look daft, and it's probably comfier this way.

I attached poppers to close the waistband, but added a button for decoration. I had planned to do a proper buttonhole, but at the last minute decided poppers might be easier. It also means that if I do decide to change the waistband fit, I can do so fairly easily.


It's not my best invisible zipper ever, and there does seem to be a small gap between the top of the zipper and the bottom of the waistband (you can see it in the top picture here). Not sure why that is. But if someone is looking that closely at that part of me, I have bigger concerns!

Close up of zip closed. You can see it, but I'm not hugely bothered.
Front, flat view
Back, flat view
Better seam finishing on side seams, and hem tape, which I'd already done.
I really love this skirt. I got a few nice compliments about it today too. It is summery, so addresses my summer wardrobe issues, and it might be OK with tights and a darker top when it gets a bit more Autumnal out there. Maybe. My main issue is that the yellow top I'm wearing here, is the only thing I have that actually goes with it. So you know what that means... make more blouses!!!! :)

I did feel slightly like I was letting you all down by doing this, myself included. You really all were so supportive, helpful and complimentary about this dress, and I did feel that maybe I should have pushed myself to make this good, as a learning experience. However, the joy of having a wearable, gorgeous skirt that I love and will actually wear outweighs all of that! I hope you agree?!

Sources for Pinned images: 1. Preen 2. Oasis 3. Stella McCartney
SHARE:

Tuesday, 18 June 2013

Haberdashery heaven, a featured post and Bloglovin frustration!

In my previous post, I showed you the lovely items I received from Claire at Ragbags and Gladrags as part of Kerry's Spring Sewing Swap. If you would like to see what I sent to Claire (although prepare to be underwhelmed by the volume of items I sent), she has now posted her link here. For those interested, I bought the buttons and trim from Ruth at The Polished Button, a website on which I love window shopping, as her huge array of vintage buttons matches my enthusiasm for haberdashery! I did also treat myself to a little something at the same time.

1930's carved flower buttons
No idea what I'll use these for, but the colour is so pretty (it's a bit darker IRL) and the shape is really interesting. I always find the selection of buttons in my local shops fairly limited and unexciting - and the ones they do stock that catch my attention are always really expensive - I do not want to spend more on buttons than on fabric, unless they are absolutely to die for. Or made of actual diamonds.


As the above picture is so appalling - I can no longer get our ancient camera to focus at short distance - here are some nice Etsy pics:


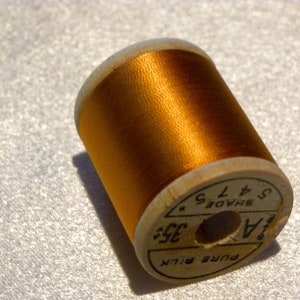
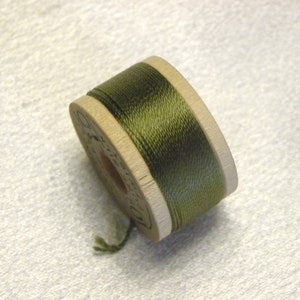
The silk thread that I sent Claire was bought from here, a tip off by Karen from Did You Make That. And once again, I treated myself... well, if you are paying for postage from the US, you may as well make it worth your while! Karen really rated this thread for hand basting, as apparently it's really easy to remove. I wouldn't know because I don't think I can ever bear to use it! I love the idea of it, but I also love the colours and the vintage reels, and so I currently have both reels displayed in my vintage printers tray instead. I probably will, at some point, use the orange (which I bought because the colour is called "ginger", one of my favourite foodstuffs - and just look at the richness of that colour!), but the smaller reel - have you ever seen such a cute thing as this little half height reel? - was bought specifically for display purposes. For the time being though, I like the 2 side by side.


In other news, I noticed I had been copied (I'm convinced that's the wrong terminology) on a tweet last week. On further investigation, I realised that someone called Lynn Herrick, who edits (again, terminology?) an online Refashioning and Upcycling newspaper called Refashion Passion, had featured (i.e. linked to) my recent post about my skirt refashion. And therefore also my holiday pics! While I am chuffed to get the mention and for the blog to receive the exposure, I did make me realised that gosh, what I write and post really is out there on the internet for the whole world to see and to do with it what they will. I always have this awareness, which is why I'm reluctant to feature my family and friends too much, but I guess this really illustrates the point.

What about you? How do you feel about putting yourself out there online?

Finally, is anyone else having issues with the Bloglovin iPhone app? Before I went off on holiday, I couldn't even open the app and had to de-install and then re-install it to get it to work. Since then, I seem to have an issue whereupon selecting a post to read, the one immediately beneath is opened instead. This is easy enough to work around as I just hit the one above to read the one I want, but annoying because, do you think I remember to do it?

The biggest annoyance by far is that I can't comment while still in the app. Instead, I need to open the post in Safari, scroll to the bottom and then comment. But, of course, while I'm in the app, it lets me write the comment, just not publish, so I, again, forget, spend time writing a comment and then immediately lose the lot! I am most definitely losing the will to live with it. Anyone got any ideas or suggestions, other than throwing my phone out of the window finding an alternative blog reader? It has crossed my mind that it could just be that I have an old phone, it being an iPhone 3. Any ideas?
SHARE:

Sunday, 16 June 2013

I'm back!

Hi! I'm back from our holiday! We were only away for a week, but I feel like I've been away from the blog and the sewing world for so much longer. On Bloglovin I had 434 unread posts!

We had a fantastic time. The weather was... dry. Which is pretty good for the East Coast of the UK. I can't say my bikini saw the light of day, but then neither did my cagoule and that makes for a good holiday in my book! We went crabbing, the (wee) boys spent a lot of time digging up and moving around stones, we built sandcastles and ate ice cream. We went to a food festival, we had BBQs, the (big) boys did a brewery tour, we bought art and we went on a 90 second long ferry journey. My nearly-2-year-old niece finally said my name ("Lele" - so cute), we went out for dinner and we walked along the harbour to see the lobsters in the tank at least once a day.

I've just reviewed our photos and most of them are of children - we were away with my sister and her family, my brother and my parents, so 7 adults and 3 under 4's. I won't share these as there is nothing worse than photos of other people's children, however here are a few that you may like.


As you can see, no sun! But no anoraks either! :) And the last 2 photos bring me to my first refashion on this blog... the skirt!

I bought this at some point during MMM13, from our local charity "boutique" for £6.50. It's a simple dirndl or gathered skirt, originally from New Look and the print, which you can't see clearly from these photos, is a stripe, mixed with a kind of vague Venice-y type print (gondolas/boats and bridges/viaducts). I loved the print, the colours (I'm totally in love with orange right now) and the style of skirt, so bought it, thinking it would be perfect for my holiday. Now, this is not a refashion that I could remotely compare with the likes of Miss P, or her current Refashioners challenge. This was a straightforward, perfect as it was skirt, just a couple of sizes too large. The refashion was a simple matter of unpicking the waistband and the gathers. Regathering the skirt, cutting the excess off the waistband and then reattaching it. Simples. It took me 2 evenings to do - actually no, 3, as I did the unpicking on the train back from Leeds the other week. But then I am a really slow sewer. Someone like Miss P could probably do this in 30 mins. In her sleep.


Anyway the result was a great, wearable skirt, which, as you can see, I wore on holiday, regardless of the fact that the sun did not shine and it was actually rather windy. But it looked great accessorised with my new sunnies, 3 layers on top and my peely-wally Scottish legs! Not forgetting a convenient butter-cup strewn field in which to run through...


One last photo. We stopped off at the Angel of the North on the way back up the road. I have to share this photo because I love this sculpture so much!


OK, so it's 2 last photos, but who's counting?
P.S. The eagle eyed among you will spot that the is the same location as is in my profile pic at the top of my blog. Spot the difference. (clue look at the size of the Small Boy?!?)
SHARE:
© Grosgrain Green | All rights reserved.
Blogger Template Created by pipdig