Sunday, 19 May 2013

Here's one I prepared earlier - polka dot Violet

Me Made May has shown me how few of my finished items I have blogged. Not surprising considering I've been sewing for 4 years, but only blogging for 5 months.

I thought I'd rectify this, by continuing my "Here's one I made earlier" series, and am kicking off, by special request of Jenny, with my Colette Violet blouse. I made this at some point last summer, so don't remember the finer details, but will tell you what I can.


Colette was the first Indy pattern company I stumbled across. I can't really remember how, but that's not important. Once I did, I immediately bought the Violet and the Rooibos patterns. With the Violet, I was drawn to the white version on Colette's website. I love the vintage styling, the collar and the gathered details at the back. I loved the freshness of the white, but didn't plan to make a white one myself as white and I just don't get along. I am far too clumsy. I did, however, like the idea of the dobby spot/swiss dot, and planned to look for this in a colour: I thought a pale aqua would be nice. And then I came across this:


The background is white and the spots are navy and I love it!

I cut a size 4, as per my measurements. This is actually a little large as you can see here.


 The shape is meant to be loose, but I find it a little boxy on me, and the excess fabric bunches up under cardigans and jackets. The side seams tick out slightly weirdly at the bottom as you can see from the photo on the right, due to the shaping. Furthermore, the bust darts are too low and it's a little short. I know now though that Colette bodices are short on me. The width, plus the shortness, make it a difficult blouse to tuck in, without constant re-tucking and fiddling. In general though, this is a blouse that requires constant adjustment to keep it sitting right. Not a major fail, just annoying. Somewhat bizarrely, the fit looks much better in my first photo above - the excess fabric must have moved round to the back - I told you it requires constant fiddling! But it's making me wonder if I should consider taking the sides in a little. Thoughts?

This was my first attempt at both a collar and buttonholes. The collar, again, doesn't sit quite right. If you look closely at the photos above, you can see a fold/rumple on the collar on the left hand side. It's as if the collar is too big for the blouse, and I seem to remember finding this when I attached the collar to the blouse. I made this in sewing class, so wonder if the collar maybe stretched whilst being carried back and forth each week? Again, just slightly annoying. When wearing the blouse with a cardigan, I often pull the blouse out over the top of the cardigan, which alleviates the problem slightly.

I found the buttons in the same shop as the fabric (Cloth Shop), and they are an amazingly perfect match. I believe this gives it quite a professional look, which makes up for the fit issues mentioned above.


Despite the fit issues, I love this blouse. It got a LOT of wear last summer. In fact it was a bit of a staple with my orangey-coral cardigan and my mint green jeans, and it's pulling its weight so far this Me Made May. And, miraculously, I seem to be able to wear it without spilling anything on it!

More collar rumpling going on at the back

What I liked
Good clear instructions. Nice, simple, wearable blouse with lovely details.

What I didn't like
Sizing not quite right, but I'm discovering that's the norm with Colette patterns and I.

Any alterations to fit?
No. This was in the days before I made adjustments, unless the fit was truly dire.

Did I change anything?
No. This is straight out the packet.

Did I try anything new?
Collar and buttonholes. Mixed results with the collar, but I fell in love with my one step buttonhole stitch with this project and went on to make my Kelly and my button back blush blouse shortly afterwards.

What would I do differently next time?
Fit adjustments. 

Will I make it again?

I have been planning to do so, but never quite got round to it. I did buy fabric to make another, but am now thinking I might use that for another Laurel instead. I will make another Violet though. It's a really wearable style.


SHARE:

Tuesday, 2 April 2013

Here's one I prepared earlier: Button Back Blush Blouse

OK, this is a bit of a misnomer. It's pink, not blush and I make no reference to the lovely collar. But I'm challenging myself to come up with garment names with alliteration now, and liked the sound of this!

Thank you all for very your kind comments on my last post. Since that make was so different to the original, I thought you might like to see, by way of comparison, what else I made using with the same pattern as a base.


I made this blouse specifically to go with this skirt, which I bought from H&M, whilst slightly drunk after a celebratory posh lunch to celebrate P's 40th birthday last summer. I fell for the bird print. I love a bird print - in fact I love birds in general and they are a theme in various forms around our house. Ironically we get very few actual birds in our garden, despite our best efforts (feeders, bird friendly plants, bird box) something that is of great disappointment to me.

Anway, I digress! The birds are mostly turquoise, with pink "breasts", and when I found this fabric it matched perfectly.


I didn't want to go down the usual black top route for this skirt and I already had in mind to make a blouse inspired by this:

I love the contrast collar here and the elbow length sleeves. I also have a penchant for button back blouses since I bought one a good few years ago, also from H&M. Unfortunately the H&M one shrank when I washed it, then shrank some more and I can no longer get into it. But ever since, I've coveted button back blouses.


So, my initial thought was to get the pink fabric and a white/off white one to make a contrast collar. I was discussing this with the lady in the shop when she mentioned the lace collars they were selling. I love these and thought they'd be perfect for the blouse - and much easier than drafting a peter pan collar myself!


The fabric is cotton, with probably a bit of poly in there too. It's slightly transparent, but not enough to need to wear something under it. It also crushes like mad!

I took the basic pattern, using the boat neck line again. I cut the front bodice as normal and extended the back bodice pieces slightly to allow me to create a button band. For the button band, I worked out how wide I wanted it to be and doubled it, plus a little for seam allowance. Once cut, I interfaced it and folded it back, turning under the seam allowance and top stitching down each side. The buttons were bought to go with the fabric and are dark pink with lighter pink markings. To work out how many I needed, I simply laid them out in various quantities until I was happy and went from there, double checking to ensure they were evenly spaced. I deliberately left a gap at the bottom, as I knew I'd be tucking this in, and didn't want buttons poking through the skirt fabric.


I used the given sleeve pattern pieces and used a longer sleeve from a different pattern to gauge width and length, and attached as normal. At the sleeve hem and blouse hem, I simply turned under and top stitched. To attach the collar, I sandwiched it (ensuring it was the right way around) between the bodice and the neck facing, and pressed to ensure it lay flat. It's not exactly the same shape as the neckline but I was able to ease it into place without any problems.

Here it is untucked, and with jeans to show it's diversity, and to show the back better!

And that was that! I have had tons of wear out of this. I wear it with the skirt, with other skirts, with black trousers, with jeans etc etc. Very versatile and easy to wear.


What I liked
As before, simple pattern. Easy to follow and quick to put together. My alterations were also relatively straightforward to make.

What I didn't like
Nothing, really!

Any alterations to fit?
Nope.

Did I change anything?
As described above. Sleeve length, buttons at back and addition of collar.

Did I try anything new?
Adding buttons at back, changing sleeves, collar etc etc

What would I do differently next time?
Nothing. Although I did love this blouse before I added the sleeves possibly even more than once the sleeves were in, but I made this in autumn, so sleeveless didn't seem practical. I may do a sleeveless version, with a collar, at some point. Or even removing the sleeves from this one...

Will I make it again?
Well this was my third attempt at this (didn't mention this before but my very first attempt, which was true to the pattern, was a bit of a disaster), but yes, I reckon there is more mileage to be got out of this pattern.


SHARE:

Saturday, 30 March 2013

Here's one I prepared earlier: Graphic kimono sleeve blouse

Before I started my blog, I just thought of my clothes as e.g. "plum coloured cardigan", "pink blouse", "navy and white blouse I made". Now, if I am writing about them, I feel that they need names. Names with Capitalisation."Chevron Charlotte", "Red Denim Kelly". And if I can fit some alliteration in there, so much the better! And so, may I introduce... (drum roll)... the "Graphic Kimono Sleeve Blouse"! (no alliteration, sorry folks).

I made this blouse last year at some point. Probably early summer. It is one of the first times where I deviated from simply following the instructions, and therefore one of the first things I took in a different direction.


The pattern is this:
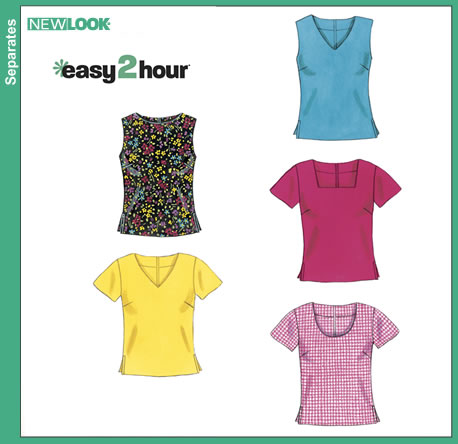
New Look 6351
It's a basic shell top pattern with sleeve and neckline variations and a zip at the back neck. I used version A as my starting point - the sleeveless boat neck version -  and extended the shoulder line to create a "grown-on" or kimono sleeve.

In real life, both sleeves are the same length!
I omitted the zip and instead left the opening, err... open, and added a pearl type button at the top with a thread loop. As you can see, it kind of "bags" open at the back. I'm not sure if this is the weight of the button since the fabric is so lightweight, or something else entirely.

Poor, poor, pattern matching!
The blouse is made from habotai silk and is actually navy and silvery white, although the navy is so dark, I can get away with wearing this with black jeans.

I can't remember if I even tried pattern matching. If I did, that wasn't a very good job, was it? I also either cut it not quite on grain, or the print wasn't straight because you can see the print is not level at the hem.

This was very easy to put together. It's just front and back pieces and front and back neck facings, with a couple of bust darts. I did a lot of hand sewing on this, as I didn't want visible stitching so the hem, sleeve hems and the folded back bits at the back opening are all hand stitched using a slip stitch. The thread loop was a bit of a nightmare to do and it doesn't sit right and can twist, so sometimes I can't undo the button myself and need help to get the top off! Next time I would do a fabric loop.

This has become my "go to" blouse for a casual-ish night out. I can wear it as I have done here with low heel boots/ballet pumps or dress it up with more jewellery and heels. I have only ever worn it with jeans though. Not sure why, it would be nice with a pencil skirt!

And so to the round up:

What I liked:
Simple, useful shape, open to dozens of interpretations. Easy to put together.
Fit the top into less than a metre of fabric.

What I didn't like:
Nothing as far as I can remember.

Any alterations to fit?
Nope, but I think the darts might be slightly too low, and I suspect the top is meant to be slightly more fitted than this has ended up.

Did I change anything?
Yes, as detailed above. Changed sleeve and back opening.

Did I try anything new?
Thread loop for button. Altering pattern.

What would I do differently next time?
Fabric loop. 
Better pattern matching. 
Understitch facing - the instructions don't tell you to do this, and although the facing stays in place, I've since learnt it's better to understitch here.
Possibly play around with dart placement.

Will I make it again?
 I already have. Again, I used the basic pattern to draft a button back, 3/4 sleeve version with a lace collar, but that's a story for another day.
And I would like to make the sleeveless version for summer - may have to play around with fit for this one though.


SHARE:

Monday, 11 February 2013

Here's One I Prepared Earlier - Red Denim Kelly

Since it takes me quite a while to complete a garment, I thought I might boost my blog slightly with some "here's one I prepared earlier" posts, to hold your interest and keep my hand in!

I am starting with a Megan Nielsen Kelly skirt that I made at the end of the summer last year. If I'd had the foresight to wear a me-made top with it at the weekend, when I took the photos, you could have got 2 for the price of 1. But I didn't. So you can't.
Obviously zoomed in a bit too far on this one!
The Kelly is made from a red denim with slight stretch which I picked up in John Lewis* during the summer. The stretch is not necessary for the pattern, I just liked the colour and fabric, and had never sewn with denim previously. I was also really inspired by one of the sample versions on Megan's website and this fabric felt kind of in the same vein.
Source
I LOVE this pattern. It was so simple to sew up. The pattern itself is basically 2 rectangles plus a waistband and the pocket pieces, but sometimes simple is best. I cut a size XS, which was a tad optimistic, as when I tried the skirt on for the first time (after attaching the waistband, before the buttonholes) I realised it was quite neat. So, I just cut another waistband in a size S, and unpicked the side seams and resewed using slightly smaller seam allowance, and this worked a treat!
Inside the pocket
I used a contrast quilting cotton, which I bought for the purpose, for the pocket lining, and used the same fabric to bias bind the pockets, which I rather like. I probably should have also used the bias binding on the side seams, but my bias binding maker wasn't playing, so I gave up after the pockets.
Should really have ironed this before taking photos!
The buttons, are kind of like distressed wood and maintain the casual look I was going for. On the subject of buttons, why are they so expensive? I saw loads that I liked, but some were over £3 each and I needed 7! I just cannot justify over £20 on buttons! That was more than the fabric cost!
I really, really love these buttons.
So, to the roundup:

What I liked
The simplicity of the pattern. So straightforward! Plus it's printed on proper paper, which makes it really durable!

I could fit the pattern pieces into 1 metre of fabric, by cutting the waistband on the fold. This means a version in a more expensive fabric is viable in future!

What I didn't like
Nothing (except the size being wrong due to my own vanity).

Did I change anything?
Nope

Did I try anything new?
Contrast pocket lining (hardly rocket science) and bias bound pockets (ditto).

What would I do differently next time?
Maybe line it. The denim sticks to my tights, which is a pet hate, and I haven't yet found a slip that's the right length.

Will I make it again?
Abso-bloomin-lutely! My head is full of variations: a smarter wool version for work (thinking black/white dogtooth), a corduroy version (grey or navy) and a buttonless version (possibly more than one), inspired by these:

This is such a great basic pattern that has so many possibilities. All I need is more time to make them!

* Please don't think that I only ever buy fabric from John Lewis, but it's just so handy being in the city centre and in the past 6 months, their selection (although still very expensive) has improved by 200%, which is just too too tempting - the lady who cuts the fabric said they have a new buyer, and it shows!

Photo sources:  Boden blue and white stripe skirt, Thom Dolan plaid skirt
SHARE:
© Grosgrain Green | All rights reserved.
Blogger Template Created by pipdig