Wednesday, 30 March 2016

Say It Ain't Sew

Did you know that March was National Craft Month? I didn't until recently. To celebrate, Scottish company Say It Ain't Sew got in touch to ask me to help spread the word about the work they are doing. I have to be honest, I had never heard of the company, the products or what they offer, but I was intrigued. And we all love a sewing pun, don't we?!

Say It Ain't Sew was founded by former costume and fashion designer, Iona Barker in 2010. Iona's mission is to get Scotland sewing, and to further this, she holds free (yes, free!) weekly sewing classes in Edinburgh, Glasgow and Dundee. To fund the classes, Iona makes and sells sewing kits on Etsy, which she supports with her own YouTube channel. I'm not sure I get the economics or the logistics (how does she pay her bills?), but I think the idea is really cool.

Sadly I can't make it along to the weekly Edinburgh sessions - the times are difficult for me - but they do sound like fun, with recent makes including Easter bunnies and pandas, but they did send me one of the sewing kits that is currently available on Etsy to give it a try!
Please ignore the weird carpet - we were away for the weekend.
I chose the Glasgow Tenement House, mostly because I was really intrigued as to what it would look like (this was before it was up on the Etsy page). The kit consists of pre-cut felt and instructions. You need to supply the thread, needle and scissors. The instructions are pretty clear, although there are limited diagrams, which makes things trickier for the more visual among us. I guess this would be where the YouTube channel would come in, though. The Tenement was fun and fairly easy to sew. It's a bit fiddly, especially the sewing the last tab in place, but it does state that it's challenging for beginners. It really only took about an hour or so, though and I enjoyed it. I particularly love the detail of the bay window and the fact that the roof tiles are "carved" on (I believe the whole thing is actually laser cut). They add a nice attention to detail.


While the kits fund the classes, they would in themselves make a nice gift to introduce a friend to sewing. Or why not treat yourself to something a bit different? While they are not sold as toys, I know the donuts would go down a treat with my boys.

SHARE:

Monday, 14 March 2016

Completed: Ampersand Sweatshirt

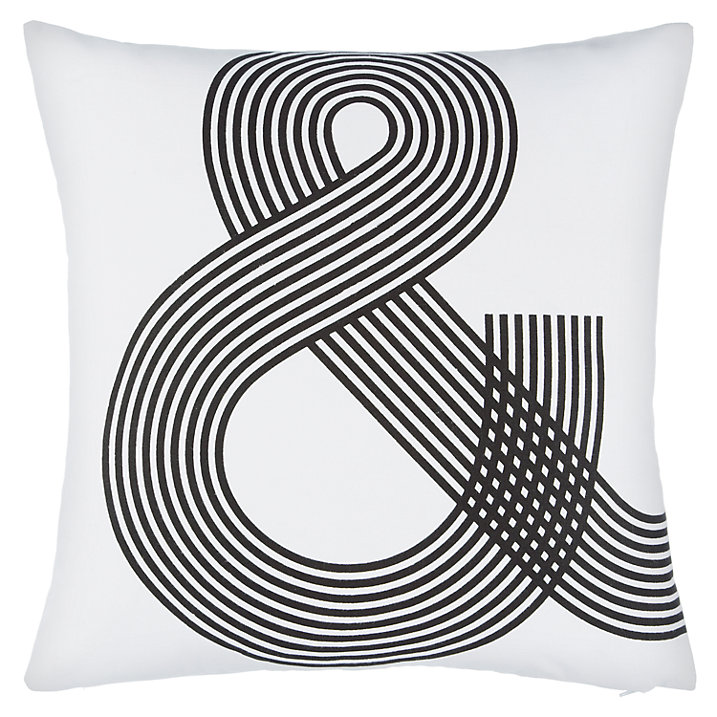
I have a bit of a thing for ampersands. I think the word "ampersand" is rather lovely - it's my favourite after "haberdashery", and I love the swishy elegance of them.

It seems I am not alone. I have since found Pinterest board after Pinterest board dedicated to them. All of which I am now following, obviously. Anyway, when I came across this cushion in John Lewis last year, inspiration struck.
Source
You might recognise this sweatshirt if you look closely. The front used to be covered in gold foil. Sadly, but as expected, the gold foil has worn away. It is just not possible to own a garment that can't be washed often when you have young children. I am forever covered in goo.

But that's OK. I still have enough of the gold French terry to make another, once I buy some more plain grey marl terry. And while it also hasn't stopped me from wearing this Linden, I do feel like the sweatshirt has lost its edge and is now borderline scruffy. Which is where the ampersand comes in.

Do you ever find yourself with a million plans, but without the confidence to execute them? That's where I was with this. I mean, I had all the necessary tools: freezer paper, fabric paint, a printer, an iron, a sweatshirt, but I was always worrying about the what if. What if it didn't work out? What if it was difficult? What if it was messy? What if? What if? 

Then one evening I just forced myself. I dug out the Freezer paper and the fabric paint, browsed ampersands and fonts on Pinterest, and just got on with it! And what do you know, it worked!
I found the below image on Pinterest - I quicky realised that as lovely as the JL cushion might be, it would take FOREVER to cut out with all those lines. I copied and pasted my image to Powerpoint, where I resized it. I then traced and cut it out with a craft knife, which was very enjoyable and made me feel like a REAL CRAFTER. As there were quite a few middle bits that I needed to not lose, I numbered them, so I could remember where they were to go.

Source
I had intended for the ampersand to be dark grey, but I had some issues with paint application which apparently took up so much of my brain that I forgot to mix some white in. I still think dark grey would have been softer and less "in your face", but I do love it as is. I'm particularly pleased with how clean the lines are - very little bleeding at all. There is one bit that bugs me, but I'm not going to point it out, as there is nothing I can do about it now!


The paint now needs to "cure" for up to 7 days, and after that I will be able to wash the sweatshirt with no fading or removal of the paint. Unlike that pesky gold foil! 

SHARE:

Monday, 29 February 2016

2016 Sewing Budget: February

So, February is done and dusted. Wasn't that quick? Even with that extra day in there. Actually we moved house on the 29th Feb, 8 years ago, so I guess that makes today the second anniversary of living here?

I did well on the old spending front this month, although I did nearly crack a couple of times! It sounds ridiculous, but when you are in the habit of falling for a fabric, and just snaffling it up, it's hard to get out of that mindset. It's also been doubly challenging in that I'm in a bit of a sewing lull currently and since my ongoing project - an Archer shirt dress in viscose - is a bit more challenging than my regular sew, I'm finding it difficult to motivate myself to get back to it. Ordinarily I would perhaps sew something more simple to ease my way back in, and I have the perfect project in mind... but I don't have the perfect fabric for it. Looks like I'll need to find another inroad.

So, what did I spend?

I bought a pattern for shorts. I'm not actually a big wearer of shorts, and it's not summer, and I have no holiday plans at present. However, it's being discontinued, and I really, really like the pattern. When I do make shorts, these are the ones I want to make. And that was it. I'm pleased with that, even if it doesn't make for the most exciting post.
SHARE:

Saturday, 20 February 2016

Lately

I haven't been doing much sewing since I last posted. I was feeling a bit poorly and tired, and then it's been half term this week.

Since I feel like I've been out of touch, here's a bit of what I've been up to in the meantime:
We had Bobby Bear (Small Boy's class bear) home for the weekend. We went to the library, the zoo and Bobby got his own homemade pizza for dinner on the Saturday night!
I've been trying to stop biting my nails. It was going well until they started splitting and basically disintegrating. Sigh.
I got this embroidery kit for my birthday. It's by Nancy Nicholson, and as you can see, the stitches are printed onto the fabric, making it very easy to keep it neat. It's nice and relaxing to do on the evenings when I want to do something, but not get the sewing machine out.
Valentine's card from my boys.
A visit to the Botanics

For half term, we went to Dundee for a couple of nights. It's only about an hour away from us and our hotel was free, as my husband has loads of Best Western points from working away so much last year. It's not the most beautiful of cities, but it has lots of heritage and there is quite a lot to do.


We visited the Science Centre, which was excellent. It's fairly small, but we had animal handling (including a meercat,of which we failed to get a photo), and 3 seperate demonstrations/experiments/lectures. Plus lots of fun with mirrors, and the opportunity to pretend to be a bogey, by sliding out of a giant nose.

I always seem to manage to sneak something sewing related into a family holiday. This time it was the Verdant Works, a museum about the Jute Mills, a major part of Dundee's history.

The boat is the Friggate Unicorn, the world's oldest still floating battleship, or something similar. We were advised to avoid Discovery, and were advised this was better. It was certainly a lot cheaper, and there was enough to keep Small Boy interested for an hour, or so. Baby Boy just liked the "horsey".

Small Boy and I even ended up as the Facebook and Twitter page header photo for Dundee City!


SHARE:

Wednesday, 3 February 2016

Completed: Pams for the Boys

I made these pyjamas because I wanted an excuse to buy the fabric. Initially I thought the whales might make nice shorts for Small Boy, but he vetoed the fabric because there were "too many whales". Instead the dinosaurs caught his eye, so Baby Boy got the whales because he's too young to voice an opinion. Small Boy wanted PJs, so PJs it was.
Baby toes!!!
The fabric was from Backstitch and is gorgeous. It's by Lizzy House from the Natural History collection. It's quilting fabric, but it's lovely and soft and makes very nice pyjama bottoms. The colours are beautifully vibrant. The tops are made from this oatmeal ponte, also from Backstitch. I wanted something very stable, as befits boys' tees. This is a cotton/viscose mix, which is ideal as Small Boy suffers quite badly from eczema, so breathable fabrics are better. It's also lovely fabric. It's quite thick, but very cosy for winter 'jams, and at 160cm wide, I got both tops from 1m.

For the tops I used the Titchy Threads Rowan Tee, previously made here. I made a size 5 for Small Boy, who's 5 1/2 and the 2T for Baby Boy, who's 20 months. In truth, Baby Boy's is too big, but one thing you can guarantee with kids is that they'll grow. And we've had issues in the past with his wee chubster arms not fitting into long sleeves, so I erred on the side of caution so they'd fit comfortably. I made the patterns pretty much as directed, although I did use a slightly larger SA on Baby Boy's. Instead of attaching the neck binding as directed, I tried this tutorial by Megan Nielsen, which worked well. The tees are sewn with a zig zag on my sewing machine, edges left raw. Small Boy's top has the hems and neck twin needled, but the stitching has already popped on both sleeves and the hem. I saw that Kathryn has had similar issues and recommended wooly nylon thread in the bobbin. I didn't have this to hand, but also spotted this week that Sallie has had a similar issue and instead uses her triple stretch stitch, so Baby Boy's hems are done with this stitch. I will see how it holds up. It doesn't look as professional, but it's kid's pyjamas, so I'm not going to get too upset about it!

The bottoms are the FREE Sunny Day Shorts pattern from Oliver + S, lengthened to trousers. I based the leg length and width for both sizes on existing pyjama bottoms, which worked out OK. Small Boy's bottoms are the size 5, and again the 2T for Baby Boy. Hilariously, both boys have exactly the same waist measurement!!! The 2T is fine, but doesn't leave a lot of room for a nappy, so I'd probably size up for him next time. I sewed a ribbon into the waistband of each pair, so we can easily tell the front from back.


I didn't initially plan to do the applique, but I wanted to somehow tie the tops in with the bottoms, and to brighten up the tops as the oatmeal colour doesn't do much for their pale, Scottish faces! Co-ordinating ribbing would have been nice, but I didn't want to add any more cost to the project. This was my first attempt at applique, and I'm pretty pleased with how it turned out. There is room for improvement, but actually I think it looks good. I used my walking foot and a very short zigzag stitch. The curves and corners were pretty difficult, but with patience, I got there. The jersey stretched out slightly, but fortunately I managed to steam it back into shape. I found the templates on Pinterest, and looked for the simplest versions of dinosaur and whale shapes that I could find.


I'm chuffed to bits with these. I really enjoyed making them, as they were a very simple sew. I'm not sure I'll be making them PJs too often though, as the fabric alone cost me £37, so at £18 a pair they are the most expensive pyjamas they have ever owned. Still, it was nice to do, and they both love them. Hopefully Baby Boy will get wear out of the dinosaur ones once he is big enough too.


And the title of this post? When Small Boy was little he used to call pyjamas "pan-pams", and that, or "pams" for short, has kind of stuck in our house.
SHARE:

Sunday, 31 January 2016

2016 Sewing Budget: January

I mentioned in this post that I was going to keep track of what I spent on both sewing stuff and RTW clothes. At the time I had no intention of sharing this information, but since I am so appalled at how much I spent this month (on sewing stuff) - a month when I felt I didn't really need much, I have decided I will share it. If you feel this type of post is boring, please feel free to skip it.

Spend is all relative. What I spend in one month might be a drop in the ocean for some, while it might be 6 month's budget for others. I usually have a rough budget of around £50 per month for sewing related paraphenalia, which is based on absolutely nothing, and is completely made up. However, this weekend I read this post (and the follow up), and it got me thinking. Do I actually even need to spend £50 a month? Again, it's all relative, but I have a fairly sizable stash of both fabric and patterns. I have a few zips, some elastic and quite a bit of thread. What exactly is it that I think I need to buy?

So, along with recording my spending, I have decided to set myself a few other rules. This is for the foreseeable future. It might not be all year, but I'm starting with 3 months, and then I'll see how I go.
1. Plan. I always have a million sewing plans floating around my head and I don't document them (other than occasionally on here). I like to keep things fluid because needs change, and I never manage to sew all the things I intend to, however I'd like to plan at least the next 3 garments to keep my focus.

2. Sew from the stash. It's kind of a duh one, but while I have quite a bit of fabric that's seasonally inappropriate/I've gone off/I can't decide what to make with, I also have jersey and denim, and quite a few pieces that I bought with firm ideas that still hold. Where I have fabric, do I also have co-ordinating thread? Elastic? Interfacing? Zips? Let's check those things BEFORE I nip to the shops.

3. Buy only what I need. So, for example, I could really do with more trousers for work. I have no trouser appropriate fabric, so I am permitted to buy that, but only that. No sneaking other (non-essential) things into my basket.

4. Don't compromise on quality, but keep it realistic. For example, I want to make a shirt. I have buttons that are just OK, but I'm not 100% sold on them. I don't want to spend time making an item I'm not happy with, so I'm not going to force myself to use the buttons. I will buy nicer buttons. But if the buttons are pretty decent, and I like them and they'd make a nice garment, but I've seen really nice ones in John Lewis that are £2 each, I will stick with the buttons I have. And if I do buy them, I will have to own up to you! And do 100 press ups.

That's it. I'm keen to keep it simple. To be clear, this is not a spending ban, rather a plan to use what I already have, where possible. Because, what else is it for?

Right. On to January's spend, which went something like this:


I lumped the new blog template in there, which wasn't truly sewing related, however if I didn't sew, I wouldn't have the blog, so it does kind of fit! Also, note me justifying to myself that the Camas blouse was on sale!!! :)

On the plus side, I have already sewn up the Lizzy House/ponte into pyjamas that are still to be blogged (but have been Instagrammed), and my next project is a shirt dress, based on this with the navy/white viscose. The haby was replenishing stocks.

Let's see what February brings!
SHARE:

Saturday, 30 January 2016

Tutorial: How to change your favicon

How to change your what?!

As part of my recent blog renovation, I got a bit obsessed about having my own favicon. A favicon is the little symbol that appears at the beginning of the tab, before the name of a website. You've probably seen them before, but if not, see the photo below.


Of course before I started, I had no idea what this was called, but Google is a wonderful thing. So, favicon apparently means "favourite icon" and it basically acts as an identifier, drawing the internet surfer's eye to the tab containing your website or blog. You will already have one, but it will be Blogger's favicon - that white and orange B you can see above. Actually creating your own in Blogger is quite straightforward. In case you are interested, I thought I'd write a little tutorial. Sorry I can't help out the Wordpress or self-hosted users, but as I said before, Google is a wonderful thing, and at least you now know what to search for. :)

First up, you need to create your image. I chose to use letters for mine. You can use an image, but bear in mind it's going to end up very small, so I'd choose something very simple and clear. The image also needs to be square. I used Picmonkey, a free online photo editing tool, to create my image. Open up Picmonkey and select Design from the top of the page.

This will bring up a square blank page. If it gives you a different shape, don't panic, you'll need to crop your image anyway.

If you want to create an image using letters, select Text from the menu on the left hand side (it's the Tt), then click on Add Text.

This will bring up a text box. Type your text (remember: keep it simple! I'd say 1-2 letters at the most!), and then play around with colours and fonts to get the look you like. I chose a green colour and the font Didact Gothic, as it mirrored the font on my blog theme.


This next step might not be necessary, as you are going to crop the image anyway, but I then made the letters as large as Picmonkey would let me.

If you want to use a photo, or similar image you can still select Design and then just upload your photo/image. The following steps will still apply.

Now crop the image. Go back to the left hand menu and select the Basic Edits (the top one) and then crop. Go to the drop down that says "No fixed proportions", and select "Square", then crop the image as much as possible. You want your letters/picture to fill the image as much as possible.

Once you are happy, click Apply and save the file to your computer.

Now that you have your image, you need to convert this to a favicon file - a .ico file. You can do this through a favicon generator. There are loads online. I used favicon.co.uk.

Select Choose File and then find and select your image. You can select your Favicon size, but I have to confess that I don't really know what size is best. I selected 16 x 16, but not really for any particular reason.

Then click Generate Favicon. Once it's generated, it will give you a preview. If you are happy, download the .ico file and save it to your computer.

Now that you have created your favicon, you need to upload it to your blog!

Open Blogger and go to Layout. You will see there is a box called Favicon at the top left of the page.

Click Edit, then Choose File and upload your favicon. It will display your image. Click Save, then Save Arrangement.

If you now open your blog, you should see the Favicon, and I did read that it can take a while to update, but after a couple of days mine still hadn't uploaded (I didn't intend to leave it that long - I was just busy!). Further Googling revealed this final stage.

Have your blog open. Open another browser page and type the following into the address bar: http://[your blog url]/favicon.ico. Refresh the page and the favicon on this page should update to your image. Return to the your blog and refresh. Your blog should now have your favicon!

Hopefully this will work for you too! Do let me know if you give it a try!


SHARE:
© Grosgrain Green | All rights reserved.
Blogger Template Created by pipdig