So, this dress was a bit of a challenge, when it really didn’t need to be. It was also one of the first times that I made a fit adjustment that worked as I hoped thought it would!

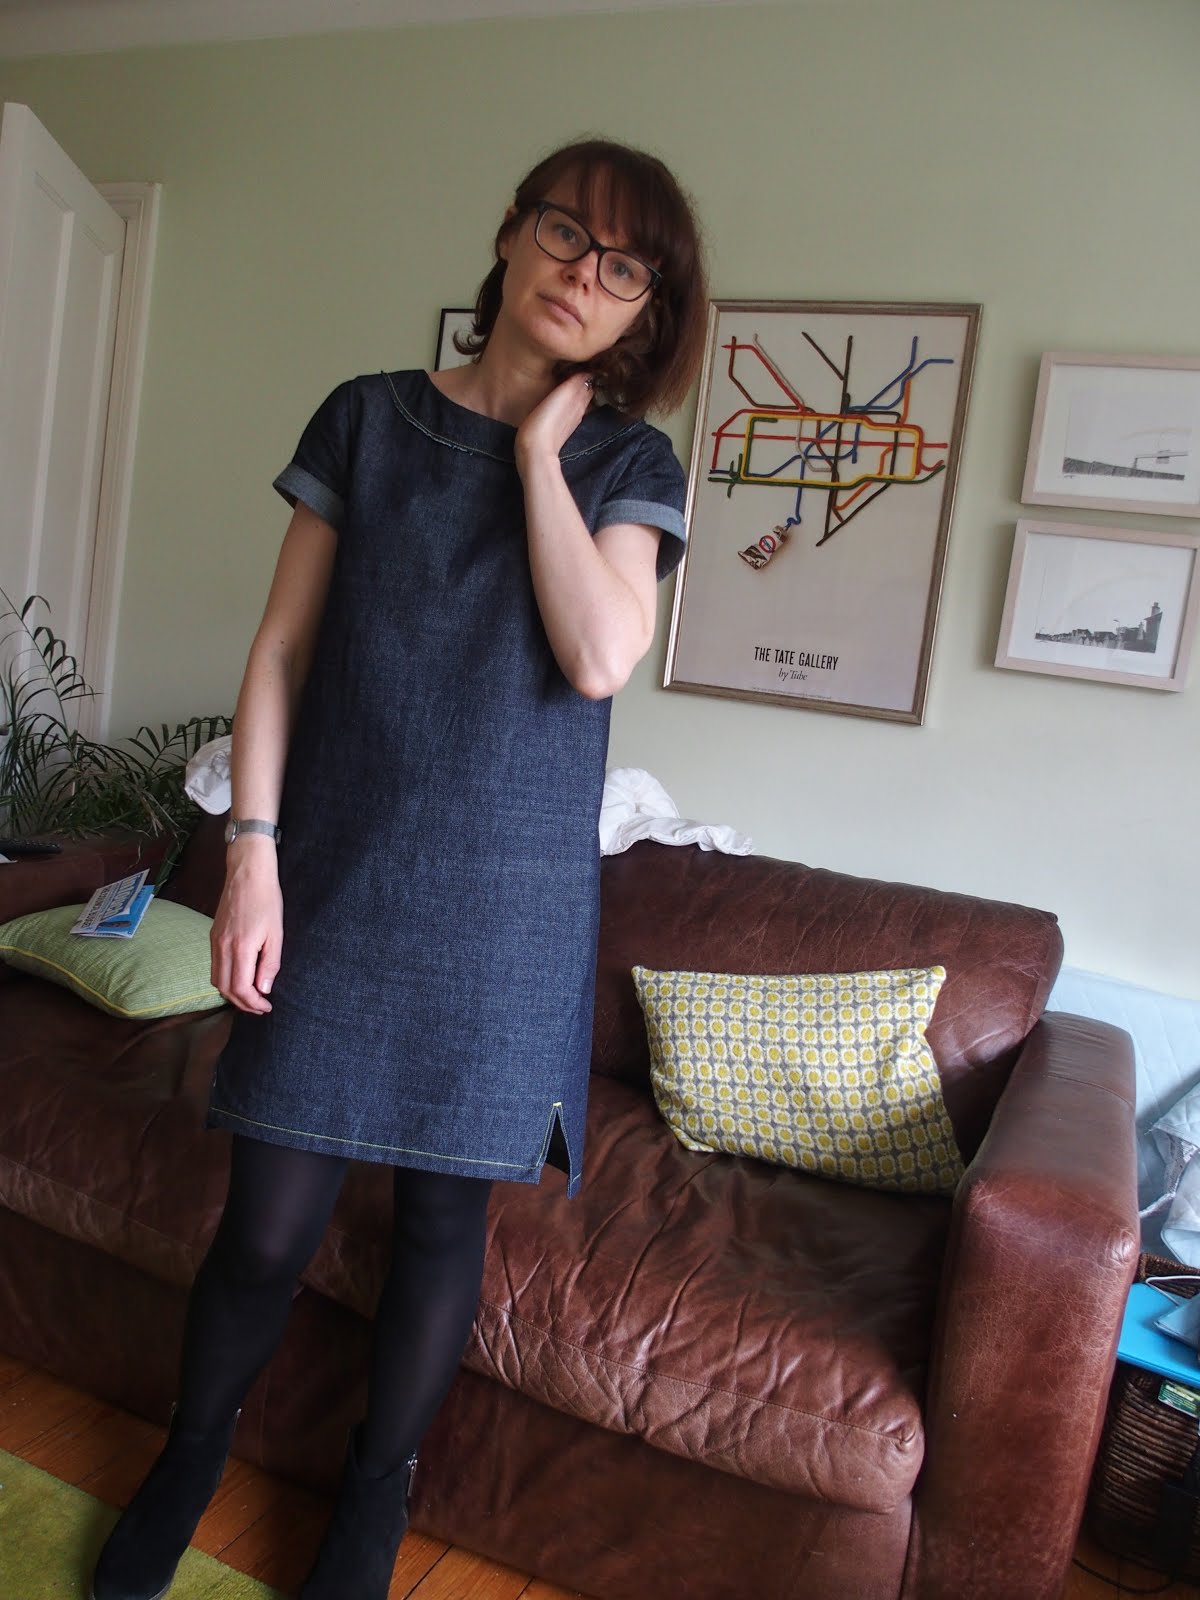
First things first, this is another Inari dress by Named. The fabric is a beautiful crosshatch denim from The Splendid Stitch and was one of the fabrics I bought with the voucher I won. The fabric is maybe a little on the heavy side for this dress, but it works. Amy also has a lovely navy stretch denim, which would also have worked well (possibly better), but I loved the crosshatch weave of this particular denim. I ordered a swatch and it was quite stiff initially but I had a hunch it would soften after a wash, so for the first time ever I washed a fabric swatch. This shows it pays to do so! The fabric was lovely to sew, although areas with multiple layers, like the hem, were a challenge. I used a denim needle and standard thread.
I’m pretty happy with the fit of my first Inari, but the low armscyes are a bit annoying and I suspected they might be even more so in a thicker, more stable fabric. So I attempted an adjustment to raise/reduce the depth. To do this, I compared the pattern with that of the Scout and realised the armscye was (I think) about 5/6cm lower on the Inari. To err on the side of caution I opted to remove 4.5cm (I cannot remember why that 0.5cm seemed so important!). I did this by cutting a line perpendicular to the grainline/CF/CB across the bodice, through the armscye. I actually did this in 2 places so I wasn’t taking too much out of one area, and I made the lines run through the straightest part of the armhole curve, so it had least impact on the curve shape itself. I then overlapped the pieces by 2cm and 2.5cm respectively, keeping the cut edges parallel. I did this to the front and back pieces.
To adjust the sleeve, I did the same, drawing parallel lines perpendicular to the grainline, ensuring the lines were in the sleeve cap (rather than sleeve itself) and keeping them above the notches, so they would still match up.
So far, so good. At this stage, I realised that I had effectively shortened the entire dress by 4.5cm, and as the Inari is already pretty short, I decided to add this back in. I was aware I’d hiked the whole dress from the armholes up by 4.5cm so I wanted to make sure the cocoon shape was in the right place. I therefore added the 4.5cm back onto the bodice/dress piece at the lengthen/shorten line that’s just below the sleeves/armscye. Named patterns are great in that they have multiple lengthen/shorten lines!

I made a muslin to check the sleeve fit, so cut it at waist length to save time and fabric. The sleeve/armscye were a good fit, but were snug so I decided to lower them by 1.5cm again, making the overall adjustment only 3cm (2cm and 1cm). I did the same with the sleeve. I opted to leave the additional length in the dress, as the original is pretty short, and I figured 1.5cm additional on the length was neither here nor there – if it bothered me, I could take it out of the hem. I was a bit tired of adjustments by that point and was running out of sellotape.


I then cut straight into the denim. It all went together beautifully and it didn’t even occur to me to try it on until just before I added the sleeves (the last thing I did), and which point I realised it was far too long. The front sat just immediately above my knee, which just made the dress feel really “meh”. To work (on me at least), a solid colour, cocoon shaped dress needs to be short. I was really disappointed!
I managed to resolve the issue by removing about 4cm off the length. It means that the vents are shorter than designed and a little of the tapered shape at the bottom is lost, but it elevated the dress from “meh” to the “yay” I had been expecting! So, where did I do wrong? Short of blaming the pattern pixies making mischief, how do I explain the additional length? I can’t. I really, really can’t. I just don’t get it. I removed 3cm of length, so it makes sense that I would add that back on to retain the original length. Everything else was the same: same hem length, same size, I am the same height. I really have no idea.
Anyway, I am pleased to report that I am otherwise delighted with this dress! Funkbunny on IG had suggested that I look at this dress by Jillian, and I’m glad I did, as I immediately loved the look of the exposed neckline facing. Jillian very kindly explained how it was done, which was very straightforward. You simply sew the facing right side to the wrong side of the dress. Clip the curves and turn out. She had edgestitched hers before topstitching twice. Instead I understitched before flipping it out, and then topstitched with one row of triple stitching. I actually messed up the first lot of topstitching, as I found the curve, plus the backwards-forwards motion of the triple stitching hard to manage, so I ended up having to unpick quite a bit of triple stitching. Which was fun (it wasn’t). I then basted the facing in place before attempting again, and it worked far better the second time. My topstitching game still needs improvement but it’s passable. The edge of the facing remains raw and it will fray, but that's the point.


Other alterations I made to the pattern was to add the sleeve cuffs wrong side out. It just felt like that made more sense in a dark denim. And I added inseam pockets. I used the pocket pieces, including pocket facing from the Ailakki jumpsuit. The pocket linings are a bird print voile I got from Franca. They are very handy, but I do feel that they mess with the silhouette somewhat. I’m undecided on them.

I triple stitched the hem, and added bar tacks at the top of the vents, and at the top of the sleeve cuffs, again in the yellow thread. I had a debate initially about which colour to use, but ultimately the yellow won it for me. It also matches the selvedge of the fabric, so felt right.

So, another successful Inari. I am seeing more and more of these popping up on the interwebs and it's easy to see why. A simple shape that really flatters everyone! The perfect dress!
I love this it's beautiful!!!! Love the idea of the facing fraying!! X
ReplyDeleteWahoo looks great. I've already told Jillian I intend to copy her dress at some point this year! Yours is great, and I don't think the pocket ruins the silhouette, you can barely see it's there. The yellow topstitching looks fabulous and this is a knock out dress.
ReplyDeleteI love it. I love the fraying facing look too. I think it all works really well, and the wider hem and shorter vents work well in this firmer fabric. good job thinking through the adjustment process too!
ReplyDeleteThis looks so great Helen!! I love the heavier denim in this style of dress, and all the little details you've added - the inside-out cuffs, the bar tacks and the yellow stitching. So good!!
ReplyDeleteIt looks fab, I love the exposed facing, what a great idea.
ReplyDeleteThis is lovely! The facing is great, and I love the contrast sleeve bands. I think it might be time for me to jump on the Inari bandwagon, I keep seeing all these amazing versions....
ReplyDeleteI love this! I just got a very similarly shaped jersey version from M&S but I'd love a denim one :)
ReplyDeleteThis is lovely. I like the exposed facing and contrast cuffs. It looks great, so wearable. I am seeing so many Inari dresses that I like.
ReplyDelete