Sunday, 3 April 2016

Completed: Block Printed Scout Dress

Hello! Hope you are enjoying the Easter break if you are having one. I, sadly, am heading back to work tomorrow having just had a week and a bit off. I am easing the pain with red wine, sweet potato crisps and a new dress to wear tomorrow.

There are a couple of back stories to this particular dress, but firstly let's talk about the most exciting part: I printed my own fabric! I've been interested in doing this for a while. If you follow me on Pinterest you will notice I've been spamming your feed with print related pins (my board is here if you are interested), and buoyed by my recent stencil success, and some successful potato printing that Small Boy and I did at Christmas, I finally got round to executing the idea. I already had the ink, and most of the necessary tools, so I bought some linocutting tools on Amazon and I was good to go.

The fabric printing process was really good fun and I definitely want to do more of it. A lot more. I read a few different tutorials online before starting. Rochelle has written a few posts , which were really helpful. I bought the same ink and carving block she uses (I've linked to the products I bought, but I'm pretty sure I did not pay that much for the ink). I will state that I am most definitely not an artist. I cannot draw for toffee, but all that Pinterest-ing made it clear that simple, geographical shapes can work really well. I had a play around with a few different shapes, and made a few stamps before settling on the really simple cross stamp.
I will definitely revisit the triangles and the cross-hatch circles at some future point
The carving of the stamps is trickier than it looks on all the videos - I was anxious I was going to mess it all up at the last moment, and although I enjoyed doing it, once I was done I found I was really tense!


Rather than over-complicate things, I went with random pattern placement, which I like and which, I think, suits the style of the dress. I did ensure all of the crosses were the same way up by marking the back of the stamp, and I tried as much as possible to keep the crosses parallel to the grainline, but this was done by eye. As you can see from the above photo, rather than print 1.5m of fabric, I cut the pattern pieces out first and printed each separately. The main reason was that I cut out the pieces before deciding to print them, but I would have done so anyway, as I simply don't have the room to print large pieces of fabric. It also allowed me to consider how I wanted the pattern to look on each piece, and helped to avoid any awkward "X marks the spot" faux-pas on my bust, or anywhere else!

The fabric itself is a very lovely chambray from The Sweet Mercerie (sorry, not sure which one to link to it), that I bought in their Black Friday sale. It's beautifully soft and has a nice drape and a really lovely weave to it. I wish I had bought more.

Now for the dress. The shape was inspired by the below dress that I spotted in this season's Hush catalogue. I'm really loving their aesthetic at the moment, and thought this dress looked really cool, comfortable and stylish.

The shape looked very simple, so I thought I could emulate it cropping a Grainline Scout to waist level and adding a gathered skirt, which is what I did. I also added the button back detail because I like it. To do that, I didn't cut the back bodice on the fold, and added a further 7cm width to make a grown on placket (is that a term? it is now). The placket was 3cm wide, based on the size of my buttons. I doubled this over and used a 1cm SA (3 x 2, +1 = 7) (I just used a comma in a sum). In the end I sewed the placket shut, as I don't need it and it saved me making button holes. Had I decided to do that initially, I could have just created an external box pleat and saved myself a bit of work!

Other alterations included raising the neckline slightly, and reducing the shoulder to a size 0. Recently I've been thinking that my Scouts are too large on the shoulders, so this modification has given me my preferred fit through the shoulder. I also cut the size 0 sleeve. I'm not convinced this was the right thing to do as my notches were totally off, but I think the worst thing that could happen there would be less sleeve cap ease, and having made this previously with no sleeve cap ease, I knew this wouldn't be the end of the world.


I think it has worked well. My version is somewhat looser fitting than the Hush dress, and initially I thought I had wasted my lovely printed fabric on the frumpiest dress ever - both the volume and the initial length seemed off - but as ever Instagram saved the day.

My gut feeling was to chop considerable length off it, to counter the frump, but as sewsarahuk pointed out, it would have thrown the garment off balance (she also suggested that if all else failed, I could crop it to a peplum top, which I would never have thought of and made me so relieved that I had a back up plan. Thank you sewsarahuk!). So, instead I hemmed it at just above knee level. This has the added bonus of meaning I will be able to wear it in the summer - while I like my legs clad in black opaques, I'm not so keen on them bare, so my hemlines tend to be much more modest in summer!

It's funny because even after hemming it last night, I still wasn't completely convinced, but when I chucked it on today with tights and heeled ankle boots to take these photos, I completely fell in love with it. Yes, some people will probably still think it's unflattering (husband's comment: "it's really nice. It's meant to be wide isn't it? I like it, but you don't look like you have any boobs"), but I really do like it.

And should I decide that I'm not in the mood for loose and flowing, it actually works pretty well belted!


But mostly likely I won't, and I'll happily wear it like this!


SHARE:

Friday, 1 April 2016

2016 Sewing Budget: March


Right, before we start, I need to make a disclaimer: I have partly failed this month. Failed because I bought lots of fabric, but only partly because I didn't actually spend very much money. Let me explain: I won a £50 giftcard for The Splendid Stitch. Amy has started a Customer's Gallery on her website and to launch it, she ran a draw. I uploaded a photo of my jumpsuit and happily my name was picked out the hat. I needn't have spent it immediately - there was no expiry date - but I had my heart set on a particular fabric (the Atelier Brunette) that I (correctly) suspected would sell out pretty quickly. The gift card was single use, so this happened:

In my defense, there was a great deal of consideration made over what to buy and even ordered swatches. How sensible. Every single thing I bought has a plan against it. Well, nearly.

Bottom to top:
Navy crosshatch denim (and matching thread) - another Inari dress.
Black Eva poly-viscose suiting - trousers, probably the Cali Faye Hampshire Trousers, which is a pattern I don't yet own. I know, I know, but I don't have a suitable trouser pattern for this fabric and I REALLY NEED trousers for work, so it is permitted.
Black Lydia viscose challi (out of stock, so no link) - this is to accompany the...
Atelier Brunette modal challis - this was going to be either a Biscayne blouse or a Camas, but then there wasn't enough fabric left. I really wanted the fabric though, so I bought the very last 0.75m and then chucked in metre of the black rayon challis so I can combine the two. I haven't actually decided what I'll make; possibly another Geometry top, or maybe something else. Maybe I'll just see if I can get hold of more of it, and use the black viscose for something else?

Oh yeah, and the linocutting tools? Well, I've been dabbling a bit in fabric printing. I already had all the other bits needed, so I just needed some cutting tools to get going. The results of this will hopefully be finished and blogged soon.

In theory I shouldn't really need to buy anything in April. I have the Inari dress to sew, plus that shirt dress that I am procrastinating on because I think it is going to be hard. But I really could do with trousers (Me Made May is fast approaching!). Let's see! How are you getting on?
SHARE:

Wednesday, 30 March 2016

Say It Ain't Sew

Did you know that March was National Craft Month? I didn't until recently. To celebrate, Scottish company Say It Ain't Sew got in touch to ask me to help spread the word about the work they are doing. I have to be honest, I had never heard of the company, the products or what they offer, but I was intrigued. And we all love a sewing pun, don't we?!

Say It Ain't Sew was founded by former costume and fashion designer, Iona Barker in 2010. Iona's mission is to get Scotland sewing, and to further this, she holds free (yes, free!) weekly sewing classes in Edinburgh, Glasgow and Dundee. To fund the classes, Iona makes and sells sewing kits on Etsy, which she supports with her own YouTube channel. I'm not sure I get the economics or the logistics (how does she pay her bills?), but I think the idea is really cool.

Sadly I can't make it along to the weekly Edinburgh sessions - the times are difficult for me - but they do sound like fun, with recent makes including Easter bunnies and pandas, but they did send me one of the sewing kits that is currently available on Etsy to give it a try!
Please ignore the weird carpet - we were away for the weekend.
I chose the Glasgow Tenement House, mostly because I was really intrigued as to what it would look like (this was before it was up on the Etsy page). The kit consists of pre-cut felt and instructions. You need to supply the thread, needle and scissors. The instructions are pretty clear, although there are limited diagrams, which makes things trickier for the more visual among us. I guess this would be where the YouTube channel would come in, though. The Tenement was fun and fairly easy to sew. It's a bit fiddly, especially the sewing the last tab in place, but it does state that it's challenging for beginners. It really only took about an hour or so, though and I enjoyed it. I particularly love the detail of the bay window and the fact that the roof tiles are "carved" on (I believe the whole thing is actually laser cut). They add a nice attention to detail.


While the kits fund the classes, they would in themselves make a nice gift to introduce a friend to sewing. Or why not treat yourself to something a bit different? While they are not sold as toys, I know the donuts would go down a treat with my boys.

SHARE:

Monday, 14 March 2016

Completed: Ampersand Sweatshirt

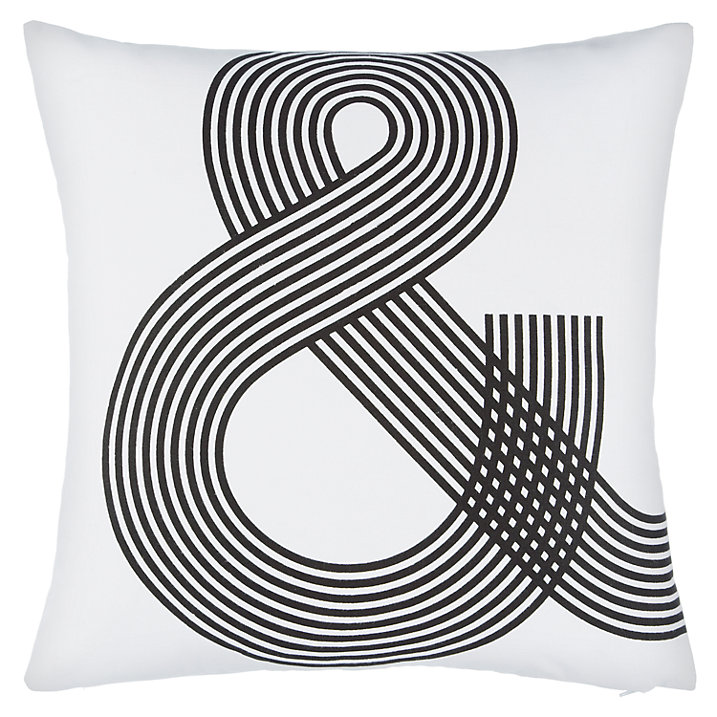
I have a bit of a thing for ampersands. I think the word "ampersand" is rather lovely - it's my favourite after "haberdashery", and I love the swishy elegance of them.

It seems I am not alone. I have since found Pinterest board after Pinterest board dedicated to them. All of which I am now following, obviously. Anyway, when I came across this cushion in John Lewis last year, inspiration struck.
Source
You might recognise this sweatshirt if you look closely. The front used to be covered in gold foil. Sadly, but as expected, the gold foil has worn away. It is just not possible to own a garment that can't be washed often when you have young children. I am forever covered in goo.

But that's OK. I still have enough of the gold French terry to make another, once I buy some more plain grey marl terry. And while it also hasn't stopped me from wearing this Linden, I do feel like the sweatshirt has lost its edge and is now borderline scruffy. Which is where the ampersand comes in.

Do you ever find yourself with a million plans, but without the confidence to execute them? That's where I was with this. I mean, I had all the necessary tools: freezer paper, fabric paint, a printer, an iron, a sweatshirt, but I was always worrying about the what if. What if it didn't work out? What if it was difficult? What if it was messy? What if? What if? 

Then one evening I just forced myself. I dug out the Freezer paper and the fabric paint, browsed ampersands and fonts on Pinterest, and just got on with it! And what do you know, it worked!
I found the below image on Pinterest - I quicky realised that as lovely as the JL cushion might be, it would take FOREVER to cut out with all those lines. I copied and pasted my image to Powerpoint, where I resized it. I then traced and cut it out with a craft knife, which was very enjoyable and made me feel like a REAL CRAFTER. As there were quite a few middle bits that I needed to not lose, I numbered them, so I could remember where they were to go.

Source
I had intended for the ampersand to be dark grey, but I had some issues with paint application which apparently took up so much of my brain that I forgot to mix some white in. I still think dark grey would have been softer and less "in your face", but I do love it as is. I'm particularly pleased with how clean the lines are - very little bleeding at all. There is one bit that bugs me, but I'm not going to point it out, as there is nothing I can do about it now!


The paint now needs to "cure" for up to 7 days, and after that I will be able to wash the sweatshirt with no fading or removal of the paint. Unlike that pesky gold foil! 

SHARE:

Monday, 29 February 2016

2016 Sewing Budget: February

So, February is done and dusted. Wasn't that quick? Even with that extra day in there. Actually we moved house on the 29th Feb, 8 years ago, so I guess that makes today the second anniversary of living here?

I did well on the old spending front this month, although I did nearly crack a couple of times! It sounds ridiculous, but when you are in the habit of falling for a fabric, and just snaffling it up, it's hard to get out of that mindset. It's also been doubly challenging in that I'm in a bit of a sewing lull currently and since my ongoing project - an Archer shirt dress in viscose - is a bit more challenging than my regular sew, I'm finding it difficult to motivate myself to get back to it. Ordinarily I would perhaps sew something more simple to ease my way back in, and I have the perfect project in mind... but I don't have the perfect fabric for it. Looks like I'll need to find another inroad.

So, what did I spend?

I bought a pattern for shorts. I'm not actually a big wearer of shorts, and it's not summer, and I have no holiday plans at present. However, it's being discontinued, and I really, really like the pattern. When I do make shorts, these are the ones I want to make. And that was it. I'm pleased with that, even if it doesn't make for the most exciting post.
SHARE:

Saturday, 20 February 2016

Lately

I haven't been doing much sewing since I last posted. I was feeling a bit poorly and tired, and then it's been half term this week.

Since I feel like I've been out of touch, here's a bit of what I've been up to in the meantime:
We had Bobby Bear (Small Boy's class bear) home for the weekend. We went to the library, the zoo and Bobby got his own homemade pizza for dinner on the Saturday night!
I've been trying to stop biting my nails. It was going well until they started splitting and basically disintegrating. Sigh.
I got this embroidery kit for my birthday. It's by Nancy Nicholson, and as you can see, the stitches are printed onto the fabric, making it very easy to keep it neat. It's nice and relaxing to do on the evenings when I want to do something, but not get the sewing machine out.
Valentine's card from my boys.
A visit to the Botanics

For half term, we went to Dundee for a couple of nights. It's only about an hour away from us and our hotel was free, as my husband has loads of Best Western points from working away so much last year. It's not the most beautiful of cities, but it has lots of heritage and there is quite a lot to do.


We visited the Science Centre, which was excellent. It's fairly small, but we had animal handling (including a meercat,of which we failed to get a photo), and 3 seperate demonstrations/experiments/lectures. Plus lots of fun with mirrors, and the opportunity to pretend to be a bogey, by sliding out of a giant nose.

I always seem to manage to sneak something sewing related into a family holiday. This time it was the Verdant Works, a museum about the Jute Mills, a major part of Dundee's history.

The boat is the Friggate Unicorn, the world's oldest still floating battleship, or something similar. We were advised to avoid Discovery, and were advised this was better. It was certainly a lot cheaper, and there was enough to keep Small Boy interested for an hour, or so. Baby Boy just liked the "horsey".

Small Boy and I even ended up as the Facebook and Twitter page header photo for Dundee City!


SHARE:

Wednesday, 3 February 2016

Completed: Pams for the Boys

I made these pyjamas because I wanted an excuse to buy the fabric. Initially I thought the whales might make nice shorts for Small Boy, but he vetoed the fabric because there were "too many whales". Instead the dinosaurs caught his eye, so Baby Boy got the whales because he's too young to voice an opinion. Small Boy wanted PJs, so PJs it was.
Baby toes!!!
The fabric was from Backstitch and is gorgeous. It's by Lizzy House from the Natural History collection. It's quilting fabric, but it's lovely and soft and makes very nice pyjama bottoms. The colours are beautifully vibrant. The tops are made from this oatmeal ponte, also from Backstitch. I wanted something very stable, as befits boys' tees. This is a cotton/viscose mix, which is ideal as Small Boy suffers quite badly from eczema, so breathable fabrics are better. It's also lovely fabric. It's quite thick, but very cosy for winter 'jams, and at 160cm wide, I got both tops from 1m.

For the tops I used the Titchy Threads Rowan Tee, previously made here. I made a size 5 for Small Boy, who's 5 1/2 and the 2T for Baby Boy, who's 20 months. In truth, Baby Boy's is too big, but one thing you can guarantee with kids is that they'll grow. And we've had issues in the past with his wee chubster arms not fitting into long sleeves, so I erred on the side of caution so they'd fit comfortably. I made the patterns pretty much as directed, although I did use a slightly larger SA on Baby Boy's. Instead of attaching the neck binding as directed, I tried this tutorial by Megan Nielsen, which worked well. The tees are sewn with a zig zag on my sewing machine, edges left raw. Small Boy's top has the hems and neck twin needled, but the stitching has already popped on both sleeves and the hem. I saw that Kathryn has had similar issues and recommended wooly nylon thread in the bobbin. I didn't have this to hand, but also spotted this week that Sallie has had a similar issue and instead uses her triple stretch stitch, so Baby Boy's hems are done with this stitch. I will see how it holds up. It doesn't look as professional, but it's kid's pyjamas, so I'm not going to get too upset about it!

The bottoms are the FREE Sunny Day Shorts pattern from Oliver + S, lengthened to trousers. I based the leg length and width for both sizes on existing pyjama bottoms, which worked out OK. Small Boy's bottoms are the size 5, and again the 2T for Baby Boy. Hilariously, both boys have exactly the same waist measurement!!! The 2T is fine, but doesn't leave a lot of room for a nappy, so I'd probably size up for him next time. I sewed a ribbon into the waistband of each pair, so we can easily tell the front from back.


I didn't initially plan to do the applique, but I wanted to somehow tie the tops in with the bottoms, and to brighten up the tops as the oatmeal colour doesn't do much for their pale, Scottish faces! Co-ordinating ribbing would have been nice, but I didn't want to add any more cost to the project. This was my first attempt at applique, and I'm pretty pleased with how it turned out. There is room for improvement, but actually I think it looks good. I used my walking foot and a very short zigzag stitch. The curves and corners were pretty difficult, but with patience, I got there. The jersey stretched out slightly, but fortunately I managed to steam it back into shape. I found the templates on Pinterest, and looked for the simplest versions of dinosaur and whale shapes that I could find.


I'm chuffed to bits with these. I really enjoyed making them, as they were a very simple sew. I'm not sure I'll be making them PJs too often though, as the fabric alone cost me £37, so at £18 a pair they are the most expensive pyjamas they have ever owned. Still, it was nice to do, and they both love them. Hopefully Baby Boy will get wear out of the dinosaur ones once he is big enough too.


And the title of this post? When Small Boy was little he used to call pyjamas "pan-pams", and that, or "pams" for short, has kind of stuck in our house.
SHARE:
© Grosgrain Green | All rights reserved.
Blogger Template Created by pipdig